|
Historical Railway Photograph Gallery 1751-1800 |
|||||||||
|
Photos 1751-1800 |
|||||||||
| Photo | ELR | Branch | Subject | Location | M | C | Elev'n | Date | Time |
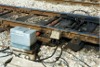 bpm01751.jpg |
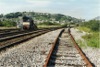
SWA | Swansea | Electro-hydraulic point machine driving catch points in up main line (Port Talbot switch reference 914) (1983 installation). Note insulated rail joints (IRJ) & track circuit feeder cables. Line is 113A section on wooden sleepers | Up main just north of Swansea Loop East junction | 215 | 38 | West | 10-Jul-91 | 16.58 |
 bpm01752.jpg |
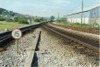
SWA | Swansea | View of out-of-use down goods line showing severed line at Port Talbot signal PT545 & point identity N913B (Turnout is 1:10� and had extended wings) installed 1978. Location was known as Vivian's Sidings | Down Goods Loop (out-of-use) at 913B switch, north of High St station, Swansea | 215 | 39.7 | South | 10-Jul-91 | 17.00 |
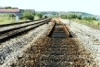
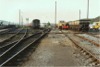
 bpm01753.jpg |
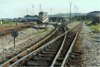
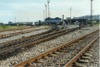
SWA | Swansea | General view of recovered Nos.1 & 2 Maliphant Sidings showing some upgrading of one siding | Maliphant Sidings north of Swansea High Street | 215 | 35 | West | 10-Jul-91 | 17.01 |
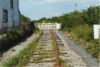
 bpm01754.jpg |
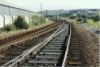
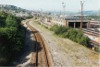
SWA | Swansea | General view of out-of-use down goods line, up & down Swanse branch and up & down Swansea Loop lines at approximate site of former Hafod Junction & Signalbox. Turnout in BH rail is 8 to 10B (PT911A) facing to 1:10 C-switch trailing (built up) (PT911B) | Footbridge just north of PT signals 462, 262 & 362, near former Hafod junction, Swansea | 215 | 20 | North | 10-Jul-91 | 17.05 |
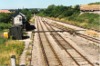
 bpm01755.jpg |
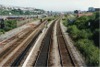
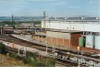
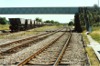
SWA SWL | Swansea Loop & South Wales Main (Swansea) | Arrangement of up & down Swansea Loop lines & up & down Severn Tunnel Jct & Fishguard Harbour with out-of-use down goods line at approximate site of former Hafod junction (215M-18C). Note AWS magnets in up main | Footbridge just north of PT signals 462, 262 & 362, near former Hafod junction, Swansea | 215 | 20 | South | 10-Jul-91 | 17.05 |
 bpm01756.jpg |
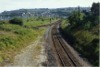
SWA SWL | Swansea & Swansea Loop | View of up & down Swansea Main lines and Swansea loop lines from footbridge just near former Hafod junction & signalbox. Part of remaining Maliphant Sidings are just visible to the left | Swansea Loop. Footbridge near PT signal 362 | 0 | 30 | North | 10-Jul-91 | 17.05� |
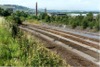
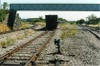
 bpm01757.jpg |
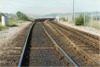
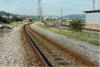
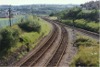
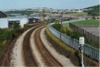
SWA | Swansea | Out-of-use down goods line and up & down main Swansea Branch lines. An adjustment switch is just visible in down main. Swansea loop lines are on top of right-hand bank | South of Landore diesel maintenance dep�t | 215 | 10 | NW | 10-Jul-91 | 17.14 |
 bpm01758.jpg |
SWA | Swansea | Up & down Swansea branch lines south of Landore DMU dep�t showing PT910B trailing crossover (D-switch) of 1:10� turnout installed 1971 & built up before 1991. Out-of-use down goods line on right | PT910B points & PT signal 547, Landore | 215 | 10 | South | 10-Jul-91 | 17.15 |
 bpm01759.jpg |
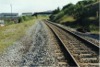
SWA | Swansea | Up & down lines in Swansea branch just south of Landore diesel maintenance dep�t | A4067 road underbridge, Landore | 215 | 06 | NW | 10-Jul-91 | 17.15 |
 bpm01760.jpg |
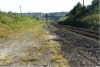
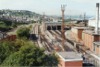
SWA | Swansea | Out-of-use down goods line alongside up & down Swansea branch lines into Swansea High Street. Note severed section in out-of-use loop | Landore R&M Unit (DMU dep�t) | 214 | 70 | NW | 10-Jul-91 | 17.18 |
 bpm01761.jpg |
SWA | Swansea | Out-of-use & severed down goods loop alongside up & down Swansea branch lines at Landore DMU dep�t. Note catch point PT903B and reversing colour light ground signal PT549 | Landore R&M Unit | 214 | 69 | SW | 10-Jul-91 | 17.20 |
 bpm01762.jpg |
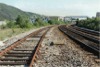
SWM SWA | Severn Tunnel Jct & Fishguard Harbour & Swansea Branches | Up & Down Swansea branch lines at south side of Landore Viaduct, with Swansea avoiding single line on left & 1:9� turnout to Landore dep�t. Point reference is PT904 and it is a 1973 C-switch (built up) | Landore junction points PT904 | 214 | 66 | SW | 10-Jul-91 | 17.22 |
 bpm01763.jpg |
SWM SWA | Severn Tunnel Jct & Fishguard Harbour (Swansea avoiding line) | Landore traction maintenance dep�t viewed from avoiding line and turnout (1:9�) C-switch (PT902) & looking at PT908A 1:9� (1973) C-switch semi-welded, all 113A section | South of Landore viaduct | 214 | 65.6 | North | 10-Jul-91 | 17.22 |
 bpm01764.jpg |
SWM | Severn Tunnel Jct & Fishguard Harbour | View of Edgar Allen manganese steel facing crossover leading to Landore junction and Swansea avoiding line. Crossing is 1:18� E-switch. Port Talbot panel reference is PT901A & PT901B of same specification | Landore junction south of viaduct | 214 | 58 | North | 10-Jul-91 | 17.26 |
 bpm01765.jpg |
SWM | Severn Tunnel Jct & Fishguard Harbour | South side of Landore viaduct with facing crossover to Swansea avoiding single line. | Landore junction & Viaduct (PT901 crossover) | 214 | 58.5 | South | 10-Jul-91 | 17.26 |
 bpm01766.jpg |
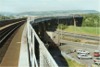
SWM | Severn Tunnel Jct & Fishguard Harbour | General view of 389-yard Landore Viaduct viewed from 214M-58C | South-west side of Landore Viaduct (From 214M-39C to 214M-62C) | 214 | 39 | South | 10-Jul-91 | 17.27 |
 bpm01767.jpg |
SWM | Severn Tunnel Jct & Fishguard Harbour | Facing turnout at south-west end of Landore Viaduct. Turnout is an E-switch of 1983. Angle is 1:18�. Manufacturer Edgar Allen. Material manganese steel. Point reference is PT901A | South-west end of Landore Viaduct | 214 | 57.5 | North | 10-Jul-91 | 17.28 |
 bpm01768.jpg |
SWM | Severn Tunnel Jct & Fishguard Harbour | View looking onto Landore viaduct from Landore end, showing derailment protection rails for and dual-speed restriction sign. A wet patch is evident in the up line | Landore Viaduct (From 214M-39C to 214M-62C) | 214 | 39 | South | 10-Jul-91 | 17.28 |
 bpm01769.jpg |
SWM | Severn Tunnel Jct & Fishguard Harbour | View looking towards Landore diesel traction maintenance dep�t from Swansea avoiding single line | Landore junction & Motive Power dep�t | 214 | 65.4 | North | 10-Jul-91 | 17.32 |
 bpm01770.jpg |
SWM | Severn Tunnel Jct & Fishguard Harbour (Swansea avoiding line) | Single Swansea avoiding line looking towards Landore viaduct | Landore Motive Power dep�t | 214 | 76 | South | 10-Jul-91 | 17.36 |
 bpm01771.jpg |
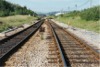
SWM | Severn Tunnel Jct & Fishguard Harbour (Swansea avoiding line) | Single Swansea avoiding line looking towards Swansea Loop West junction north west of Landore DM dep�t | Swansea avoiding line, Landore | 214 | 79.5 | North | 10-Jul-91 | 17.37 |
 bpm01772.jpg |
SWM | Severn Tunnel Jct & Fishguard Harbour (Swansea avoiding line) | The Swansea avoiding line approaching Swansea Loop West junction | North of Swansea Loop West junction | 215 | 10 | North | 10-Jul-91 | 17.39 |
 bpm01773.jpg |
SWM | Severn Tunnel Jct & Fishguard Harbour (Swansea avoiding line) | Looking north-east along the Swansea avoiding line west of Landore DM dep�t | Landore Motive Power dep�t, Swansea avoiding line | 215 | 05 | SW | 10-Jul-91 | 17.40 |
 bpm01774.jpg |
SWM | Severn Tunnel Jct & Fishguard Harbour (Swansea avoiding line) | Landore diesel maintenance dep�t and ful siding | Landore Motive Power dep�t | 215 | 05 | SW | 10-Jul-91 | 17.40 |
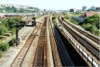
 bpm01775.jpg |
SWM | Severn Tunnel Jct & Fishguard Harbour (Swansea avoiding line) | Looking south-west towards Swansea Loop West junction from a footbridge south-west of Landore diesel maintenance dep�t | Swansea Loop West junction | 215 | 05 | North | 10-Jul-91 | 17.41 |
 bpm01776.jpg |
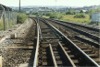
SWL | Swansea West Loop | Looking east at the tight curves of Swansea West loop, from a footbridge adjacent to Landore diesel maintenance dep�t | Landore Motive Power dep�t & Swansea Loop West junction | 215 | 05 | SW | 10-Jul-91 | 17.41 |
 bpm01777.jpg |
SWL SWM |
Swansea Loop / South Wales Main | Arrangement of up & down Swansea Loop lines & junction with SWM Swansea single avoiding line (Down avoiding line removed prior to 1991). Previous down avoiding line merged with Swansea Loop at 215M-14C which was zero for SWL Line (0M-00C). Note the Radio Relay wires and posts on the left. These were later removed | Swansea Loop West junction (PT 270 signal) | ~0 | 06 | East | 10-Jul-91 | 17.42 |
 bpm01778.jpg |
SWL | Swansea West Loop | Looking north-east along the tight, checked curves of Swansea West Loop lines | Adjacent to Swansea Loop West junction | 0 | 06 | West | 10-Jul-91 | 17.42 |
 bpm01779.jpg |
SWL | Swansea West Loop | View of Landore diesl maintenance dep�t from a footbridge over Swansea West Loop | Swansea west Loop, south of Landore Motive Power dep�t | 0 | 06 | South | 10-Jul-91 | 17.42 |
 bpm01780.jpg |
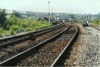
SWM | Severn Tunnel Jct & Fishguard Harbour | Elevation of Swansea Loop West junction showing trailing crossover, points 933B end, 1 in 13 turnout ("C"-switch), from Swansea West Loop down branch to South Wales main down line to Fishguard. View is after singling of Swansea avoiding line chord. | Swansea Loop West junction | 215 | 17.6 | SW | 10-Jul-91 | 17.49 |
 bpm01781.jpg |
SWM | Severn Tunnel Jct & Fishguard Harbour | The up & down South Wales mMain lines immediately west of Swansea Loop West junction | Swansea Loop West junction | 215 | 19 | NE | 10-Jul-91 | 17.49 |
 bpm01782.jpg |
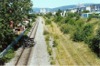
SWA | Swansea | General view of carriage & engineers sidings, Morfa yard. Left line runs through to Maliphant Sidings, remaining fan runs to 8 sidings. Up & down Swansea main line branch runs extreme left (into High Street Station) | Swansea (High Street) carriage & engineers sidings | ~215 | 55 | South | 10-Jul-91 | 18.18 |
 bpm01783.jpg |
OVE | Ogmore Vale Extension | View of single line branch and hand-operated gates at Cwmffoes level crossing. This road had been closed for a period and was reopened after NCB site cleanup operations | Cwmffoes Level Crossing | 2 | 07 | West | 10-Jul-91 | 18.49 |
 bpm01784.jpg |
NWN | Ebbw junction & Park junction (Cardiff Curve) | View from footbridge just south-east of Park jct signal box. The up & down Cardiff curve lines to Ebbw jct run to the left and rear of the camera point. Park jct is located at 160M-24C from Paddington (equivalent to 1M-02C on the WVL), beyond the semaphore signals, the single line running to the left and to Gaer jct on the South Wales main line. The in-between line is a siding which was part of the true WVL into Newport dockland area | Just south-east of Park jct signal box, Newport | 0 | 71 | SE | 16-Jul-89 | 10.29 |
 bpm01785.jpg |
GAE NWN |
Gaer junction & Park jct / Cardiff Curve | Gaer & Ebbw junction branches with down siding, ground disc & detection for double traps at sidings exit | Just south of Park junction, Newport | 160 | 14 | NW | 16-Jul-89 | 10.30 |
 bpm01786.jpg |
NWN | Cardiff Curve | Ebbw junction double line approach as viewed from foot crossing adjacent to Park junction Signalbox, showing Pandrol-fixed tracks with both timber & reinforced concrete sleepers | South-east of Park junction (Cardiff curve) | 0 | 73.5 | NW | 16-Jul-89 | 10.31 |
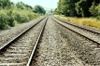 bpm01787.jpg |
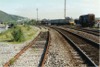
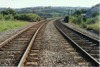
WVL | Gaer junction / Aberbeeg jct | Looking towards Park junction from �chain south-east of 2 milepost on Western Valleys line. The right-hand single bi-directional line runs along the former route to Machen and Bargoed but has only served Machen quarry (still in use in 2006) since the closure of Bedwas colliery and the through route to Bargoed, Rhymney or Brecon | Just SE of former Bassaleg junction (Near Pye Corner) | 1 | 79.5 | NW | 16-Jul-89 | 10.55 |
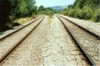 bpm01788.jpg |
WVL | Gaer junction / Aberbeeg jct | Looking towards Rogerstone from �chain south-east of 2 milepost on Western Valleys line. The left-hand single bi-directional line runs along the former route to Machen and Bargoed but only serves Machen quarry (still in use in 2006) since the closure of Bedwas colliery and the through route to Bargoed, Rhymney or Brecon. The 0M-00C milepost is just visible on the left and is aligned with a 2M-05C reference on the right-hand single bi-directional Western Valleys line to Ebbw Vale. Bassaleg road underbridges are located at 0M-0.5C(BJR) and 2M-05.5C(WVL) and a top side wall is just visible along the Machen branch just beyond the second milepost | 5 chains SE of former Bassaleg junction (2M-00C milepost in view) | 1 | 79.5 | SE | 16-Jul-89 | 10.55� |
 bpm01789.jpg |
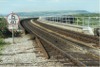
BJR | Bassaleg Jct & Bargoed | The single line between the former Bassaleg jct and Machen quarry and looking towards Bassaleg and the then, recently installed new rail overbridge (0M-16C) over the new A467 dual carriageway to Ebbw Vale and Brynmawr | Near Bassaleg Station | 0 | 13 | SE | 16-Jul-89 | 11.02 |
 bpm01790.jpg |
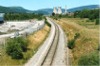
WVL | Gaer junction / Aberbeeg jct | Looking along the singled Western Valleys line towards the now demolished Rogerstone power station | Bassaleg Rd overbridge, south of Rogerstone | 2 | 29.5 | SE | 16-Jul-89 | 11.07� |
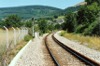
 bpm01791.jpg |
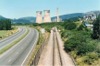
WVL | Gaer junction / Aberbeeg jct | Looking along the singled Western Valleys line towards Rogerstone power station (now removed) | Chartist Drive road overbridge south of former Rogerstone power station | 2 | ~70 | SE | 16-Jul-89 | 11.11 |
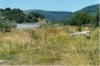
 bpm01792.jpg |
WVL | Gaer junction / Aberbeeg jct | Re-aligned track in vicinity of Rogerstone power station showing groundframe and lead into power station site | South of Rogerstone railway station & Power Station groundframe (All now removed) | 3 | 25 | SE | 16-Jul-89 | 11.15 |
 bpm01793.jpg |
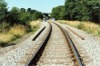
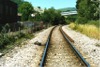
WVL | Gaer junction / Aberbeeg jct | Approach to site of former Risca station with Moriah footbridge still present (Compare jpeg00500). A rail lubricator is fitted to the outside curve rail | South of former Risca Station | 5 | 50 | SE | 16-Jul-89 | 11.41 |
 bpm01794.jpg |
WVL | Gaer junction / Aberbeeg jct | Looking up the line from site of former Risca junction at repeater signal LK28R. Previously a double line ran to the left to Nine Mile Point to link up with the former Sirhowy branch to Tredegar & Nantybwch (Compare jpeg00501, 502 & 503) | Former Risca junction site | 5 | 47 | South | 16-Jul-89 | 11.45 |
 bpm01795.jpg |
WVL | Gaer junction / Aberbeeg jct | Looking across the valley from Risca junction site from where a double line ran over a multi-arched viaduct to run to the right of the new dual carriageway concrete retaining wall seen | Former Risca junction | 5 | 46 | SE | 16-Jul-89 | 11.45 |
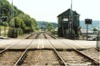 bpm01796.jpg |
WVL HRD | Gaer junction / Aberbeeg jct & Halls Road Branches | Looking towards Newport at site of Lime Kiln Sidings level crossing & signal box. The double line runs into a single line in the distance. A double trap point is located in the Halls Rd single line (left) | Lime Kiln Sidings level crossing & Signalbox | 6 | 15 | NW | 16-Jul-89 | 11.54 |
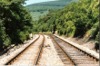 bpm01797.jpg |
WVL | Gaer junction / Aberbeeg jct | Looking towards Crosskeys and the start of the Halls Road branch (right) to Markham colliery, the latter being taken out of use after 1989 and lifted beyond Crosskeys | Lime Kiln Sidings level crossing & signal box | 6 | 17 | SE | 16-Jul-89 | 11.54 |
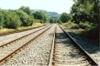
 bpm01798.jpg |
WVL HRD | Gaer junction / Aberbeeg jct & Halls Road Branches | Looking towards Crosskeys at the up & down Western Valley lines (left & centre) and the Halls Road single line branch on the right. The WVL lines are of flatbottom rail section whilst the Halls Rd single line is of 95RBSbullhead section keyed alternately with Mills steel rail clips and steel Panlock clips in the chairs | Lime Kiln Sidings | 6 | 21 | SE | 16-Jul-89 | 11.55 |
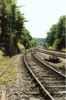 bpm01799.jpg |
WVL HRD | Gaer junction / Aberbeeg jct & Halls Road Branches | The southern end of the Halls Road branch single line merging with the western Valleys lines at Lime Kiln level crossing and signal box | Lime Kiln Sidings | 6 | 21 | NW | 16-Jul-89 | 11.58 |
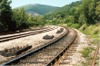
 bpm01800.jpg |
WVL HRD | Gaer junction / Aberbeeg jct & Halls Road Branches | Looking towards Rogerstone at the up & down Western Valley lines (centre & right) and the Halls Road single line branch on the left | Former true Halls Road junction site | 6 | 58 | NW | 16-Jul-89 | 12.07 |
|
Photos 1751-1800 |
|||||||||
|
Date Last Revised:November 30, 2009 |
|||||||||