|
Historical Railway Photograph Gallery 1901-1950 |
|||||||||
|
Photos 1901-1950 |
|||||||||
| Photo | ELR | Branch | Subject | Location | M | C | Elev'n | Date | Time |
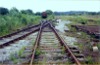
 bpm01901.jpg |
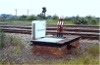
SWM | Gloucester & Severn Tunnel junction | Groundframe controlling movements from up relief line into Severn & Wye line at Lydney junction, South Wales main. | Lydney, South Wales main line, up relief | NW | ||||
 bpm01902.jpg |
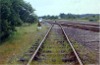
SWM | Gloucester & Severn Tunnel junction | Lead from South Wales Main line up relief at Lydney junction into Severn & Wye branch. | Connection to Lydney yard from main line (up relief), Lydney | East | ||||
 bpm01903.jpg |
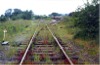
SWM | Gloucester & Severn Tunnel junction | Lead from South Wales Main line up relief at Lydney junction into Severn & Wye branch. | Connection to Lydney yard from main line (up relief), Lydney | West | ||||
 bpm01904.jpg |
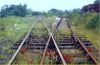
SAW | Berkeley Rd & Speech House Rd | Lead from South Wales Main line up relief at Lydney junction into Severn & Wye branch. | Connection to Lydney yard from main line (up relief), Lydney | East | ||||
 bpm01905.jpg |
SAW | Berkeley Rd & Speech House Rd | Lead from South Wales Main line up relief at Lydney junction into Severn & Wye branch. | Connection to Lydney yard from main line (up relief), Lydney | West | ||||
 bpm01906.jpg |
SAW | Berkeley Rd & Speech House Rd | Double inside slip (since removed) in lead from South Wales Main line up relief at Lydney junction into Severn & Wye branch. | Connection to Lydney yard from main line (up relief), Lydney | West | ||||
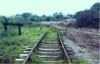 bpm01907.jpg |
SAW | Berkeley Rd & Speech House Rd | Layout changes at former Lydney yard, east end (Under Dean Forest Railway ownership) | Lydney yard | East | ||||
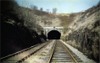
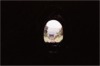
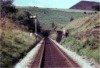
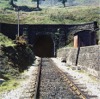
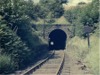
 bpm01908.jpg |
BRY | Cardiff (General) & Barry Pier | East portal of 280-yard, Pier tunnel (Barry Island). The fixed caution distant signal for Barry Island East 'box was a Western Region standard replacement to the original wooden Saxby & Farmer arm with starting and distant somersault-style arms on a much higher post. The line from the docks to the west breakwater, crossed at this point where the rails had to be temporarily fixed above the pier lines (delineated by the sleepers in the scene) so that traffic could pass from a natural rock tunnel on the right, to get to the breakwater line which split into a high & low level siding at the Barry Yacht Club building. The telegraph wire link between Barry Island East �box and the Pier 'box was cabled through the tunnel but the short link from the latter to the Pier box was via aerial wires, the insulators and wooden arm still being visible, bolted to the stonework behind the signal. | Barry Pier station | 9 | 23 | East | ||
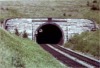
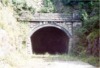
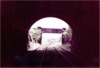
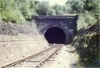
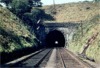
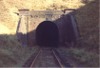
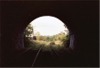
 bpm01909.jpg |
BRY | Cardiff (General) & Barry Pier | West portal of 280-yard, Pier tunnel (Barry Island), showing Barry Island East signal box's starting signal and the single line into the tunnel. The original double line was singled in 1929 to make room for an additional siding, pit and watering point on the level to the left of the centre-line of the tunnel bore. The line was still in use at the time of taking. The inset date is 1897 in the top walling. Note also the telegraph insulators with support arms directly bolted to the capstone on the right and a second set lower down above the handrails. These caried the signalling and telephone circuits to the former Pier station and signal box via cabling in the tunnel. The cable junction box is attached to the wall of the portal | Barry Island East yard & DMU inspection & fuelling dep�t | 9 | 08 | West | ||
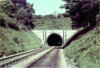
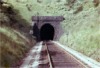
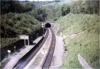
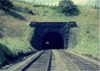
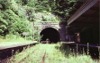
 bpm01910.jpg |
BRY | Cardiff (General) & Barry Pier | West portal of 222-yard, Cogan tunnel showing full bore. The inset date is 1886. The banner repeater signal repeats the aspect of the home signal just beyond the tunnel mouth at the other end of the tunnel | Between Dinas Powys and Cogan | 3 | 07 | West | ||
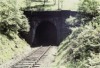
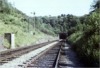
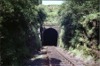
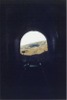
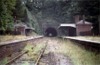
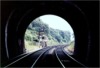 bpm01911.jpg |
BRY | Cardiff (General) & Barry Pier | East portal of 222-yard, Cogan tunnel from inside of bore, showing Cogan Sidings signal box and home bracket signal assembly. An up passenger train had just passed and signalman, Walter Bobbett, replaced the up main home arm to 'danger' just after this photo' was taken. | Between Dinas Powys and Cogan | 2 | 75 | West | 04-Jul-65 | 11.12 |
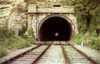
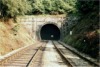
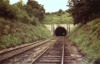
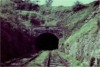
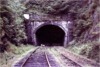
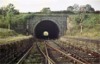
 bpm01912.jpg |
VOG | Vale of Glamorgan | South-east portal of 543-yard Porthkerry No.1 tunnel whose limits are 0M-53C to 0M-77C | Barry side of Porthkerry No.1 tunnel | 0 | 50 | SE | ||
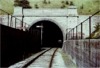
 bpm01913.jpg |
VOG | Vale of Glamorgan | North-west portal of 543-yard, Porthkerry No.1 tunnel. Note the superelevated tracks permitting a 40mph speed from the curves into or out of the tunnel | Porthkerry park side of Porthkerry No.1 tunnel | 0 | 79 | NW | ||
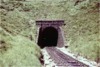
 bpm01914.jpg |
VOG | Vale of Glamorgan | South-east portal of 543-yard Porthkerry No.1 tunnel. The starting signal in the 'off' position used to be located on the left and on the top of the tunnel portal walling but after relocation to the photographed position, it was necessary to install a banner repeater signal just west of Barry Sidings signal box. | Barry side of Porthkerry No.1 tunnel | 0 | 50 | SE | ||
 bpm01915.jpg |
VOG | Vale of Glamorgan | Distant shot of 71-yard Porthkerry No.2 tunnel, south-west portal | Lane overbridge West of Porthkerry village | 2 | 09 | SW | ||
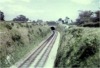
 bpm01916.jpg |
VOG | Vale of Glamorgan | West portal of 71-yard Porthkerry No.2 tunnel, west of Porthkerry viaduct. Tunnel limits are 1M-72.75C to 1M-76C Porthkerry viaduct side walls can be seen on the other side of the bore | Immediately west of Porthkerry No.2 tunnel | 1 | 79 | West | 24-Mar-90 | 15.16 |
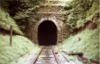
 bpm01917.jpg |
CTD | Cadoxton South jct & Trehafod jct | South portal of 1867-yard Wenvoe tunnel when line was closed. Tunnel limits are 3M-23C to 4M-28C | Wenvoe tunnel, south end | 3 | 21 | South | ||
 bpm01918.jpg |
CTD | Cadoxton South jct & Trehafod jct | South portal of 1867-yard Wenvoe tunnel when line was in full use | Wenvoe tunnel, south end | 3 | 20 | South | ||
 bpm01919.jpg |
CTD | Cadoxton South jct & Trehafod jct | Rebuilt ventilator shaft enclosure at mid-point of closed Wenvoe tunnel. The original vent shaft was surmounted by a circular red and Staffordshire blue corbelled stack which was carefully removed some time before the new retail store site was built here | Wenvoe tunnel, mid-point ventilator shaft. Although the BRB inspection figures read 3M-23C. The actual location is 3M-65�C | 3 | 65.5 | South | ||
 bpm01920.jpg |
CTD | Cadoxton South jct & Trehafod jct | Rebuilt ventilator shaft enclosure at mid-point of closed Wenvoe tunnel. The original vent shaft was surmounted by a circular red and Staffordshire blue corbelled stack which was carefully removed some time before the new retail store site was built here | Wenvoe tunnel, mid-point ventilator shaft. Although the BRB inspection figures read 3M-23C. The actual location is 3M-65�C | 3 | 65.5 | SW | ||
 bpm01921.jpg |
|||||||||
 bpm01922.jpg |
|||||||||
 bpm01923.jpg |
|||||||||
 bpm01924.jpg |
|||||||||
 bpm01925.jpg |
CRY | Cardiff Railway | North portal of the 180-yard Tongwynlais tunnel now completely removed to permit A470 trunk road improvements. Tunnel limits were 4M-13C to 4M-21C | Tongwynlais tunnel north portal | 4 | 22 | North | ||
 bpm01926.jpg |
MER | Gelli Tarw jct & Merthyr | East portal of 2497-yard Merthyr tunnel. Internally, this tunnel housed clappers in the track, near the outlets, to give audible warning during external darkness, that the train was about to leave the tunnel mouth. The branch was originally part of the Vale of Neath Line. | Merthyr tunnel, north-east portal | 4 | 72 | NE | ||
 bpm01927.jpg |
MER | Gelli Tarw jct & Merthyr | North-east portal of 2497-yard Merthyr tunnel viewed from inside of bore | Merthyr tunnel, north- east portal | 4 | 69 | NE | ||
 bpm01928.jpg |
MER | Gelli Tarw jct & Merthyr | West portal of 2497-yard Merthyr tunnel after line closure | Merthyr tunnel, west portal | 3 | 38.5 | West | ||
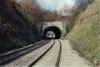
 bpm01929.jpg |
VON | Neath (General) & Pontypool Road | East portal of 703-yard Quakers' Yard tunnel when in use. The new A470 trunk road passes over the camera point now and the cutting is engulfed in trees but it was still possible to walk through the bore in 2003. Tunnel limits are 16M-9C to 16M-41C | Quakers' Yard tunnel, east portal | 16 | 7.5 | East | 08-Sep-63 | |
 bpm01930.jpg |
VON | Neath (General) & Pontypool Road | West portal of 703-yard Quakers' Yard tunnel when in use. Tunnel limits are 16M-09C to 16M-41C. The tunnel was still accessible in 2005 | Quakers' Yard tunnel, west portal | 16 | 42 | West | ||
 bpm01931.jpg |
VON | Neath (General) & Pontypool Road | East end of 703-yard Quakers' Yard tunnel showing single line approach, motorised down distant signal for Quakers' Yard Tunnel West signal box, and ganger's hut. The new A470 Cardiff-Merthyr dual-carriageway now passes over the cutting justy beyond the hut.The tunnel was still accessible in 2004 | Eastern approach to Quakers' Yard tunnel | 16 | 02.75 | East | ||
 bpm01932.jpg |
CAR | Cardiff (Stonefield Jct) & Rhymney | Former Cefn On halt and south portal of Caerphilly tunnel. Note the sighting enhancement quadrants fitted to the Up starting signal & Wernddu signal box's up motorised distant signals | Former Cefn On halt | 5 | 75 | SE | ||
 bpm01933.jpg |
CAR | Cardiff (Stonefield Jct) & Rhymney | North side of 1993yd Caerphilly tunnel, showing fogman's hut and Cherry Orchard down, motorised distant signal | Between Wernddu signal box & Caerphilly tunnel, north portal | 7 | 22 | NW | ||
 bpm01934.jpg |
BAL | Bridgend & Abergwynfi | South portal of 1595-yard Cymmer tunnel (now sealed off). Tunnel limits are 10M-17C to 11M-10C | Just north of former Caerau station | 10 | 16 | South | ||
 bpm01935.jpg |
RSB | Rhondda & Swansea Bay | South-west portal of 3443-yard Rhondda tunnel (Now completely buried). Tunnel limits were 1M-45C to 3M-41C | Blaengwynfi station, tunnel end | 3 | 43 | West | ||
 bpm01936.jpg |
RSB | Rhondda & Swansea Bay | Eastern approach to 3443-yard Rhondda tunnel (ends now completely buried). The high volume of water seepage which always plagued the tunnel, is now culverted away at this end to drain into the River Rhondda in the Treherbert valley. Note the single line token pick-up/set-down apparatus on the right | Blaencwm signal box steps, at Blaenrhondda end of Rhondda tunnel | 1 | 34 | NE | 1962 | |
 bpm01937.jpg |
RSB | Rhondda & Swansea Bay | East portal of 3443-yard Rhondda tunnel (Limits 1M-45C to 3M-41C). This area is completely backfilled but the three trees above the entrance still marked the location in 2004 | North-east portal of Rhondda tunnel, Blaencwm | 1 | 44 | NE | 1962 | |
 bpm01938.jpg |
VON | Neath (General) & Pontypool Road | East portal of 398-yard Bryn tunnel east of Maesycwmmer junction (The cuttings at both ends of the tunnel are now completely backfilled). Tunnel limits are 9M-46C to 9M-64C | Between Pontllanfraith and Maesycymmer | 1 | 45 | East | 28-Jul-63 | |
 bpm01939.jpg |
VON | Neath (General) & Pontypool Road | East portal of 280-yard Glyn tunnel east of Hafodyrynys platform. Tunnel limits are 4M-59C to 4M-72C. The tunnel is now earth-sealed at both ends | Between Crumlin & Pontypool Road | 4 | 58 | East | 28-Jul-63 | |
 bpm01940.jpg |
BND | Brecon & Dowlais | South portal of 667-yard Torpantau tunnel. Tunnel limits are 13M-52C to 14M-03C. The line was still in use for freight traffic at the time | East of former Torpantau station | 14 | 04 | SW | 27-Jul-63 | |
 bpm01941.jpg |
HRD | Halls Road (Oakdale & Lime Kiln Sidings) | East portal of 239-yard Penar tunnel. Tunnel limits are 4M-42C to 4M-53C | East portal of Penar tunnel | 4 | 41 | East | 28-Jul-63 | |
 bpm01942.jpg |
PTP | Copper Works junction & Cwmdu | View of South West portal of 1010-yard Bryn (Cwmcerwyn) tunnel (From interior) | Bryn (Cwmcerwyn tunnel.) From 5M-08C to 5M-54C | 5 | 09 | NE | ||
 bpm01943.jpg |
PTP | Copper Works junction & Cwmdu | View of south-west portal of 1010-yard Cwmcerwyn tunnel, West of Maesteg, after closure of line. The keystone is dated 1897 | Bryn (Cwmcerwyn tunnel). From 5M-08C to 5M-54C | 5 | 07 | SW | ||
 bpm01944.jpg |
ROS | Ross-on-Wye & Little Mill junction | 256-yard Usk tunnel at east end of station (Track lifted beyond buffer stop) | Usk station | 25 | 14 | NE | 13-Jul-64 | 16.59 |
 bpm01945.jpg |
ROS | Ross & Little Mill | Usk station and tunnel after closure | Usk station (after closure) | 25 | 12 | West | ||
 bpm01946.jpg |
ROS | Ross & Little Mill | East portal of 256-yard Usk tunnel after track removal. Tunnel limits are 25M-00C to 25M-11C | Usk tunnel, east portal | 24 | 79 | East | ||
 bpm01947.jpg |
ROS | Ross & Little Mill | West portal of 148-yard Monmouth tunnel. The milepost on the left reads 13� miles from Ross. The right-hand line was a siding, the left line leading to a set of points for the ensuing 2-tracks into the station beyond. . This end is now engulfed in backfill and a highways dep�t stands here | West portal of Monmouth tunnel. (From 13M-12C to 13M-19C) | 13 | 19.5 | West | ||
 bpm01948.jpg |
ROS | Ross & Little Mill | West portal of 148-yard Monmouth tunnel viewed from inside and looking towards Raglan. The left-hand line led to a buffer stop beyond and a loading platform existed here where the crane seen, could handle rail cargo. | Monmouth tunnel, west portal | 13 | 18 | East | ||
 bpm01949.jpg |
ROS | Ross & Little Mill | East portal of 148-yard Monmouth tunnel. The armless bracket signal and the transfer telegraph post on the extreme left, are now exhibits in the Coleford railway museum but the bracket signal ironwork has been curtailed. The tunnel is sealed at this end and a housing estate was later established here | Monmouth tunnel, east portal |
13 13 |
12 19 |
East | ||
 bpm01950.jpg |
WYE | Wye Valley Jct & Monmouth | South portal of 433-yard Symonds Yat tunnel. Note the canted track | North-east of former Symonds Yat station |
7 7 |
21 41 |
SW | ||
|
Photos 1901-1950 |
|||||||||
|
Date Last Revised:November 30, 2009 |
|||||||||