|
Historical Railway Photograph Gallery 2001-2050 |
|||||||||
|
Photos 2001-2050 |
|||||||||
| Photo | ELR | Branch | Subject | Location | M | C | Elev'n | Date | Time |
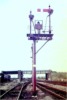
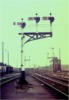
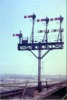
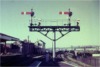
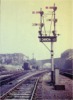 bpm02001.jpg |
MLN | Bristol & Exeter | 2-doll bracket signal assembly with motorised splitting distant arms | Bristol West Dep�t | 120 | 36 | West | ||
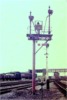
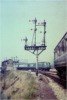
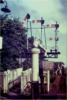
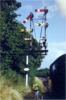 bpm02002.jpg |
SVR | Kidderminster & Bridgnorth | 2-doll bracket signal assembly with one permanent caution and one worked motorised distant arm and also with Call On arms and track circuit indicator with telephone facility indicated | North of Bewdley, Worcestershire | |||||
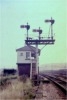
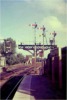
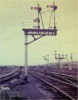 bpm02003.jpg |
SWM | Severn Tunnel Jct & Fishguard Harbour | 2-doll bracket subsidiary signal assembly with Call-on arm on one doll | Near former Llandeilo Middle signal box, Llanelly | 224 | 03.5 | East | 15-Oct-66 | 13.11 |
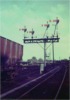
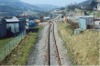
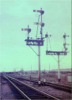 bpm02004.jpg |
SWM | Severn Tunnel Jct & Fishguard Harbour | 2-doll bracket signal with worked distant and subsidiary 2ft arm | Near Llandeilo Jct West signal box | 223 | 54 | East | 15-Oct-66 | 13.31 |
 bpm02005.jpg |
SWM | Severn Tunnel Jct & Fishguard Harbour | 2-doll bracket signal with route indicator. The assembly was being erected in connection with the 1966 Llandeilo junction signalling rationalisation and the main 4-ft arm was already in use, the former wooden GWR post assembly in advance (just visible behind) already having had its arm removed | Llandeilo junction | 223 | 11 | East | 15-Oct-66 | 12.56 |
 bpm02006.jpg |
LLA | Llandeilo jct & Llandeilo | 2-doll bracket signal with route indicator. The assembly was being erected in connection with the 1966 Llandeilo junction signalling rationalisation. The former wooden post GWR assembly to the rear was just about to be removed and the function would be taken over by the arm to be fitted to the higher doll on the new assembly | Llandeilo junction | 223 | 11 | East | 15-Oct-66 | 12.57 |
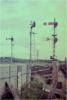
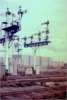 bpm02007.jpg |
SWM | Severn Tunnel Jct & Fishguard Harbour | 4-doll bracket semaphore assembly with motorised splitting distant arms and older style back-light blinders. The main mast is of wood construction but the dolls are of the later tubular section. The nearer 2-doll bracket is of all wood construction with metal enamelled arms. All of these were about to be replaced with new semaphores in conjunction with the 1966 Llandeilo Junction amalgamation scheme | West of Llandeilo Middle signal box | 224 | 06 | SW | 15-Oct-66 | 13.39 |
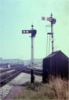
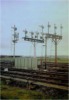 bpm02008.jpg |
SWM | Severn Tunnel Jct & Fishguard Harbour | New 3-doll bracket signal in course of erection. The new arms would replace the stop arms on the older assembly seen beyond. The route indicating signal would be replaced by the nearer single post and was to be accompanied by a ground disc | West of Llandeilo Middle signal box | 224 | 06 | NW | 15-Oct-66 | 13.39� |
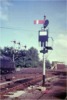
 bpm02009.jpg |
SWM | Severn Tunnel Jct & Fishguard Harbour | 3-doll GWR wooden bracket signal with one of the older ringed goods arms replaced with a plain 3ft arm | East of Llandeilo Middle signal box | 223 | 78 | East | 15-Oct-66 | 13.09 |
 bpm02010.jpg |
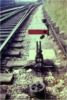
LLA | Llandeilo jct & Llandeilo | Elevated disc alongside starting and distant signals. The lines on the left are part of Genwen loop which connects with Trostre tinplate works. The Central Wales lines come in from the right | Genwen junction east of Llanelly and Trostre tinplate works | 0 | 30 | SW | 15-Oct-66 | 14.00 |
 bpm02011.jpg |
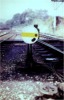
CAM | Cardiff (Bute Rd) & Merthyr | 4-Route indicating assembly with 3ft semaphore | Alongside station at Radyr junction | 5 | 32 | West | ||
 bpm02012.jpg |
MLN | Bath & Bristol | Backing signal on original GWR wooden post, alongside standard WR 4ft stop signal on tubular metal post | Bristol relief line junction | 117 | 30 | West | ||
 bpm02013.jpg |
MLN | Bath & Bristol | 3-doll bracket signal with two route indicators, one signalled clear to' Marsh Junction' | Bristol East Dep�t, Down Yard signal box | 117 | 19.5 | SE | ||
 bpm02014.jpg |
MLN | Bristol Temple Meads & Bath | 4-doll bracket signal with route indicator, subsidiary arms and fixed & worked distant arm. The slot weights for the indicator are just below platform level. | North Somerset junction signal box | 117 | 47 | West | ||
 bpm02015.jpg |
BRL | St.Philips Marsh avoiding line | 3-doll bracket signal with call-on arm, permanent caution arms and extended dolls for better sighting | North Somerset junction | 23 | 22 | South | ||
 bpm02016.jpg |
MLN | Bristol Temple Meads & Bath | 4-doll gantry with permanent caution arms, call-on arm and removed arms, all on extended dolls for better sighting | East of North Somerset junction & signal box | 117 | 42 | East | ||
 bpm02017.jpg |
MLN | Bristol Temple Meads & Bath | 3-doll GWR wooden bracket signal with ringed goods loop arms | West Dep�t Jct & signal box, Bristol | 120 | 69 | SW | ||
 bpm02018.jpg |
MLN | Bristol Temple Meads & Exeter | 4-doll bracket signal with call-on arms | Red Cow Crossing north of Exeter station | 193 | 62 | North | ||
 bpm02019.jpg |
RAD | City Line | 4-doll bracket signal with paired arms for separate lines, one line being track-circuited | Radyr Yard and near Radyr quarry signal box and Llandaff Loop line | 3 | 78 | NW | ||
 bpm02020.jpg |
MLN | Bristol temple Meads & Exeter | Arrangement of single ground disc with integral mechanical detection | Portishead Jct, Bristol | 120 | 26 | North | ||
 bpm02021.jpg |
BDO | Barry Docks Low Level Lines | Double ground disc assembly east of former Graving Dock Jct signal box and alongside line to No.2 dock | Graving Dock junction Barry | 6 | 33 | NE | ||
 bpm02022.jpg |
MLN | Bristol Temple Meads & Highbridge | Triple ground disc with integral mechanical detection and cubical lamps | Just north of Parson Street Jct, Bristol | 120 | 2.5 | SW | ||
 bpm02023.jpg |
BAL | Bridgend & Abergwynfi | 16" diameter, GWR "Caution" ground disc, not a common sight on the GWR (later, Western Region). Photo� shows split pedestal & integral mechanical detection from associated points | Road overbridge, north of Tondu junction | 3 | 3.75 | SE | ||
 bpm02024.jpg |
BAL | Bridgend & Abergwynfi | 11�" diameter BRWR "Caution" ground disc, quite rare on the Western Region. Unit has split pedestal & incorporates integral mechanical detection | Road overbridge, north of Tondu junction | 3 | 3.75 | SE | ||
 bpm02025.jpg |
BRY | Cardiff (General) & Barry Pier | Up, slotted starting signal with elevated disc. This arm was Barry Island West signal box home and Barry Island East starting signal. | Barry Island station | 8 | 65 | East | ||
 bpm02026.jpg |
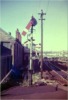
BRY | Cardiff (General) & Barry Pier | Barry Island West's Platforms 3 & 4 starting signals with elevated discs reading to dead end spur. | Barry Island station | 8 | 67 | East | ||
 bpm02027.jpg |
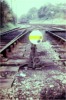
CAM | Cardiff (Bute Rd) & Merthyr | 3-doll bracket signal; with permanent caution and elevated disc | Radyr station & junction | NW | ||||
 bpm02028.jpg |
CAM | Cardiff (Bute Rd) & Merthyr | 3-doll bracket signal with elevated discs and route indicator | Radyr station & junction | |||||
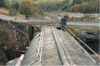
 bpm02029.jpg |
EBW | Aberbeeg Jct & Ebbw Vale | Looking north from A4046 road overbridge, Cwm showing re-laid single line when modifications to a drainage culvert were underway | A4046 road overbridge, Cwm | |||||
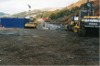
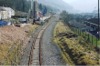 bpm02030.jpg |
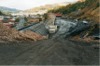
EBW | Aberbeeg Jct & Ebbw Vale | Looking south-east from A4046 road overbridge, Cwm, showing piling operations underway for new elevated bypass road | A4046 road overbridge, Cwm | |||||
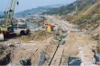 bpm02031.jpg |
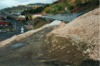
EBW | Aberbeeg Jct & Ebbw Vale | Preparatory earthworks underway at A4046 roead overbridge, south of Cwm, where a build-&-cover tunnel was to be established | A4046 road overbridge, south of Cwm | |||||
 bpm02032.jpg |
EBW | Aberbeeg Jct & Ebbw Vale | Re-bar cages ready for piling for foundations of new build-&- cover tunnel, south of Cwm | Near A4046 road overbridge, south of Cwm | |||||
 bpm02033.jpg |
EBW | Aberbeeg Jct & Ebbw Vale | The A4046 overbridge, south of Cwm, showing the already constructed south portal section of the new build-&-cover tunnel | A4046 road overbridge and build-&-cover tunnel, south of Cwm | |||||
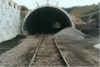 bpm02034.jpg |
EBW | Aberbeeg Jct & Ebbw Vale | North portal of the new build-&-cover tunnel, south of Cwm | Build-&-cover tunnel, south of Cwm | |||||
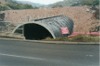
 bpm02035.jpg |
EBW | Aberbeeg Jct & Ebbw Vale | South portal of the new build-&-cover tunnel showing the then still in use A4046 road overbridge south of Cwm | A4046 road overbridge and build-&-cover tunnel, south of Cwm | |||||
 bpm02036.jpg |
EBW | Aberbeeg Jct & Ebbw Vale | South portal of the new build-&-cover tunnel showing the handrailing of the then still in use A4046 road overbridge south of Cwm | A4046 road overbridge and build-&-cover tunnel, south of Cwm | |||||
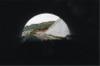 bpm02037.jpg |
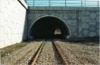
EBW | Aberbeeg Jct & Ebbw Vale | The north portal of the new build-&-cover tunnel, south of Cwm | North portal of build-&cover tunnel, south of Cwm | |||||
 bpm02038.jpg |
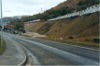
EBW | Aberbeeg Jct & Ebbw Vale | View of the new Cwm elevated bypass roadway set above the original alignment of the Ebbw Vale single line branch | South end of Cwm | |||||
 bpm02039.jpg |
EBW | Aberbeeg Jct & Ebbw Vale | View of the new Cwm elevated bypass roadway set above the original alignment of the Ebbw Vale single line branch | South end of Cwm | |||||
 bpm02040.jpg |
EBW | Aberbeeg Jct & Ebbw Vale | The finished build-&-cover tunnel reinforced concrete sections at the A4046 road overbridge south of Cwm | A4046 road overbridge and build-&-cover tunnel, south of Cwm | |||||
 bpm02041.jpg |
EBW | Aberbeeg Jct & Ebbw Vale | The finished build-&-cover tunnel reinforced concrete sections at the A4046 road overbridge south of Cwm, showing the path of the new elevated bypass road on the right, with the single line Ebbw Vale branch north of the new tunnel | Build-&-cover tunnel, south of Cwm | |||||
 bpm02042.jpg |
EBW | Aberbeeg Jct & Ebbw Vale | South elevation of the new Cwm elevated bypass road under construction. The single line Ebbw Vale branch is seen beyond the gate | South end of Cwm | |||||
 bpm02043.jpg |
EBW | Aberbeeg Jct & Ebbw Vale | Completed reinforced concrete tunnel sections at the south end of the build-&-cover tunnel immediately north of the A4046 road overbridge south of Cwm. Marine colliery previously stood in the right distance. | A4046 road overbridge and build-&-cover tunnel, south of Cwm | |||||
 bpm02044.jpg |
EBW | Aberbeeg Jct & Ebbw Vale | Backfilled earthworks above the new build-&-cover tunnel over the Ebbw Vale branch, south of Cwm. | Build-&-cover tunnel, south of Cwm | |||||
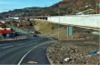 bpm02045.jpg |
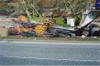
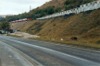
EBW | Aberbeeg Jct & Ebbw Vale | The completed and opened elevated Cwm bypass road alongside the Ebbw Vale branch and old A4046 road south of Cwm | South end of Cwm | |||||
 bpm02046.jpg |
EBW | Aberbeeg Jct & Ebbw Vale | South elevation of Ebbw Vale branch and new elevated Cwm bypass road, south of Cwm | South end of Cwm | |||||
 bpm02047.jpg |
EBW | Aberbeeg Jct & Ebbw Vale | North elevation of completed build-&-cover tunnel south of Cwm | North portal of build-&-cover tunnel, south of Cwm | |||||
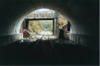
 bpm02048.jpg |
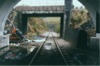
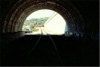
EBW | Aberbeeg Jct & Ebbw Vale | Looking north from inside the northern portal of the then just completed build-& cover tunnel south of Cwm. The bypass road alignment under construction, is the elevated section seen on the right | North portal of build-&-cover tunnel, south of Cwm | |||||
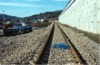
 bpm02049.jpg |
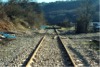
EBW | Aberbeeg Jct & Ebbw Vale | Looking towards Aberbeeg from trackbed south of A4046 road overbridge, during modifications to the road layout. Marine colliery previously stood on the right of the track, beyond the curve | South of A4046 road overbridge, south of Cwm | |||||
 bpm02050.jpg |
EBW | Aberbeeg Jct & Ebbw Vale | A4046 road overbridge and build-&-cover tunnel, south of Cwm | ||||||
|
Photos 2001-2050 |
|||||||||
|
Date Last Revised:November 30, 2009 |
|||||||||