|
Historical Railway Photograph Gallery 151-200 |
|||||||||
| 101-150 <- |
Photos 151-200 |
-> 201-250 | |||||||
| Photo | ELR | Branch | Subject | Location | M | C | Elev'n | Date | Time |
 bpm00151.jpg |
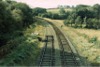
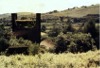
CTD | Cadoxton South jct & Trehafod jct | View looking south from unclassified road overbridge (Tynycoed Rd), north of Creigiau during recovery of track by contractor. The down line had been removed as far as the overbridge location at the time of photo record. (See frame bpm02814.jpg for track level reverse view) | Unclassified road overbridge north of Creigiau | 9 | 43 | North | ||
 bpm00152.jpg |
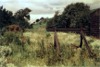
CTD | Cadoxton South junction & Trehafod junction | Lifted down line near unclassified road overbridge north of Creigiau | North of Creigiau | 9 | 40 | South | ||
 bpm00153.jpg |
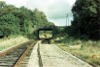
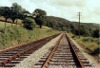
CTD | Cadoxton South junction & Trehafod junction | Disused track at rail overbridge. The bridge was later removed and the Culverhouse Cross-M4 motorway link road bridged the unclassified road underneath at a point to the east of this scene. The field-to-field access overbridge in the distance was also removed | Near St-y-Nyll, NW of St.Fagans | 6 | 13 | SE | ||
 bpm00154.jpg |
CTD | Cadoxton South junction & Trehafod junction | Cadoxton North yard inlets | Coldbrook Road East rail overbridge | 0 | 42 | North | ||
 bpm00155.jpg |
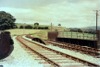
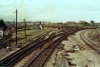
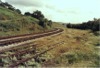
BRY | Cardiff (General) & Barry Pier | Cadoxton South junction showing severed permanant way to & from east side of Cadoxton Yard. The so-called penny-halfpenny footbridge spanning the siding complex can be seen in the distance. A large housing estsate now occupies all to the left of the up Cardiff line curving from left to right | Cadoxton South signal box |
6 0 |
06 00 |
South | ||
 bpm00156.jpg |
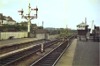
BRY | Cardiff (General) & Barry Pier | Former Great Western wooden 3-doll bracket with triple ground disc for backing movements. The latter replaced a route-indicating backing semaphore signal located on Nos 2/3 platforms | Cadoxton station | 6 | 08.5 | South | ||
 bpm00157.jpg |
BRY | Cardiff (General) & Barry Pier | Elbows in down main (awaiting removal after closure of east side Cadoxton Yard) | Cadoxton South | 6 | 04 | SE | ||
 bpm00158.jpg |
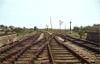
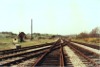
CTD | Cadoxton South junction & Trehafod junction | View looking towards Wenvoe, showing abandoned double lines, down homes bracket semaphore for Cadoxton North signal box & trailing connection from Cadoxton North Yard, west side. The protective plate for the down main facing lock is also visible | Cadoxton North | South | ||||
 bpm00159.jpg |
CTD | Cadoxton South junction & Trehafod junction | The same view as bpm00158.jpg after complete recovery of the permanent way & signalling by the Contractor | Cadoxton North | South | ||||
 bpm00160.jpg |
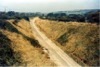
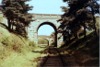
CTD | Cadoxton South junction & Trehafod junction | View of trackbed after recovery by contractor, showing field cross-access overbridge & semaphore signal (up Advanced starting signal for Cadoxton North signal box). This cutting is now completely backfilled but the bridge still stands (2001) The A4050-A4055 link road now passes just north of camera point, the earthworks from Cadoxton yard and embankment having been removed for the road scheme | Cadoxton North, first farm cross-field access overbridge | 0 | 52 | South | ||
 bpm00161.jpg |
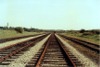
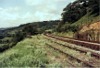
CTD | Cadoxton South junction & Trehafod junction | General view of abandoned double line with 2-mile mile-post visible | Vishwell road overbridge, south of Wenvoe | 1 | 78.5 | South | ||
 bpm00162.jpg |
CTD | Cadoxton South junction & Trehafod junction | General view of trackbed immediately after removal of track by contractor | Vishwell road overbridge, south of Wenvoe | 1 | 78.5 | South | ||
 bpm00163.jpg |
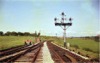
CTD | Cadoxton South junction & Trehafod junction | General view of abandoned double line showing rear of up worked distant semaphore signal for Wenvoe | Vishwell road overbridge, south of Wenvoe | 1 | 78.5 | North | ||
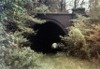
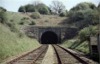 bpm00164.jpg |
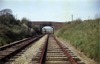
CTD | Cadoxton South junction & Trehafod junction | North portal of 1867-yard Wenvoe tunnel (3M-23C to 4M-28C) after abandonment of line | Wenvoe tunnel portal, north end | 4 | 30 | North | ||
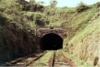 bpm00165.jpg |
CTD | Cadoxton South junction & Trehafod junction | South portal of 1867-yard Wenvoe tunnel (3M-23C to 4M-28C) after abandonment of line | Wenvoe tunnel portal, south end | 3 | 21.5 | South | ||
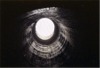 bpm00166.jpg |
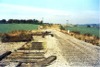
CTD | Cadoxton South junction & Trehafod junction | View looking up ventilator shaft showing laid-across rails for prevention of large object d�bris-dumping | Wenvoe Tunnel | 3 | 65 | Under-view | 10-May-64 | 15.01 |
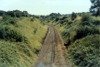 bpm00167.jpg |
CTD | Cadoxton South junction & Trehafod junction | View looking towards north end of Wenvoe tunnel after tracklifting | Former road overbridge at Drope junction (The Culverhouse Cross link road to the M4 now passes immediately to the left of this trackbed and at a lower level) | 4 | 54 | North | ||
 bpm00168.jpg |
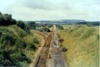
CTD | Cadoxton South junction & Trehafod junction | Approach to Drope junction (The bridge was removed after 1984 and a wide-span concrete structure substituted to span the M4-Culverhouse Cross road link which was run at a much lower level, to the right of the trackbed here) | Drope junction | 4 | 51 | NE | ||
 bpm00169.jpg |
CTD | Cadoxton South junction & Trehafod junction | View of abandoned and partly truncated junction as seen from former stone-arched road overbridge at Drope | Drope junction | 4 | 54 | SE | ||
 bpm00170.jpg |
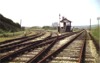
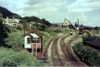
CTD | Cadoxton South junction & Trehafod junction | Drope junction with signal box and 178 yard Drope viaduct in distance. [A concrete semaphore signal (Down Home) which carried a somersault signal until the closure of the branch, still stands on the right of the track]. Now also obliterated Drope-Peterston branch curves to the left | Drope junction | 4 | 56.5 | SE | ||
 bpm00171.jpg |
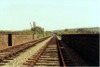
CTD | Cadoxton South junction & Trehafod junction | View on 180 yard St.Fagans Viaduct with Drope viaduct beyond (This is now the course of the M4-Culverhouse cross road link) | St.Fagans viaduct | 5 | 06 | NW | ||
 bpm00172.jpg |
CTD | Cadoxton South junction & Trehafod junction | Approach to Tynycaeau junction (Now the M4-Culverhouse Cross road link) | North of St.Fagans viaduct | 5 | 20 | West | ||
 bpm00173.jpg |
CDT SWM SFA |
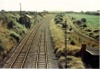
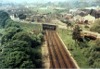
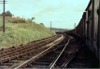
Cadoxton South junction & Trehafod junction/ South Wales Main/ St.Fagans | View of up & down South Wales main lines and single line St Fagans branch from Tynycaeau junction to St Fagans junction. Viewed from former Cadoxton-Trehafod branch of Barry Railway at a viaduct (now a bridge) which is now part of the Culverhouse cross-M4 motorway link road | St.Fagans viaduct | 5 | 15 | West | ||
 bpm00174.jpg |
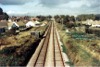
SFA | St.Fagans | St.Fagans branch at 180-yard St.Fagans viaduct which carried the ex Barry Railway's Cadoxton-Trehafod line. The lower bridge still survives (2006) but the viaduct was replaced with an earthwork embankment to bear the Culverhouse Cross-M4 Motorway link after 1984 and this was run at a lower level. This single line rail link carried passenger traffic between Pontypridd and Cardiff General, via Creigiau until 1962. | St.Fagans viaduct (Cadoxton South junction-Treforest junction mileage = 5M-17C) | ~0 | 42 | West | ||
 bpm00175.jpg |
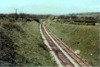
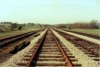
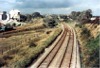
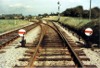
CTD | Cadoxton South junction & Trehafod junction | Double to single line branch to & from St.Fagans, South Wales main line, to Tynycaeau Jct, after abandonment | Tynycaeau junction | 0 | 04 | North | ||
 bpm00176.jpg |
CTD | Cadoxton South junction & Trehafod junction | Tynycaeau junction with demolished signal box site. The Culverhouse Cross-M4 Motorway link (A4232) now passes through this site and continues past the cliff-cut in the centre background of the photograph | Tynycaeau junction | 5 | 50 | SE | ||
 bpm00177.jpg |
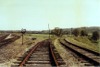
CTD | Cadoxton South junction & Trehafod junction | Tynycaeau main and up & down loop lines after complete closure of line | Tynycaeau junction | 5 | 50 | NW | ||
 bpm00178.jpg |
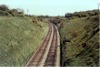
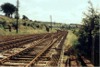
CTD | Cadoxton South junction & Trehafod junction | Abandoned double track, the up line (right) of which bears bull-head rail with Mills taper steel rail keys in bull-head chairs laid on steel sleepers. The down line is carried on wooden sleepers. | Rail overbridge over St.Fagans/Peterston-super-Ely road | 6 | 13 | NW | ||
 bpm00179.jpg |
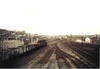
BRY | Cardiff (General) & Barry Pier | Cadoxton Low Level junction with 94XX-hauled goods train awaiting departure ex-docks line from Graving Dock junction. Most wooden GWR bracket and straight post semaphores remained in use here until the closure of Cadoxton South and Cadoxton Low level Jct signal boxes. | Cadoxton Low Level junction signal box | 6 | 28 | South | ||
 bpm00180.jpg |
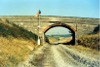
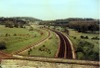
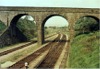
WNT | Aber junction & Penrhos junction | Penrhos junction looking east from signal box. The three-arch road bridge is now completely engulfed in backfill and a housing estate now stands at a higher level beyond the bridge | Penrhos junction |
9 12 |
47 36 |
South | ||
 bpm00181.jpg |
Spare | ||||||||
 bpm00182.jpg |
VOG | Vale of Glamorgan | 0-6-2 Collett tank loco' No.6633 on empties Aberthaw power station coal train with partly vacuum-fitted mineral wagons in formation | Approaching A4055 Harbour Road overbridge, Barry | 0 | 07.5 | East | ||
 bpm00183.jpg |
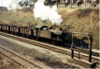
BRY | Cardiff (General) & Barry Pier | 0-6-2 Collett tank loco' No.6633 on empties Aberthaw power station coal train, passing Palmerston Road overbridge | Palmerston Road overbridge, Barry | 5 | 62 | SE | ||
 bpm00184.jpg |
PTH | Penarth | Double track line at Penarth Cement Works (Note the well-indented rear face of the semaphore arm and the absence of coloured glass, due to air-rifle vandalism) | Penarth Cement Works signal box | 2 | 33.5 | North | 09-Oct-66 | 14.20 |
 bpm00185.jpg |
PTH | Penarth | View of line just south of site of former Lower Penarth halt when still open to passenger traffic. The cut down platforms are still discernable beyond the ganger's hut | Brockhill Rise road overbridge, Lower Penarth | 2 | 11 | South | ||
 bpm00186.jpg |
PTH | Penarth | Trailing crossover with single inside slip in up main when branch & cement works was still fully operational (Note the gradient fall towards the low point at former Lower Penarth halt in the distance). A housing estate now stands on both sides of the trackbed. The latter is a pedestrian footway. The Fowler diesel loco� present was narrow gauge for hauling quarry drams from the works quarry sited between Cogan Hall and the works. The quarry site is now known as Cosmeston Park and lies to the northwest of the B4267 main Barry-Penarth road. | Penarth Cement Works, north connection. Photo� was taken from a stone arched bridleway/farm access overbridge just north of Penarth Cement Works Sidings signal box. | 2 | 32.75 | South | 09-Oct-66 | 14.18 |
 bpm00187.jpg |
PTH | Penarth | Trailing crossover, down main to works via up line diamond crossing for south connnection to Penarth Cement Works. A lower access platform is seen on the semaphore signal which served the by-then, removed distant signal for Lavernock signal box. The slot proving contact box (white) a little way up the post, is still visible. Only a grassy trackbed remains (2004) | East of Lavernock station | 2 | 50 | South | 09-Oct-66 | 14.12 |
 bpm00188.jpg |
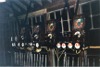
BRY | Cardiff (General) & Barry Pier | Permissive block instruments with signal arm repeaters | Cadoxton Low Level signal box | 6 | 28 | � | ||
 bpm00189.jpg |
BJR | Bassaleg Jct & Rhymney | Track details, showing circular point rodding & pull-wires after closure of Newport-Brecon line between Machen & this point. Note the two aerial telegraph pole routes, fairly heavily wire-laden | Just north-west of former Maesycymmer junction | 13 | 29 | SE | ||
 bpm00190.jpg |
BJR | Bassaleg Jct & Rhymney | Track details, showing trailing crossover and actual junction 200-yds from camera point and also showing circular point rodding & pull-wires | Maesycymmer junction, after closure. (junction mileages stated) |
13 10 |
22 69 |
NW | ||
 bpm00191.jpg |
BJR | Bassaleg Jct & Rhymney | Surviving piers of former 397-yard Llanbradach viaduct (Ex Barry Railway). Central mileage location was 14M-69C (From Cadoxton South junction). All piers and d�bris have now been removed. | Duffryn Isaf junction (Formerly Barry junction) | ~15 | 10 | NE | ||
 bpm00192.jpg |
BJR | Bassaleg Jct & Rhymney | Buffer stop at north-east end of former Llanbradach viaduct with one pilaster visible, which marked the north-east extremity of the former Llanbradach viaduct | South-west of former Duffryn Isaf junction (Previously, Barry junction) | 14 | 78 | South | ||
 bpm00193.jpg |
BJR | Bassaleg Jct & Rhymney | Abandoned double track south of Maesycwmmer, both tracks comprising 95lb/yd bullhead rail in cast-iron chairs laid on timber sleepers. Note that the full aerial telegraph rig was still intact | South-east of Maesycwmmer | ~11 | ? | NW | ||
 bpm00194.jpg |
BJR | Bassaleg Jct & Rhymney | Disused sidings north-east of former Llanbradach viaduct | Duffryn Isaf | 9 | 38 | North | ||
 bpm00195.jpg |
BJR | Bassaleg Jct & Rhymney | Abandoned double track, top end of Duffryn Isaf yard | Duffryn Isaf | 9 | 38 | South | ||
 bpm00196.jpg |
BJR | Bassaleg Jct & Rhymney | Bedwas signal box & track layout after closure of through route to Bargoed from Newport | Dawlyn road overbridge overlooking Bedwas North signal box | 7 | 59 | West | ||
 bpm00197.jpg |
CAM PRS |
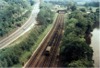
Cardiff (Bute Road) & Merthyr/Penrhos | "Aerial" view of Walnut Tree junction | Walnut Tree viaduct, Penrhos Branch |
9 7 |
60 13 |
SE | ||
 bpm00198.jpg |
CAM PRS |
Cardiff (Bute Road) & Merthyr/Penrhos | "Aerial" view from Walnut Tree viaduct | Walnut Tree viaduct, Penrhos Branch |
9 7 |
60 13 |
West | ||
 bpm00199.jpg |
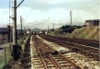
VON | Neath (General) & Pontypool Road | Up & down main with sidings with out-of-use double lines from Bird-in-Hand junction to Tredegar junction (for Tredegar, LMS line). The entire area now hosts a housing estate | Bird-in-hand junction, Pontllanfraith area | 9 | 18 | West | ||
 bpm00200.jpg |
CRY | Coryton | North-West portal of now extinct 180-yard Tongwynlais tunnel. The tunnel was broken into and removed to blend in with the new A470 dual carriageway and slip road into Tongwynlais and old A470 slip road, south-east bound from Taffs Well and Morganstown/Pentyrch cross-river/rail link | Tongwynlais tunnel. From 4M-13C to 4M-21C | 4 | 22 | NW | ||
| 101-150 <- |
Photos 151-200 |
-> 201-250 | |||||||
|
Date Last Revised:November 30, 2009 |
|||||||||