|
Historical Railway Photograph Gallery 101-150 |
|||||||||
| 51-100 <- |
Photos 101-150 |
-> 151-200 | |||||||
| Photo | ELR | Branch | Subject | Location | M | C | Elev'n | Date | Time |
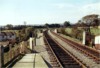
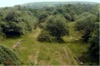
 bpm00101.jpg |
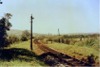
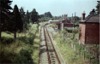
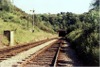
MER | Gelli Tarw junction & Merthyr | Abandoned single line & down home signal | Werfa Loop junction | 3 | 20 | East | 02-Jun-63 | |
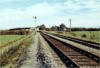
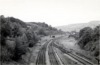
 bpm00102.jpg |
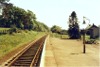
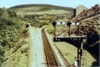
MER | Gelli Tarw junction & Merthyr | Abandoned single line, station & level crossing | Abernant groundframe | 2 | 40 | East | 02-Jun-63 | |
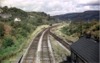
 bpm00103.jpg |
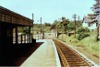
MER | Gelli Tarw junction & Merthyr | Abandoned single line and station | Abernant station | 2 | 42 | West | 02-Jun-63 | |
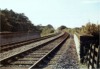
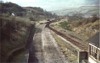
 bpm00104.jpg |
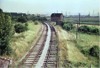
MER | Gelli Tarw junction & Merthyr | Abandoned single line and station | B4276 Merthyr Rd overbridge, Llwydcoed | 0 | 60 | East | 02-Jun-63 | |
 bpm00105.jpg |
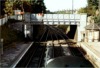
LED | Ledbury | Double track of start of Ledbury branch leaving Over junction on the South Wales Main line. The branch was severed at Dymock station 12 miles north west of this location. None of this scene now exists as the A40 road was modified and absorbed this area | Old A40 road overbridge just north-west of Over junction, Gloucester | ~0 | 10.5 | NW | 16-Jul-64 | 15.00 |
 bpm00106.jpg |
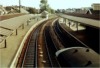
LED | Ledbury | Abandoned single line and station at Barber's Bridge station on the Gloucester-Ledbury branch | B4215 road overbridge, at Barber's Bridge station, Tibberton, Gloucestershire | 3 | 75 | SE | 16-Jul-64 | 15.12 |
 bpm00107.jpg |
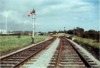
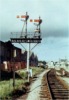
RSB BAL |
Rhondda & Swansea Bay, Bridgend & Abergwynfi | View at former junction south of Groeserw viaduct on lifted R&SB line, showing rear of two-doll bracket semaphore signal. The former BAL GWR line from Maesteg ran through a single arched bridge on the extreme right and the track sleeper impressions are still visible in this photograph. Note the rust patch and worn arm tip at the extreme bottom right end of the signal arms due to their striking the counterweight when being pulled to 'Clear' | Former Cymmer East junction, Cymmer Afan |
5 11 |
30 49 |
South | ||
 bpm00108.jpg |
VON | Neath (General) & Pontypool Road | View of Crumlin Viaduct from the west, showing single line on deck. Crumlin junction at the far end of the viaduct allowed traffic to & from Pontypool to access the Western Valleys lines at Llanilleth from the left via the single line Llanilleth branch. The single line on the viaduct reverted to double line at each end of the structure and the line east of it is seen to bridge the road to Pontypool. Beyond that stood Hafodyrynys platform followed by the short Glyn tunnel (See frame bpm01939.jpg) | Hillside north-west of Crumlin High Level halt | SW | ||||
 bpm00109.jpg |
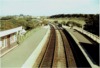
PTH | Penarth | Layout and detail at Penarth station, viewed from station footbridge | Penarth | 1 | 07 | SW | 09-Oct-66 | 14.58 |
 bpm00110.jpg |
PTH | Penarth | Layout & detail at Penarth station viewed from station footbridge when yard sidings (in background) had already been lifted | Penarth | 1 | 07 | NE | 09-Oct-66 | 14.58 |
 bpm00111.jpg |
PTH | Penarth | Double track at incline to Penarth station (Station is at the top of the incline) | Archer Rd road overbridge between Penarth station & former Alberta Place halt | 1 | 25 | SW | 09-Oct-66 | 14.50 |
 bpm00112.jpg |
PTH | Penarth | General view of double line looking towards Penarth | Forrest Rd road overbridge, Lower Penarth | 1 | 69 | SW | 09-Oct-66 | 14.43 |
 bpm00113.jpg |
PTH | Penarth | General view of double line looking towards Lavernock | Brockhill Rise road overbridge, Lower Penarth | 2 | 10.5 | NE | 09-Oct-66 | 14.45 |
 bpm00114.jpg |
PTH | Penarth | General view of Sully station when still open to passengers | Cog Rd road overbridge (now backfilled), Sully | 4 | 60 | SE | 09-Oct-66 | 13.45 |
 bpm00115.jpg |
PTH | Penarth | General view of Swanbridge halt when still open to passengers | Swanbridge Halt, east of Sully | 3 | 67 | SW | 09-Oct-66 | 13.51 |
 bpm00116.jpg |
PTH | Penarth | General view of Swanbridge halt when still open to passengers | Swanbridge Halt, east of Sully | 3 | 67 | NE | 09-Oct-66 | 13.51 |
 bpm00117.jpg |
PTH | Penarth | Track details at rail overbridge, after closure and removal of semaphore signals for Lavernock signal box. The up distant signal standing, was for Penarth Cement Works signal box | Rail overbridge, St.Mary's Well Bay Road, Lavernock | 3 | 04 | SW | 09-Oct-66 | 13.58 |
 bpm00118.jpg |
PTH | Penarth | Track details, photographed on St Mary's Well Bay rail overbridge | Rail overbridge, St.Mary's Well Bay Road, Lavernock | 3 | 04 | NE | 09-Oct-66 | 13.58 |
 bpm00119.jpg |
PTH | Penarth | General view of station after closure and removal of signalling operated from Lavernock signal box. Fort Road (formerly Station Road) rail overbridge is seen just beyond the station limit | Lavernock | 2 | 77 | SW | 09-Oct-66 | 14.01 |
 bpm00120.jpg |
PTH | Penarth | Penarth Cement Works Sidings signal box up home signal and crossover | Between Lavernock station and Penarth Cement Works Sidings signal box bridleway overbridge near Cosmeston, Lavernock | 2 | 52 | SW | 09-Oct-66 | 14.10 |
 bpm00121.jpg |
PTH | Penarth | Double disc at trailing crossover | Between Lavernock station and Penarth Cement Works signal box | 2 | 50 | SW | 09-Oct-66 | 14.12 |
 bpm00122.jpg |
PTH | Penarth | View of double line incline, Penarth Cement Works signal box and part of works reception siding | Bridleway overbridge near Cosmeston, Lavernock | 2 | 33.5 | NE | 09-Oct-66 | 14.20 |
 bpm00123.jpg |
PTH | Penarth | Northern crossover and Penarth Cement Works rail link | Penarth Cement works | 2 | 33.5 | South | 09-Oct-66 | 14.18 |
 bpm00124.jpg |
PTH | Penarth | General view at Lower Penarth showing location of Lower Penarth Halt platforms | Brockhill Rise road overbridge, Lower Penarth | 2 | 10.5 | SW | 09-Oct-66 | 14.43 |
 bpm00125.jpg |
PTH | Penarth | 2-doll bracket up homes and "Call-on" semaphores with double ground disc for backing or crossing moves | Penarth station | 1 | 17 | SE | 09-Oct-66 | 15.10 |
 bpm00126.jpg |
PTH | Penarth | Trailing crossover at south end of station | Penarth station | 1 | 20 | SE | 09-Oct-66 | 15.08 |
 bpm00127.jpg |
PTH | Penarth | View towards Alberta Place halt and Archer Road overbridge | South of Penarth station | 1 | 20.5 | NE | 09-Oct-66 | 15.10 |
 bpm00128.jpg |
PTH | Penarth | Lifted goods yard area showing severed turnout to yard sidings | Penarth station | 1 | 16 | SE | 09-Oct-66 | 15.03 |
 bpm00129.jpg |
BRY | Cardiff (General) & Barry Pier | Layout of Cogan junction showing semaphore signalling and elbows in up main. By this time, Cogan sidings (relief lines were not in use) | Cogan station A4160 road overbridge | 2 | 37 | South | 01-Aug-65 | 11.01 |
 bpm00130a.jpg |
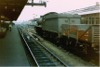
DCL | Swindon & Banbury | Scissors crossover with steam locomotive and underslung truncated semaphore arms just visible under station canopy and also some semaphore slotting weights seen at foot of overhead signal doll, right of canopy | Oxford station | 63 | 40 | SE | 12-Aug-65 | |
 bpm00130b.jpg |
DCL | Swindon & Banbury | Route indicating signal gantry with steam loco' in station precinct. Note that the loco nameplate has been removed | Oxford station | 63 | 47 | SE | 12-Aug-65 | |
 bpm00130c.jpg |
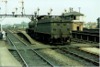
BML LSW |
Portsmouth & Southampton | Merchant Navy loco' (34038) leaving Southampton Central station | Southampton | 11-Aug-65 | ||||
 bpm00131.jpg |
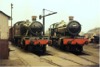
MLN | Swindon Works | GWR Locomotives 4111 & 6849 outshopped | Swindon works | 77 | 50 | � | 1963 | |
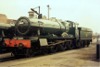 bpm00132.jpg |
MLN | Swindon Works | GWR Grange-class loco� 6849 side view | Swindon works | 77 | 50 | � | 1963 | |
 bpm00133.jpg |
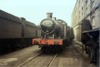
MLN | Swindon Works | GWR 0-6-2 Collett tank loco� 5691, front view | Swindon works | 77 | 50 | � | 1963 | |
 bpm00134.jpg |
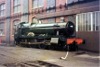
MLN | Swindon Works | GWR Grange-class loco� 6850 side view without tender | Swindon works | 77 | 50 | � | 1963 | |
 bpm00135.jpg |
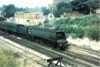
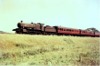
GCT | Grange Court & Hereford | GWR Manor-class loco� 7815 on Gloucester to Hereford passenger train | Near Holme Lacy, SE of Hereford | 138 | 40 | SW | 13-Jul-64 | 15.26� |
 bpm00136.jpg |
CAR | Cardiff, (Stonefield junction) & Rhymney | View towards north-west portal of Caerphilly tunnel | Caerphilly tunnel, north end and east of former Wernddu signal box | 7 | 22.5 | NW | ||
 bpm00137.jpg |
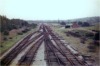
CTD | Cadoxton South junction & Trehafod junction | Tynycaeau junction with all track out-of-use and after recovery of point rodding & signalling equipment. The signal box stood adjacent to the tall telegraph pole, right of track | Tynycaeau junction | 5 | 58 | NE | ||
 bpm00138.jpg |
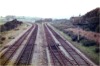
CTD | Cadoxton South junction & Trehafod junction | Tynycaeau junction. Left lines went to Tonteg, Creigiau and Treforest junction and right lines to Walnut Tree viaduct, Penrhos junction and Rhymney valley. At the time, the Penrhos branch on the right, was occasionally used for the run-around of the steam loco' working the traffic to & from the Steetley Dolomite works at Walnut tree viaduct | Tynycaeau junction | 5 | 58 | SE | ||
 bpm00139.jpg |
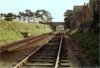
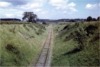
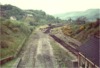
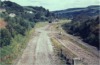
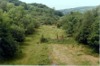
PTN | Drope junction & Peterston | General View of disused single line cutting (now completely backfilled and fields commoned) | St.Georges, west of St.Fagans | 1 | 37 | West | ||
 bpm00140.jpg |
PTN | Drope junction & Peterston | General View of disused single line cutting (now completely backfilled and fields commoned) | St.Georges, west of St.Fagans | 1 | 37 | East | ||
 bpm00141.jpg |
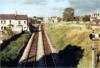
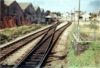
CTD LTR | Cadoxton South junction & Trehafod junction/ Llantrisant | Black & white record of Tonteg junction platforms when open to all traffic. Llantrisant branch on left and Barry via Wenvoe lines on right | Unclassified road overbridge alongside Tonteg signal box and halts |
12 5 |
23 21 |
North | 1960 | |
 bpm00142.jpg |
CTD LTR | Cadoxton South junction & Trehafod junction/ Llantrisant | Tonteg halt on the Llantrisant line (left) and out-of-use passenger down platform and line to Barry via Wenvoe on right. The Llantrisant branch was still open for coke traffic from Cwm colliery at the time. | Unclassified road overbridge alongside Tonteg signal box and halts |
12 5 |
23 21 |
North | ||
 bpm00143.jpg |
CTD LTR | Cadoxton South junction & Trehafod junction/ Llantrisant | Tonteg halt on the Llantrisant branch (left) and down platform branch to Barry via Wenvoe on right. Taken after the complete recovery of all lines | Unclassified road overbridge alongside Tonteg signal box and halts |
12 5 |
23 21 |
North | ||
 bpm00144.jpg |
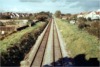
CTD LTR | Cadoxton South junction & Trehafod junction/ Llantrisant | Single & double line trackbeds after lying defunct more than 25 years. The very short single line platform for the Llantrisant branch is still visible as is part of the down platform for the Wenvoe branch | Unclassified road overbridge alongside Tonteg signal box and halts |
5 12 |
21 25 |
North | ||
 bpm00145.jpg |
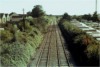
CTD LTR | Cadoxton South junction & Trehafod junction/ Llantrisant | Black & white record of Tonteg junction when in full use. The original Cadoxton-Trehafod double line ran straight ahead where the trackbed is still visible. | Unclassified road overbridge alongside Tonteg signal box and halts |
5 12 |
21 25 |
South | 1960 | |
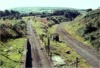
 bpm00146.jpg |
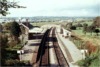
CTD LTR | Cadoxton South junction & Trehafod junction/ Llantrisant | Tonteg junction after closure of Wenvoe-Cadoxton lines, the single line Llantrisant branch possibly still being open for coke traffic from Cwm colliery at that time but in the final years, coke traffic was shipped from Cwm via Common Branch junction,down to the main line at Llantrisant | Unclassified road overbridge alongside Tonteg signal box and halts |
5 12 |
21 25 |
South | ||
 bpm00147.jpg |
CTD LTR | Cadoxton South junction & Trehafod junction/ Llantrisant | Tonteg junction after lifting of Wenvoe-Cadoxton lines (The Tonteg junction-Cadoxton section). The line to Cwm colliery ws still in use at the time | Unclassified road overbridge alongside Tonteg signal box and halts |
5 12 |
21 25 |
South | 10-Apr-65 | 16.11 |
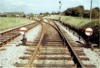
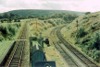
 bpm00148.jpg |
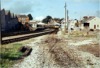
CTD LTR | Cadoxton South junction & Trehafod junction/ Llantrisant | Tonteg junction after final closure of the Llantrisant branch to coke traffic from Cwm. The recovery contractor's staff are still present at the time and it is seen that the rails have been removed from the chairs in the Llantrisant single line branch but the 2-doll bracket signal is still standing beyond the junction | Unclassified road overbridge alongside Tonteg signal box and halts |
5 12 |
21 25 |
South | 13-May-65 | 16.00 |
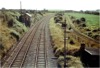
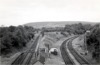
 bpm00149.jpg |
CTD LTR | Cadoxton South junction & Trehafod junction/ Llantrisant | Tonteg junction after complete removal of all permanent way and signalling equipment. Tonteg signal box structure has been lifted from its site at the near right side of the scene and is sitting in the distance on the old trackbed of the original Barry line to Trehafod, beyond Tonteg junction location | Unclassified road overbridge alongside Tonteg signal box and halts |
5 12 |
21 25 |
South | ||
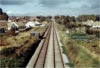
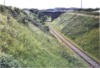
 bpm00150.jpg |
CTD LTR | Cadoxton South junction & Trehafod junction/ Llantrisant | Tonteg junction after lying derelict for 25 years | Unclassified road overbridge alongside Tonteg signal box and halts |
5 12 |
21 25 |
South | ||
| 51-100 <- |
Photos 101-150 |
-> 151-200 | |||||||
|
Date Last Revised:November 30, 2009 |
|||||||||