|
Historical Railway Photograph Gallery 51-100 |
|||||||||
| 1-50 <- |
Photos 51-100 |
-> 101-150 | |||||||
| Photo | ELR | Branch | Subject | Location | M | C | Elev'n | Date | Time |
| bpm00051.jpg | Spare | ||||||||
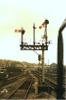
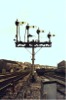
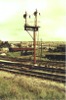
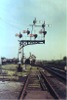 bpm00052.jpg |
CAM | Cardiff (Bute Street) & Merthyr | 4-doll bracket semaphore assembly with 3ft ringed arms and reverse-reading 4ft stop arms | Roath Branch junction | 3 | 61 | West | 16-May-64 | 16.10 |
 bpm00053.jpg |
British Railways motif (Penultimate version) | On DMU at Barry Island East yard | 17-Apr-64 | 15.20 | |||||
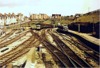 bpm00054.jpg |
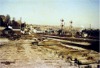
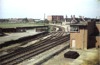
BRY | Cardiff (General) & Barry Pier | Yard layout (DMU refuelling facility & stabling) showing complex permanent way arrangement | Barry Island East | 8 | 75 | SW | ||
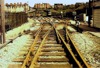 bpm00055.jpg |
BRY | Cardiff (General) & Barry Pier | Double trap points in turnout from No.4 platform | Barry Island East | 8 | 75 | SW | 17-Apr-64 | 15.15 |
| bpm00056.jpg | Spare | ||||||||
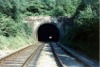
 bpm00057.jpg |
GCT | Grange Court & Hereford | 1206-yard Ballingham tunnel. (From 127M-28C to 138M-03C) The tunnel has a curved vertical gradient through its lengthy bore but the other end is just perceptable | Ballingham | 137 | 27 | SE | 13-Jul-64 | 15.46 |
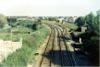
 bpm00058.jpg |
GCT | Grange Court & Hereford | Station view showing road overbridge and goods loop in distance (added after 1947). Cary viaduct (over R.Wye) and Fawley tunnel is beyond. | Ballingham | 137 | 11 | NW | 13-Jul-64 | 15.55 |
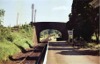
 bpm00059.jpg |
GCT | Grange Court & Hereford | Fawley station viewed from road overbridge | Fawley, (Herefordshire) | 136 | 21.5 | NW | 13-Jul-64 | 16.06� |
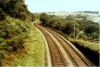
 bpm00060.jpg |
GCT | Grange Court & Hereford | Station loop and single line to 537-yard Fawley tunnel (From 136M- 32C to 136M- 56C) | West of Fawley station (Herefordshire) | 136 | 21.5 | SE | 13-Jul-64 | 16.06 |
 bpm00061.jpg |
CRY | Coryton | Single line junction to station loop | Whitchurch (Glamorgan) | 2 | 30 | East | ||
 bpm00062.jpg |
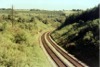
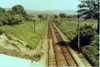
VOG | Vale of Glamorgan | Porthkerry bank looking towards Barry | Porthkerry Park | 1 | 33 | South | ||
 bpm00063.jpg |
BRY | Cardiff (General) & Barry Pier | View of Biglis junction looking towards Dinas Powys | Palmerston Road overbridge, Barry | 5 | 62 | South | ||
 bpm00064.jpg |
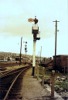
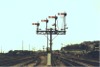
BRY | Cardiff (General) & Barry Pier | 3-doll bracket semaphore assembly (Former Bay starting arm removed) | Barry Cabin signalbox | 8 | 07 | South | ||
 bpm00065.jpg |
BRY | Cardiff (General) & Barry Pier | Route indicating signal assembly. At the grouping in 1922 this assembly had five arms, one above the other but was eventually converted to the standard GWR route indicating type. This photo has been replaced by an enhanced version 917 | Barry Van siding | 8 | 12 | South | ||
 bpm00066.jpg |
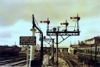
BRY | Cardiff (General) & Barry Pier | 4-doll starting semaphore bracket signal with elevated disc. Barry junction signal box in the background, was out-of-use at this time and when it was in use, this signal assembly was the down homes assembly for Barry junction �box | Barry station | 8 | 14.5 | North | ||
 bpm00067.jpg |
VOG | Vale of Glamorgan | Former Barry junction up home bracket signals. The top arm, right-hand bracket, survives (2006) | A4055 Harbour Road road overbridge, Barry | 0 | 07 | NW | ||
 bpm00068.jpg |
BRY | Cardiff (General) & Barry Pier | Rear view of 4-doll down homes bracket assembly. When Barry junction signal box was in use, the uppermost arm (down main to Vale of Glamorgan Branch) was slotted with Barry Cabin signal box and the slot weight and slot proving contact box is visible at eh lower part of the left-hand doll | East of Barry signal box | 8 | 03 | South | ||
 bpm00069.jpg |
BRY | Cardiff (General) & Barry Pier | Front view of 4-doll down homes bracket assembly showing slot weight and slot-proving contact box on right-hand doll since this arm was slotted with operation from Barry junction signal box | East of Barry signal box | 8 | 07 | North | ||
 bpm00070.jpg |
BRY | Cardiff (General) & Barry Pier | Lifted carriage shed tracks | Barry | 8 | 19 | SE | ||
 bpm00071.jpg |
BRY | Cardiff (General) & Barry Pier | Carriage siding double 3-foot arm signal assembly with reduced night aspects (i.e. partly-masked spectacles) | Former carriage shed sidings, Barry (A housing complex was established here in the year 2000) | 8 | 19 | SE | ||
 bpm00072.jpg |
BRY | Cardiff (General) & Barry Pier | New 2-doll bracket signal (Further modified after 1970 and left-side doll heightened and arm motorised). A new electric point motor with detection & facing-point lock is visible to the left of the signal base | Barry signal box up inner home signal (Barry Island curve) | 8 | 21 | South | ||
 bpm00073.jpg |
BJR | Bassaleg junction & Rhymney | View of Machen station from road overbridge, showing double junction branch to Caerphilly far left, which further split into two single routes to Gwernydomen to re-merge as double track before reaching Caerphilly | Machen | 4 | 78 | East | ||
 bpm00074.jpg |
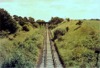
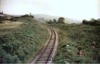
LTO | Waterhall jct & Common Branch jct | Single line branch from Waterhall junction to Common Branch junction (Serving Creigiau Quarry). The viaduct in the distance carried the double-tracked Penrhos branch. Just beyond the viaduct, at 4M-66C, the former Crofft-y-Guinea siding branched off the single line, towards the camera point, to the left as viewed, passed under the viaduct and terminated alongside the road to the left. It was used extensively during the second world war to serve as a rail supplies service point for the former Rhydlafar Hospital which was tied up with the American occupation in Britain | Road overbridge south of former Crofft-y-Guinea siding (later St.Fagans Road siding) | 4 | 78 | West | ||
 bpm00075.jpg |
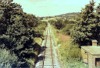
LTO | Waterhall jct & Common Branch jct | Single line branch viewed from road overbridge, looking towards Capel Llanilterne | Road overbridge south of former Crofft-y-Guinea siding (later St.Fagans Road siding) | 4 | 78 | East | ||
| bpm00076.jpg | Spare | ||||||||
 bpm00077.jpg |
CAM | Cardiff (Bute Road) & Merthyr | View of double junction. A housing estate now lies to the left of the down main (Second line from right) | Roath Branch junction | 3 | 65 | West | ||
 bpm00078.jpg |
LTR | Mwyndy junction & Tonteg junction | Double-throw catch points in single-line Brofiscin branch. Line to Tonteg junction (for Cwm Colliery) runs to left | Maesaraul junction, Cross Inn | 1 | 05 | West | 10-Apr-65 | 15.20 |
 bpm00079.jpg |
LTR | Mwyndy junction & Tonteg junction | 2-lever groundframe (Point & facing point lock). Exit from Brofiscin Branch | Maesaraul junction, Cross Inn | 1 | 3.75 | West | 10-Apr-65 | 15.21 |
| bpm00080.jpg | Spare | ||||||||
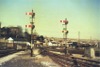
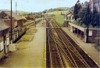
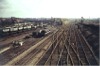
 bpm00081.jpg |
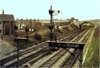
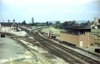
CAM | Cardiff (Bute Road) & Merthyr | View of Radyr junction from footbridge, showing bracket semaphore signal assemblies and permanent way S&C. All semaphore signalling was removed in 1998 and replaced by a new MAS installation in conjunction with the abolition of Llandaff Loop junction, Radyr, Taffs Well & Maesmawr signal boxes | Radyr station | 5 | 22.25 | West | 10-Apr-64 | 11.32 |
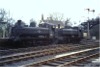 bpm00082.jpg |
CAM | Cardiff (Bute Road) & Merthyr | Pannier tank locomotives at Radyr station, awaiting signal to shed | Radyr station | 5 | 23 | South | 10-Apr-64 | 11.33 |
 bpm00083.jpg |
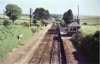
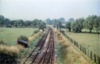
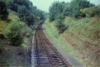
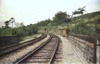
BYB | Worcester & Bromyard | Single line branch and fixed distant | Brockhampton Siding, Bromyard | 134 | 23 | East | 04-Sep-64 | 13.40 |
 bpm00084.jpg |
BYB | Worcester & Bromyard | Single line branch and Brockhampton siding | Bromyard East | 134 | 23 | West | 04-Sep-64 | 13.42 |
 bpm00085.jpg |
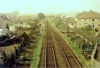
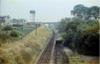
BYB | Worcester & Bromyard | Station from road overbridge | Bromyard | 135 | 8 | West | 04-Sep-64 | 13.37 |
 bpm00086.jpg |
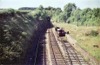
BYB | Worcester & Bromyard | Headshunt from road overbridge | Bromyard | 135 | 8.25 | East | 04-Sep-64 | 13.36 |
| bpm00087.jpg | Spare | ||||||||
 bpm00088.jpg |
CAR | Cardiff (Stonefield junction) & Rhymney | View of curve approaching Caerphilly tunnel from Wernddu. Down main starting signal for Wernddu signal box is seen. Cherry Orchard down motored semaphore distant signal is visible beyond | Road overbridge, south-east of former Wernddu signal box, Caerphilly | 7 | 34 | NW | ||
 bpm00089.jpg |
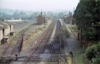
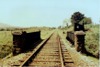
BAG | Birmingham & Gloucester | General view of signal box, part of station, and partly-dismantled branch to Upton-on-Severn. Branch, signal box and station subsequently removed but a new station sited at this point in the 1990s | Ashchurch junction | 79 | 49 | SE | 30-Aug-64 | 14.45 |
 bpm00090.jpg |
BAG | Cheltenham & Worcester | General view of layout showing lines to Malvern and Upton-on-Severn running to the left and the lines to Redditch running to the right. All subsequently demolished but a new station was constructed in the 1990s | Ashchurch junction | 79 | 49 | SW | 30-Aug-64 | 14.45 |
 bpm00091.jpg |
VOG | Vale of Glamorgan | West portal of 545-yard Porthkerry No.1 tunnel (from 0M-53C to 0M-77C). The aerial telegraph rig which used to pass overground through the Barry Garden Suburb area above the tunnel, had by this time been terminated at each end of the tunnel & routed via termination cabinets & multipair cable through the tunnel. The termination pole and cable cabinet are on the left of the lines | Porthkerry Park | 0 | 79 | SW | ||
 bpm00092.jpg |
VOG | Vale of Glamorgan | Original layout of west end of Barry Sidings with signal box when in full use | Barry Sidings | 0 | 49 | West | ||
 bpm00093.jpg |
VOG | Vale of Glamorgan | Layout of west end of Barry Sidings after abolition of signal box and with just up & down main with down freight loop remaining | Barry Sidings | 0 | 49 | West | ||
 bpm00094.jpg |
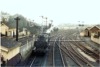
SIR | Nine Mile Point & Tredegar | View looking from Bedwas Rd overbridge towards Gelligroes junction when former LMS line was in full use between Nine Mile Point & Tredegar | Overbridge No.38, north west of former Wyllie colliery and south of Tredegar Jct Lower and Gelligroes Jct | 11 | 79.5 | South | ||
 bpm00095.jpg |
SIR | Nine Mile Point & Tredegar | Curve from Pontllanfraith High Level to Tredegar junction Lower (former LMS line) | North-east of Tredegar junction Lower (LMS line) | ~11 | 38 | NW | ||
 bpm00096.jpg |
VOG | Vale of Glamorgan | Porthkerry Bank viewed from road underbridge & looking towards Porthkerry viaduct | Porthkerry Park | 1 | 19.25 | East | ||
 bpm00097.jpg |
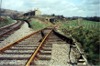
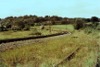
COB | Cardiff & Ogmore | Abandoned single line at Brynnau Gwynion road overbridge. The bridge was later remodelled in the form of a smaller, all red-bricked version some years after closure of this branch | Brynnau Gwynion | ~1 | 17.5 | West | ||
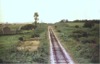 bpm00098.jpg |
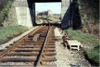
COB | Cardiff & Ogmore | Abandoned single line at Brynnau Gwynion road overbridge | Brynnau Gwynion | ~1 | 17.5 | East | ||
 bpm00099.jpg |
MER | Gelli Tarw junction & Merthyr | Abandoned single line at rail overbridge | East of Gelli Tarw junction | ~0 | 46.5 | East | ||
 bpm00100.jpg |
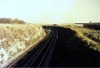
VON | Neath (General) & Pontypool Road | Double line at A465 Heads of Valleys road overbridge showing GWR wooden post semaphore signal | New Heads of Valleys A465 road overbridge, West of Gelli Tarw junction | 25 | 10 | West | ||
| 1-50 <- |
Photos 51-100 |
-> 101-150 | |||||||
|
Date Last Revised:December 05, 2009 |
|||||||||