|
Historical Railway Photograph Gallery 551-600 |
|||||||||
| 501-550 <- |
Photos 551-600 |
-> 601-650 | |||||||
| Photo | ELR | Branch | Subject | Location | M | C | Elev'n | Date | Time |
 bpm00551.jpg |
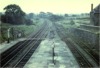
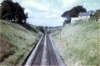
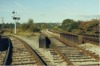
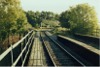
PTH | Penarth | Cutting approaching Penarth station after lifting of down line and showing tandem turnout, part of which has been removed. Central loop line remained for a while but was also removed when Penarth station was remodelled | Stanwell Rd road overbridge north of Penarth station | 1 | 04 | South | ||
 bpm00552.jpg |
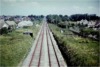
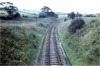
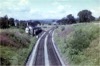
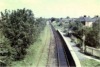
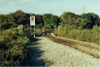
PTH | Penarth | View of line from Forrest Rd overbridge in vicinity of former Penarth power station, when up line had been taken out-of-use | Forrest Rd road overbridge north of former Lower Penarth Halt | ~1 | 77 | South | ||
 bpm00553.jpg |
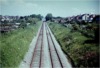
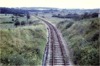
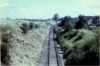
PTH | Penarth | View of line immediately south of former Lower Penarth Halt after up line had been taken out-of-use | Brockhill Rd road overbridge, south of former Lower Penarth Halt | ~2 | 9 | South | ||
 bpm00554.jpg |
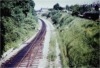
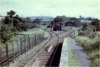
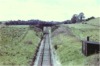
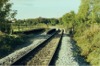
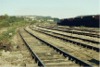
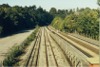
PTH | Penarth | View of abandoned track in cutting, looking east from Cog Road overbridge, east of Sully station. This cutting is now backfilled and a house stands immediately above the site shown, and beyond, a housing estate | Cog Road overbridge east of Sully station site | 4 | 58.5 | SW | 09-Jun-68 | 11.40 |
 bpm00555.jpg |
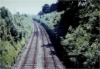
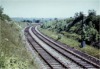
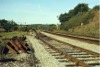
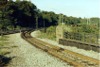
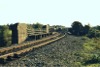
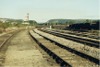
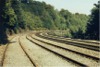
PTH | Penarth | Abandoned double line branch at curve out of Biglis junction and looking towards Cadoxton Moors | Just east of Biglis junction | 5 | 50 | West | 09-Jun-68 | 12.25 |
 bpm00556.jpg |
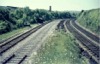
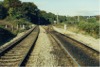
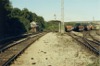
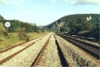
BRY PTH | Cardiff (General) & Barry Pier (and Penarth Branch) | View at intermediate point in diverging lines from Biglis junction, showing already truncated Penarth branch | Biglis junction |
~5 ~5 |
53 61.5 |
West | 09-Jun-68 | 12.22 |
 bpm00557.jpg |
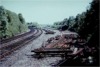
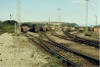
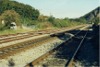
BRY PTH | Cardiff (General) & Barry Pier (and Penarth Branch) | View of Biglis junction during tracklifting of Penarth Branch | Biglis junction |
5 5 |
49.5 59 |
NE | 09-Jun-68 | 12.25 |
 bpm00558.jpg |
Spare | ||||||||
 bpm00559.jpg |
Spare | ||||||||
 bpm00560.jpg |
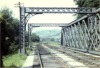
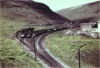
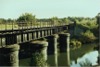
BAL | Bridgend & Abergwynfi | Arrangement of single line from Cymmer tunnel to siding fan at Cymmer Afan with line over steel viaduct leading to Glyncorrwg | North-west portal of Cymmer tunnel (Now sealed off with overhead road realignment) | 11 | 10 | South | 20-Jun-64 | 15.28 |
 bpm00561.jpg |
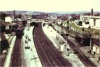
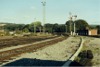
SWM | Severn Tunnel junction & Fishguard Harbour | General view of Bridgend station | Road overbridge at south-east end of station | 190 | 38 | SE | ||
 bpm00562.jpg |
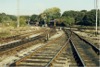
SWM | Severn Tunnel junction & Fishguard Harbour | Arrangement of junction at Peterston West junction showing South Wales Main lines & on right, line connecting Peterston with Drope junction on Cadoxton-Treforest line. Note the check-railed turnout in the foreground which contains what is known as a 'check lump' against the right-hand point blade | Peterston West junction (Since removed) |
176 06 |
67 55 |
West | ||
 bpm00563.jpg |
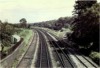
SWM | Severn Tunnel junction & Fishguard Harbour | View looking eastwards towards Cardiff, of east end of former Llantrisant station with Cowbridge Bay and run-around headshunt on right | A4222 road overbridge, at east end of former Llantrisant station | 181 | 34 | NW | ||
 bpm00564.jpg |
SWM | Severn Tunnel junction & Fishguard Harbour | View looking westwards towards Bridgend, of west end of former Llantrisant station with Cowbridge Bay and run-around lines on left | A4222 road overbridge, at east end of former Llantrisant station | 181 | 35 | SE | ||
 bpm00565.jpg |
ATW | Llantrisant Jct & Aberthaw Low Level | View of out of use single line, looking towards site of former Ystradowen station | Tychwith Road overbridge, Ystradowen | 3 | 15.25 | North | ||
 bpm00566.jpg |
ATW | Llantrisant Jct & Aberthaw Low Level | View of out of use single line, looking towards Llantrisant. The overbridge from where this view was taken, was removed in 2004 | Tychwith Road overbridge, Ystradowen | 3 | 15.25 | South | ||
 bpm00567.jpg |
Spare | ||||||||
 bpm00568.jpg |
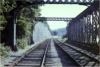
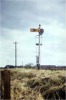
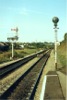
EBB | Exeter Basin | Non-standard distant signal assembly for advance indication that the trailing connection into the down main line was cleared for passage onto the Dawlish line, when in the "off" position | Near Low Level Loop junction | 0 | 22 | North | ||
 bpm00569.jpg |
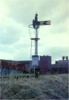
EBB | Exeter Basin | Rear view of non-standard distant signal with arm proving repeater contacts | Low Level Loop junction | 0 | 21 | SW | ||
 bpm00570.jpg |
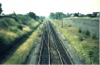
CAR | Cardiff (Stonefield Rd) & Rhymney | View looking south-east from road overbridge at Heath junction after removal of sidings and relief lines | Highbridge Rd overbridge at original Heath junction site | 3 | 16 | NW | ||
 bpm00571.jpg |
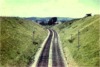
RAD | Radyr | View looking north-west from A4119 road overbridge north of Fairwater, west of Llandaff. The new (1987) Danescourt (City Line) station is now located just north-west of this overbridge | A4119 road overbridge, south of new Danescourt station | 3 | 09 | SW | ||
 bpm00572.jpg |
RAD | Radyr | View looking towards Ely Paper Mill from road overbridge in Fairwater | Fairwater, Cardiff | 2 | 52 | NW | ||
 bpm00573.jpg |
RAD | Radyr | Cutting and double line as viewed from road overbridge. This is now the site of Fairwater station on the City Line | Fairwater, Cardiff | 2 | 52 | SE | ||
 bpm00574.jpg |
RAD | Radyr | View of signal box & junction with single line Llantrisant (Waterhall) branch showing half compound point in down main (All now removed) | Road overbridge north of Fairwater station | 2 | 67 | SE | ||
 bpm00575.jpg |
RAD | Radyr | View of single line, looking towards Waterhall junction from Fairwater-Radyr/Cardiff road overbridge near Pentrebane. (Bridge now removed & line lifted in 1960's) | Fairwater | 3 | 13 | West | ||
 bpm00576.jpg |
LTO | Waterhall junction & Common Branch junction | View of single line, looking towards St, Fagans from road overbridge near Pentrebane. (Bridge now removed & cutting backfilled at road line) | Fairwater | 3 | 13 | East | ||
 bpm00577.jpg |
CRY | Coryton | View of halt and run-around loop (the latter unused after the introduction of DMU passenger trains) | Coryton halt (end of line) | 2 | 58 | West | ||
 bpm00578.jpg |
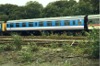
RAD | Radyr | Network Southeast coach awaiting conversion | Radyr Yard | East | 07-Oct-89 | 15.29 | ||
 bpm00579.jpg |
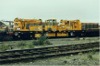
RAD | Radyr | Self-propelled track relaying unit (track panel handling cranes) | Radyr Yard | East | 07-Oct-89 | 15.27 | ||
 bpm00580.jpg |
CAM | Cardiff (Bute Road) & Merthyr | View of up & down main line as seen from Llandaff North station footbridge. The junction for the up through siding and the second turnout to the loop-line to Radyr Quarry & Radyr branch, lies opposite the signal box. All of the last-mentioned items are now removed | Llandaff station | 4 | 27 | SE | 08-Oct-89 | 09.30 |
 bpm00581.jpg |
CAM | Cardiff (Bute Road) & Merthyr | Trailing crossover and lead to Llandaff loop single line with up main inner home bracket signal for valleys route | Llandaff station | 4 | 34 | SE | 08-Oct-89 | 09.35 |
 bpm00582.jpg |
CAM | Cardiff (Bute Road) & Merthyr | Lead to through siding and branch to Llandaff loop single line (All now removed | Llandaff Loop junction | 4 | 39 | SE | 08-Oct-89 | 09.39 |
 bpm00583.jpg |
CAM LDA |
Cardiff (Bute Road) & Merthyr / Llandaff Loop | View of diverging lines at former Glamorganshire Canal rail overbridges northwest of Llandaff Loop junction | Radyr side of Llandaff Loop junction | 4 | 42 | SE | 08-Oct-89 | 09.41 |
 bpm00584.jpg |
LDA | Llandaff Loop | View of singled branch at rail overbridge between Llandaff Loop junction & River Taff viaduct (All now removed) | Llandaff Loop | 4 | 48.5 | East | 08-Oct-89 | 09.44 |
 bpm00585.jpg |
LDA | Llandaff Loop | View from rail overbridge approaching Llandaff Loop junction. This was a double-line loop previously but the entire branch was removed upon the abolition of Radyr Quarry signal box & yard & implementation of the new signalling scheme in 1999 | Rail overbridge between Llandaff Loop Viaduct & Llandaff Loop junction | 4 | 50 | West | 08-Oct-89 | 09.45 |
 bpm00586.jpg |
LDA | Llandaff Loop | Singled branch approaching former two-line river Taff viaduct. All taken out-of-use & track lifted after 1999 | East end of Llandaff Loop Viaduct | 4 | 60 | East | 08-Oct-89 | 09.50 |
 bpm00587.jpg |
LDA RAD |
Llandaff Loop Radyr | View of single to double line junction in Llandaff Loop line near Radyr Quarry junction City Line (Radyr Branch) converging from left) Branch was lifted after 1999 | West end of Llandaff Loop Viaduct | 4 | 64.25 | East | 08-Oct-89 | 09.52 |
 bpm00588.jpg |
RAD | Radyr | Double line approaching Radyr Quarry junction from Fairwater, showing trailing points in down main, leading from former Radyr Yard complex. (Single Llandaff Loop line converging from right) | East of Radyr Quarry junction | 3 | 65 | East | 08-Oct-89 | 09.54 |
 bpm00589.jpg |
LDA | Llandaff Loop | Llandaff Loop Viaduct after singling of loop line, showing support pillars for former second line section of viaduct, in River Taff [Viaduct still standing (2004) but line and earthworks now removed] | West end of Llandaff Loop Viaduct viewed from Radyr Branch (City Line) |
4 3 |
65 70 |
SW | 08-Oct-89 | 09.55 |
 bpm00590.jpg |
LDA | Llandaff Loop | Llandaff Loop Viaduct after singling of loop line. [Viaduct still standing (2004) but line & earthworks now removed] | West end of Llandaff Loop Viaduct viewed from Radyr Branch (City Line) | 3 | 67 | West | 08-Oct-89 | 09.56 |
 bpm00591.jpg |
RAD | Radyr | View of Radyr Quarry junction signal box and south-west side of Radyr Yard. The lines, immediately to the left are now used by City Line passenger trains as well as for occasional freight | South-east of Radyr Quarry junction signal box | 3 | 79.5 | SE | 08-Oct-89 | 10.04 |
 bpm00592.jpg |
RAD | Radyr | View of Radyr Yard when in full use | South-east of Radyr Quarry junction signal box | 3 | 79.5 | SE | 08-Oct-89 | 10.04 |
 bpm00593.jpg |
RAD | Radyr | View of up relief and up & down main lines passing west side of Radyr Yard | Radyr Yard | 4 | 20 | South | 08-Oct-89 | 10.06 |
 bpm00594.jpg |
RAD | Radyr | View of up relief and up & down main lines passing west side of Radyr Yard. A straight-post semaphore reading both ways is visible in the background (Radyr Quarry up starting/down home with Radyr junction up permanent caution arm) | Radyr Yard | 4 | 25 | SE | 08-Oct-89 | 10.08 |
 bpm00595.jpg |
RAD | Radyr | Radyr branch lines curving into Radyr junction and station with Radyr Yard lines also coming in & out at right | Near Radyr junction | 4 | South | 08-Oct-89 | 10.13 | |
 bpm00596.jpg |
RAD | Radyr | Permanent way layout approaching Radyr junction. Note the scissors crossover laid on the curve and also the mandatory facing-point locked turnout in the up passenger line. This layout was simplified by year-end 1999 when Radyr Yard was closed and only the Cardiff-Pontypridd and Radyr branch lines were left in use | Radyr junction. | 4 | 36 | South | 08-Oct-89 | 10.14 |
 bpm00597.jpg |
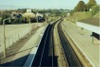
CAM | Cardiff (Bute Rd) & Merthyr | Up & down main and relief lines at Radyr station. This layout was modified by year-end 1999 and the third line from the right was realigned with a platform extension. The former relief lines north of this point were also completely removed | Radyr station | 5 | 31 | SE | 08-Oct-89 | 10.20 |
 bpm00598.jpg |
CAM | Cardiff (Bute Rd) & Merthyr | Up & down relief lines north-west of Radyr station. Out of the relief lines (left) only the down line was usable but due to the low density of freight traffic by 1992, this was rarely used. The up relief line was severed at Taffs Well and a stop sleeper installed at 5M-50C and the red light delineating the 'stopped' line can be seen on the left relief line. By 2000, both relief lines were lifted | North-west of Radyr station | 5 | 48 | SE | 08-Oct-89 | 10.24 |
 bpm00599.jpg |
CAM | Cardiff (Bute Rd) & Merthyr | Up & down main & relief lines south of former Pentyrch Crossing south-east of Taffs Well. Relief lines (left) were removed completely by 2000 | South of former Pentyrch crossing | 6 | 15 | SE | 08-Oct-89 | 10.35 |
 bpm00600.jpg |
CAM | Cardiff (Bute Rd) & Merthyr | Up & down main and relief lines at former alignment of former Taffs Well Siding extension to Pentyrch Railway, crossed these lines on its path to Melyn Griffith Tin Works, Whitchurch. Pentyrch Crossing signal box stood near here up to the early ’sixties. The trackbed beyond the tracks and foot-crossing, is seen as a lane at the left of this photo’ | Pentyrch Crossing | 6 | 31 | SE | 08-Oct-89 | 10.40 |
| 501-550 <- |
Photos 551-600 |
-> 601-650 | |||||||
|
Date Last Revised:November 30, 2009 |
|||||||||