|
Historical Railway Photograph Gallery 851-900 |
|||||||||
|
Photos 851-900 |
|||||||||
| Photo | ELR | Branch | Subject | Location | M | C | Elev'n | Date | Time |
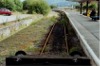 bpm00851.jpg |
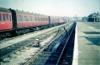
CAM | Cardiff (Bute Road) & Merthyr | Truncated second line into Merthyr station, the track having been severed towards the south end of the platform | Merthyr station | 24 | 51 | North | 25-Jun-92 | 17.12 |
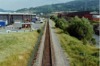
 bpm00852.jpg |
CAM | Cardiff (Bute Road) & Merthyr | View of remaining single passenger line to Merthyr viewed from Brandy Bridge. This was the junction point for Merthyr Goods line to Plymouth Street & a small spur to Willows Wireworks ran to the left, via a river bridge | South East of former Brandy Bridge junction | 23 | 56 | SE | 25-Jun-92 | 17.23 |
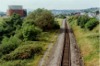
 bpm00853.jpg |
CAM | Cardiff (Bute Road) & Merthyr | View looking south-east from Brandy Bridge, showing single line & clean ballast. The former up line had been lifted some years before date of taking this photo� | South East of former Brandy Bridge junction (Hoover factory) | 23 | 56 | North | 25-Jun-92 | 17.24 |
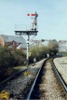
 bpm00854.jpg |
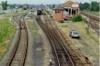
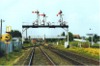
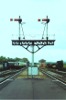
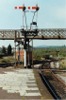
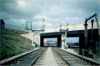
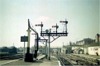
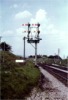
OWW | Severn Valley | General view of 'Railtrack' and Severn Valley Railway permanent way including a full compound crossover and purpose-built semaphore signal gantry | Kidderminster junction, Severn Valley Railway side | 135 | 21.5 | North | 27-Jun-92 | 15.17 |
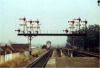
 bpm00855.jpg |
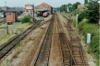
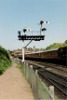
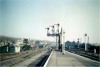
SVB | Severn Valley | General view of signal box, semaphore signalling, permanent way and point rodding | Footbridge south of Kidderminster station | 135 | 22 | South | 27-Jun-92 | 15.18 |
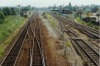
 bpm00856.jpg |
SVB | Severn Valley | General view of up & down main lines south of Kidderminster (BR) station with part of Severn Valley Railway's land on the left, Note the double lower quadrant disc assembly with overlapping disc faces on the left | Footbridge south of Kidderminster station | 135 | 22 | South | 27-Jun-92 | 15.21 |
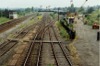
 bpm00857.jpg |
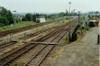
SVB | Severn Valley | Track layout at Severn Valley Railway, Kidderminster junction area | Kidderminster junction | 135 | 21.5 | NW | 27-Jun-92 | 15.30 |
 bpm00858.jpg |
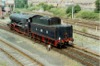
SVB | Severn Valley | 2-10-0 Locomotive, "Gordon" at Kidderminster junction | Kidderminster junction | 135 | SW | 27-Jun-92 | 16.38 | |
 bpm00859.jpg |
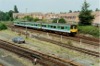
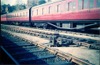
SVB | Severn Valley | 3-Car Diesel multiple set passing Kidderminster junction | Kidderminster junction | 135 | SW | 27-Jun-92 | 15.38 | |
 bpm00860.jpg |
SVB | Severn Valley | 2-10-0 Locomotive, "Gordon" leaving Kidderminster with a passenger train | Kidderminster junction | 135 | NW | 27-Jun-92 | 15.38 | |
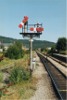
 bpm00861.jpg |
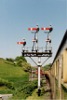
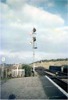
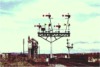
SVB | Severn Valley | 3-doll semaphore gantry with elevated discs | Severn Valley Railway opposite Kidderminster junction signal box | 135 | 24 | South | 27-Jun-92 | 15:55 |
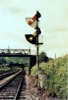
 bpm00862.jpg |
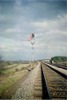
SVB | Severn Valley | Severn Valley Railway BRWR route indicating semaphore signal assembly with ground disc. Route indicator is exhibiting an 'M' which gives 'proceed' instruction onto SVR 'main' | Kidderminster (Severn Valley Railway) | North | 19-Sep-92 | ~10:30 | ||
 bpm00863.jpg |
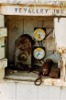
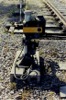
SWM | Wye Valley junction/ Gloucester-Severn Tunnel junction | General arrangement of 5-lever groundframe for control of traffic into Wye Valley branch & Tidenham Quarry | Wye Valley junction | 140 | 52 | NE | 13-Jun-92 | 11:31 |
 bpm00864.jpg |
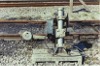
SWM | Gloucester & Severn Tunnel junction | Arrangement of points repeaters, telephone and co-operative keyswitch at Wye Valley junction groundframe | Wye Valley junction | 140 | 52 | East | 13-Jun-92 | 11:32 |
 bpm00865.jpg |
SVB | Severn Valley | Rear view of 2-doll bracket signal assembly | Bridgnorth station, south end | 149 | 68 | South | ||
 bpm00866.jpg |
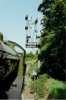
SVB | Severn Valley | 3-doll semaphore bracket assembly with "Call on" arms | Rail overbridge south of Bridgnorth station | 149 | 64 | South | ||
 bpm00867.jpg |
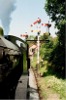
SVB | Severn Valley | 2-doll semaphore bracket signal with elevated disc & "Call-on" arm. One arm of GW pattern 3ft ringed type in "Proceed" mode. (Applies to 2 separate lines) | Bridgnorth station, south end | 149 | 68 | North | ||
 bpm00868.jpg |
SVB | Severn Valley | As frame bpm00867 but with elevated disc reading "Proceed to dead end siding) | Bridgnorth station, south end | 149 | 68 | North | ||
 bpm00869.jpg |
SVB | Severn Valley | 3-doll wooden GW semaphore bracket assembly with one worked (motored) & one fixed distant arm & lower attachment of ground disc | Bewdley South signal box (Frame taken from passenger train) | SE | ||||
 bpm00870.jpg |
SVB | Severn Valley | Rear view of 2-doll bracket signal with fixed and worked (motored) distant arms & with "Call-on" subsidiary arms | North of Bewdley North signal box (near former Wyre Forest junction) | |||||
 bpm00871.jpg |
MHD | Minehead | Double-doll semaphore bracket assembly with 4ft standard arms (one marked BAY). Both used as platform starting signals | Minehead station, West Somerset Railway | NW | ||||
 bpm00872.jpg |
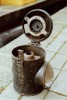
SAW | Museum inventory | Detail of Tyer & Co. Ltd patent signal lamp expander fitted in BRWR standard oil burning unit (paraffin) signal lamp. The lamp burner unit is within the main circular lamp housing and the burner wick circular exhaust aperture is clearly visible | Coleford GWR Railway Museum, Gloucestershire | 19-Sep-92 | 15:45 | |||
 bpm00873.jpg |
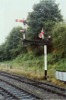
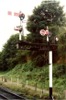
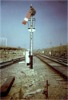
BAL | Bridgend & Abergwynfi | 2-doll semaphore, inner home bracket asssembly with route indicator and elevated disc | Tondu junction | 2 | 67 | SE | ||
 bpm00874.jpg |
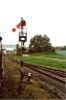
VOG | Vale of Glamorgan | "Caution" disc assembly in BR colours, rare on the Western Region. The unit is worked from a local groundframe. Note the cable for the illuminant which had been converted from oil wick to tungsten filament bulb. | Aberthaw Cement works inlet | 5 | 38 | North | 28-Apr-90 | 10:31 |
 bpm00875.jpg |
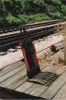
VOG | Vale of Glamorgan | Side view of a caution ground disc (frame bpm00874) showing repeater contact housing and attachment to lever weight | Aberthaw Cement works inlet | 5 | 38 | 28-Apr-90 | 10:31 | |
 bpm00876.jpg |
BRY | Cardiff (General) & Barry Pier | Up inner home semaphore bracket signal with "Warning" arm & track-circuit indicator. (Rail lubricators also visible in associated track). The assembly was later fitted with a signal identification plate | Between Barry & Barry Island stations | 8 | 32 | |||
 bpm00877.jpg |
OWW | Droitwich & Wolverhampton | Arrangement of permanent way at Kidderminster junction, British Rail tracks on left, Severn Valley Railway lines on right | BR Kidderminster junction, (Now Network Rail, formerly Western Region territory) | 135 | 21.5 | NE | 27-Jun-92 | 15.17 |
 bpm00878.jpg |
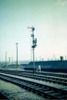
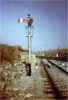
CAR | Cardiff (Stonefield junction) & Rhymney | General arrangement of motorised splitting distant bracket assembly (Down main to Caerphilly & down main to Penrhos junction (Walnut Tree branch). Assembly was down, splitting distant assembly for Aber junction | Energlyn (Adjacent to former Llanbradach Viaduct, west side) | 10 | 11.5 | NW | 11-Jul-64 | 18.43 |
 bpm00879.jpg |
CAM | Cardiff (Bute Road) & Merthyr | Arrangement of 2-doll bracket assembly with centre pivot truncated arms & track-circuit indicator. The right-hand arm authorised movements to the now lifted Nantgarw branch & initially when the City Line was opened, a few chains of the branch weres used for reversal of passenger trains terminating at Taffs Well | Taffs Well station up starting signals | 7 | 28 | South | 18-Aug-91 | 09.37 |
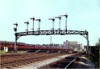 bpm00880.jpg |
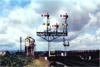
CAM | Cardiff (Bute Road) & Merthyr | Arrangement of relief exit and main 7-doll semaphore signal gantry with GWR wooden arms including ringed goods line arms and route indicator. Diamond sign track circuit indicator fitted to extreme right hand doll (for down main) | Between Queen Street North & Cathays | NW | 16-May-64 | 16.22 | ||
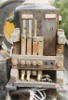 bpm00881.jpg |
CAM | Cardiff (Bute Road) & Merthyr | Detail of signal arm proving contact assemblies in standard Western Region V38 casting housing. The contacts are in the 'arm off' state, the left- hand pair being 'open circuit' and the right-hand pair 'closed circuit'. Note the 3 wires and common link at the terminal connections, and the spare facility for a possible third pair of contacts which would be used for the ATC system | Down distant signal, Walnut Tree junction | 8 | 38 | SE | 21-Jul-91 | 10.04 |
 bpm00882.jpg |
CAM | Cardiff (Bute Road) & Merthyr | General arrangement of Walnut Tree junction up advanced starter with Taffs Well Siding signal box up distant (main line), both fitted with sighting enhancement quadrant plates and post fitted with diamond sign for track circuit indication to drivers(i.e. Rule 55 exempted) The slot repeater contact housing (black) is just visible above the Loc. cabinets | Taffs Well | 7 | 57.5 | SE | 21-Jun-64 | 15.25 |
 bpm00883.jpg |
MLN | Bristol Temple Meads & Bridgwater | Arrangement of 8-doll semaphore signal gantry with standard 4ft stop, 3ft stop & 4ft fixed distant arms with "Warning" arms for all main running lines. | Bedminster station | 119 | 18 | South | 18-Aug-66 | 12.50 |
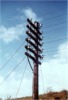 bpm00884.jpg |
PTH | Penarth | Arrangement of termination pole comprising lines for 'bus telephone system, lamp & signal arm proving & track circuits (including illuminated signal box diagram). Part of telegraph system includes an automatic semaphore arm replacer circuit | Biglis junction | ~5 | 45 | NW | Jan-66 | |
 bpm00885.jpg |
BRY | Cardiff (General) & Barry Pier | Arrangement of lever-frame, absolute block instruments, signal-lever electric lock pushbuttons and other shelf instruments | Barry Island East signal box | 8 | 75 | West | 09-Mar-64 | 13.24 |
 bpm00886.jpg |
VOG | Vale of Glamorgan | Poor quality view looking towards Barry junction from Barry Sidings with semaphore bracket signals (From a 620 colour negative) | South side of Ship Hill bridge | 0 | 09 | South | ||
 bpm00887.jpg |
PTH | Penarth | Poor quality view looking towards Lavernock near home signal (with track-circuit indicator) (From a 620 colour negative) | South of St.Mary's Well Rd rail overbridge | ~3 | 00 | South | ||
 bpm00888.jpg |
BRY | Cardiff (General) & Barry Pier | Run-round crossover from Bay platform (No.1) with GWR square-bottomed ground disc & integral mechanical detection. (Note the fouling bar just visible in the point rail). This is a reproduction from a 620 colour negative | No.1 (Bay) platform, Barry station | 8 | 16 | South | ||
 bpm00889.jpg |
BRY | Cardiff (General) & Barry Pier | Route-indicating home signal with "call-on" arm for movements from low level lines to Barry area sidings & up main line. (A reproduction from a 620 colour negative) | Immediately east of Barry station No.4 platform | 8 | 12 | SW | ||
 bpm00890.jpg |
PTH | Penarth | Poor quality view of starting signal with worked distant, in the proceed mode.(from a colour negative) | North end of Lavernock station | 2 | 74.5 | South | ||
 bpm00891.jpg |
BRY | Cardiff (General) & Barry Pier | Poor quality view looking north from Barry station showing water crane and 3-doll semaphore bracket & straight-post signal with backing arm | Barry Station | 8 | 07 | South | ||
 bpm00892.jpg |
BRY | Cardiff (General) & Barry Pier | View of square-bottomed GWR ground disc as seen from now extinct bay platform and station sidings | End of run-round crossover from Bay line at Barry station | 8 | 12 | East | ||
 bpm00893.jpg |
BRY | Cardiff (General) & Barry Pier | Poor quality shot of semaphore bracket signal assemblies & view of junction of Barry Island & Vale of Glamorgan lines | South end of Barry station | 8 | 15 | North | ||
 bpm00894.jpg |
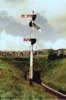
VON | Neath (General) & Pontypool Road | Double doll bracket signal assembly with motored distant & permanent caution arm. (All arms repeated at signal boxes). The entire cutting is now filled in from the bridge eastwards to Bryn tunnel which is also sealed off. | Maesycymmer junction | 10 | 05 | East | ||
 bpm00895.jpg |
WNT | Walnut Tree junction & Aber junction | 2-doll bracket signal assembly with working distant arms with slot weights clearly visible. This site is now completely buried and a housing estate is located above it | Penrhos junction | 9 | 37 | West | ||
 bpm00896.jpg |
Spare | ||||||||
 bpm00897.jpg |
Spare | ||||||||
 bpm00898.jpg |
VOG | Vale of Glamorgan | Standard 4ft advanced starting signal on 15ft post, showing track circuit and telephone indicator | West end reception inlet/outlet alongside down main (right) at Aberthaw | 5 | 25.5 | South | ||
 bpm00899.jpg |
VOG | Vale of Glamorgan | Standard 3ft subsidiary signal assembly on 15ft post | West end reception inlet/outlet at Aberthaw | 5 | 25.5 | South | ||
 bpm00900.jpg |
BAL | Llynfi (Bridgend West junction & Cymmer Afan) | GWR wooden post assembly with wooden, two-way stop arms and "Shunt Ahead" arm | Caerau station (Llynfi valley) | 10 | 14.5 | South | 20-Jun-64 | 15.11 |
|
Photos 851-900 |
|||||||||
|
Date Last Revised:November 30, 2009 |
|||||||||