|
Historical Railway Photograph Gallery 1001-1050 |
|||||||||
|
Photos 1001-1050 |
|||||||||
| Photo | ELR | Branch | Subject | Location | M | C | Elev'n | Date | Time |
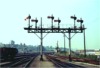
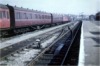
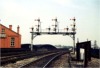 bpm01001.jpg |
WSJ SYC |
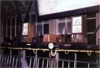
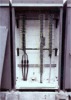
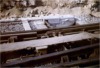
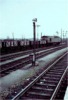
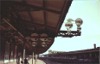
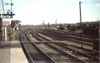
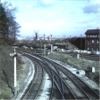
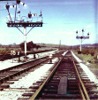
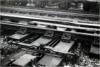
Didcot & Chester Crewe & Shrewsbury | Arrangement of 6-doll gantry signal assembly with "call-on" arms and route indicators. | Crewe junction, Shrewsbury station |
171 32 |
54 29 |
South | 13-Aug-65 | 12.30 |
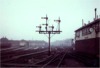
 bpm01002.jpg |
BFC | Bristol Temple Meads & Westbury | 2-doll banner repeating bracket assembly. Note the white contrast area on the overbridge in advance of the signals, for sighting enhancement. This assembly was 262 yards to the rear of the home signals which it repeated. (This photo’ was taken from a train, at speed) | 1140 yards east of Bathampton junction signal box | 103 | 74 | West | 11-Aug-65 | 19.00 |
 bpm01003.jpg |
Spare | ||||||||
 bpm01004.jpg |
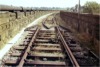
CTD | Cadoxton South junction & Trehafod junction | Trackbed and then still existing semaphore signal at inter-field access overbridge north of Cadoxton North yard. The cutting was later backfilled leaving the top sidewalls still exposed | North-east of Coldbrook, (Cadoxton north yard) | 0 | 61 | South | 30-Oct-66 | 11.20 |
 bpm01005.jpg |
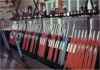
MLN | Bristol Temple Meads & Bridgwater | 3-doll goods line bracket semaphore assembly | Bristol West Depôt signal box | 128 | 69 | South | 18-Aug-65 | 11.52 |
 bpm01006.jpg |
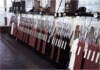
MLN | Bristol Temple Meads & Bridgwater | 6-doll ringed arm (Goods lines) gantry assembly with one GW 3ft arm replaced with 3ft BRWR arm | Bristol West Depôt |
128 0 |
65 03 |
North | 18-Aug-65 | 11.35 |
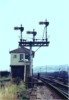
 bpm01007.jpg |
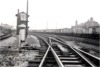
MLN | Swindon & Severn Tunnel junction | 4-doll bracket signal assembly. 4ft & 3ft standard enamelled arms fitted. Note motored distant and no weights on assembly due to close proximity of signal box. Also note catwalk extension used as smoke deflectors and use of minimal under-bracing | Swindon Station West signal box | 77 | 32 | East | 15-Feb-64 | 15.10 |
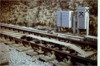
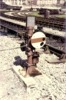
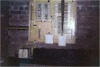 bpm01008.jpg |
BRY | Cardiff (General) & Barry Pier | Terminal & fuse switchboard with batteries & lead out, for signal & point repeaters, relays & telephone circuits | Cadoxton Low Level junction signal box | 6 | 28 | ~01-Jan-63 | ||
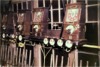 bpm01009.jpg |
BRY | Cardiff (General) & Barry Pier | Permissive block instruments & bells with semaphore arm repeaters for Nos 1 & 2 dock lines between Graving Dock junction & Cadoxton Low Level junction | Cadoxton Low Level junction signal box | 6 | 28 | |||
 bpm01010.jpg |
BRY | Cardiff (General) & Barry Pier | Up & down main absolute block apparatus and bells. The 'box switching out facility is situated between the two block bells | Cadoxton Low Level junction signal box | 6 | 28 | |||
 bpm01011.jpg |
BRY | Cardiff (General) & Barry Pier | Interior view showing signal lever frame and instrument shelf (Note the chevroned, down line, black & white detonator placer lever). The up line detonator placer lever is partly visible towards the far end of the lever frame | Cogan junction signal box | 2 | 33 | |||
 bpm01012.jpg |
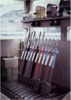
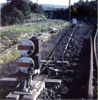
BRY | Cardiff (General) & Barry Pier | Interior of feeder box showing trickle charging apparatus, fuses, ballast & terminals. Installed in conjunction with bringing into operation new Barry Island groundframes "A" & "B" | Barry Island East | 8 | 75 | South | 02-May-64 | 11.30 |
 bpm01013.jpg |
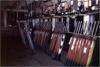
BRY | Cardiff (General) & Barry Pier | Interior view of new Barry Island groundframe "A" showing token release apparatus, telephone, electric lock plungers, interlocking levers, signal levers, point levers & facing point lock lever | Barry Island groundframe "A" | 8 | 74 | North | 02-May-64 | 11.38 |
 bpm01014.jpg |
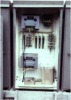
BRY | Cardiff (General) & Barry Pier | Interior of feeder panel installed for alterations to layout at Barry Island and in conjunction with groundframe locking & instrumentation. Cabinet size is 59"×31"×15˝" (site checked) | Barry Island groundframe | 8 | 75 | South | 02-May-64 | 11.31 |
 bpm01015.jpg |
BRY | Cardiff (General) & Barry Pier | Interior view of lever frame and shelf instruments at Barry Island East signal box | Barry Island East signal box | 8 | 74 | West | ||
 bpm01016.jpg |
BRY | Cardiff (General) & Barry Pier | General view of lever frame, block instruments etc. at Cadoxton Low level junction signal box (after repainting). This signal box controlled many siding turnouts but not passenger traffic points so the absence of blue facing point lock levers will be noted. Most main line running signals were slotted with Cadoxton South signal box lever movements | Cadoxton Low Level junction signal box | 6 | 28 | |||
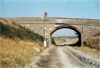
 bpm01017.jpg |
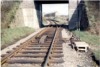
SAW | Speech House Road & Berkeley Road Including Coleford Branch (Severn & Wye Joint Line) | Single line with derailment containment guard rails on stone viaduct approach to former Severn Railway bridge. Note the gas pipeline attached to the viaduct wall capstones. Note also part of the fouling bar in conjunction with the facing/trailing points to the rear of the camera point. The entire viaduct was demolished in June 1964 after severence in 1960 of some of the steel spans of the bridge (seen beyond) due to a petrol lighter collision in fog, the ensuing explosion and fire, causing collapse of two bridge spans, taking a gas main with it | (River) Severn Railway bridge, arched-viaduct approach, west side, near Gatcombe, Glos. | 5 | 34 | West | 28-Sep-63 | |
 bpm01018.jpg |
BRY | Cardiff (General) & Barry Pier | View of swing-nose crossing (elbows) in down main with trailing connection into up main, shown severed due to rationalisation of operations and closure of Nos.3&4 platforms at Cadoxton station. The clip and red padlock can be seen near the junction of the switch blades | Cadoxton South signal box | 6 | 04 | SE | ||
 bpm01019.jpg |
BRY | Cardiff (General) & Barry Pier | Partial view of two-throw catch points showing ground disc & mechanical detection & also, insulated spacers in operation rodding & stretchers | Barry Island East signal box | 8 | 75 | SE | ||
 bpm01020.jpg |
BRY | Cardiff (General) & Barry Pier | Double traps in single turnout, (track-circuited). Insulated stretchers are just perceptable | Barry Island No.4 Platform | 8 | 73 | West | 17-Apr-64 | 15.15 |
 bpm01021.jpg |
WNT | Walnut Tree junction & Aber junction | Close-up of facing-point lock and single-blade mechanical detection in a track-circuited section of permanent way. Note the three blades in the dectector, one from each switch blade and one from the facing-point lock | Penrhos junction, north | East | ||||
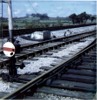
 bpm01022.jpg |
VOG | Vale of Glamorgan | Then, newly-installed motor-driven facing points | Aberthaw West, near Aberthaw Cement Works connection | 5 | 27 | East | ||
 bpm01023.jpg |
VOG | Vale of Glamorgan | Sprung trailing points, free-driven by traffic wheel flanges in trailing direction. Note insulated stretcher bars due to track-circuiting of rails | Aberthaw West, near Aberthaw Cement Works connection | 5 | 27 | East | ||
 bpm01024.jpg |
VOG | Vale of Glamorgan | Motor-driven facing points with central facing-point lock | Aberthaw West, near Aberthaw Cement Works connection | 5 | 27 | South | ||
 bpm01025.jpg |
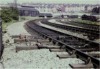
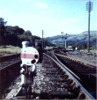
BRY | Cardiff (General) & Barry Pier | Motor-driven facing turnout on curve, showing facing-point lock and operating rodding. Note the existance of Barry carriage shed in background where a heritage DMU is standing and also note the steam locos awaiting scrapping at the locoshed sidings on the right. The severe curves here are fitted with check rails over the entire length. A housing estate now occupies the carriage shed area | South-west of Barry station at end of causeway section of line to Barry Island | 8 | 30 | SE | 17-May-64 | 10.21 |
 bpm01026.jpg |
BRY | Cardiff (General) & Barry Pier | BRWR triple-disc assembly for backing movements in "wrong" direction. This unit replaced the former route-indicating backing semaphore which stood at the north end of platform 3 | Cadoxton station | 6 | 8.5 | South | 17-May-64 | 12.51 |
 bpm01027.jpg |
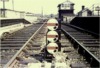
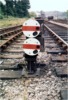
BRY | Cardiff (General) & Barry Pier | The then newly-installed BRWR 11˝" diameter ground disc assembly fitted with proving contacts for electrically repeating the aspect of the disc at the signal box shelf repeater indicator | Causeway section of line between Barry & Barry Island, west end | 8 | 31 | South | 17-May-64 | 10.19 |
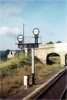
 bpm01028.jpg |
SWM | Didcot & Reading | 11˝" diameter elevated disc assembly | Didcot station | 53 | 10 | SW | 18-Apr-64 | 11.35 |
 bpm01029.jpg |
BRY | Cardiff (General) & Barry Pier | Double-disc assembly with integral mechanical detection | Down relief line, Llandough sidings | 2 | 17 | North | ||
 bpm01030.jpg |
MLN | Bristol Temple Meads & Bath | 11˝" ground disc assembly which was operated by two separate signal boxes so that a slot was fitted and hence the inclusion of two separate electrical proving contacts in housings to the right of the pedestal. The cabling to the signal box repeaters is routed through the flexible conduit seen leaving the contact boxes and running into the ground. Note the track-circuit bonds in the bull head rail at the bottom left of photo’ | Bristol, Eastern Depôt, River Avon Main Down viaduct (141 yards) | 117 | 28 | South | 29-Aug-65 | 14.14 |
 bpm01031.jpg |
SWM | Gloucester & Severn Tunnel junction | 22" & 11˝" elevated disc assembly with track-circuit indicators (white diamonds). One of the large discs is preserved and on display at the Dean Forest Railway, Norchard Museum, Lydney, Gloucestershire (2008) | Gloucester Central station | 114 | 09 | NW | ||
 bpm01032.jpg |
CTD | Cadoxton South junction & Trehafod junction | BRWR double-disc assembly with separate detection and cubical lamp units | Catch-pointed outlet from down sidings at Tonteg junction | 12 | 15 | North | 1959 | |
 bpm01033.jpg |
CTD | Cadoxton South junction & Trehafod junction | BRWR single-disc assembly controlling crossover from down to up main and through which, traffic passed form the single line Llantrisant branch travelling towards Treforest junction | Tonteg junction | 12 5 | 30 26 | South | 1959 | |
 bpm01034.jpg |
VOG | Vale of Glamorgan | GWR 16" diameter ground disc on split pedestal with integral mechanical detection. The oil flame can be seen as lunar white as this disc did not carry a red STOP aspect | Crossover from down to up main, adjacent to Rhoose cement works siding connection | 3 | 21 | SW | ||
 bpm01035.jpg |
CAM | Cardiff (Bute Road) & Merthyr | Layout of main and relief lines with crossovers, 3-way turnouts and a tandem turnout just visible (right) | Radyr junction | 5 | 27 | NW | 10-Apr-65 | 16.34 |
 bpm01036.jpg |
Spare | ||||||||
 bpm01037.jpg |
Spare | ||||||||
 bpm01038.jpg |
BRY | Cardiff (General) & Barry Pier | GWR square-bottomed ground disc with integral mechanical detection (This area is now a car park) | Run-around crossover from No.1 platform, Barry station | 8 | 15 | East | ||
 bpm01039.jpg |
BRY | Cardiff (General) & Barry Pier | Run-round crossover from Bay platform (No.1) with GWR square-bottomed ground disc & integral mechanical detection. (Note the fouling bar just visible in the point rail). This area is now a car park | Run-around crossover from No.1 platform, Barry station | 8 | 16 | South | ||
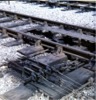 bpm01040.jpg |
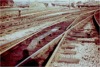
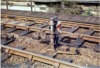
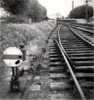
CTD | Cadoxton South junction & Trehafod junction | View of triple-pull mechanical detection at facing points. Line was track-circuited here and insulated rodding joints can be seen | Tynycaeau junction | 5 0 | 52 00 | South | 1960 | |
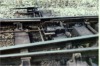
 bpm01041.jpg |
PRS | Penrhos | View of facing crossover with two-part fouling bar & showing ground disc for reversing movements | Tynycaeau junction | 5 | 54 | East | 1960 | |
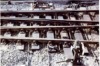
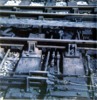 bpm01042.jpg |
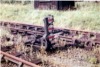
CTD | Cadoxton South junction & Trehafod junction | View of double-pull mechanical detection in facing points | Tynycaeau junction | 5 | 52 | South | 1960 | |
 bpm01043.jpg |
BRY | Cardiff (General) & Barry Pier | Cogan junction and signal box showing elbows (swing-nose) crossing in down relief/up main when all permanent way was in use | Windsor Rd overbridge Cogan station | 2 | 37 | South | 1960 | |
 bpm01044.jpg |
PRS | Penrhos | Double single-blade traps in Penrhos sidings (Out-of use) | Penrhos sidings | 12 | 20 | South | 1960 | |
 bpm01045.jpg |
VOG | Vale of Glamorgan | Single-blade catch point, mechanical detection and split-pedestal ground disc (Black & white photo’) | Up siding, Rhoose station | 3 | 30 | South | 1961 | |
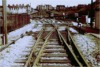
 bpm01046.jpg |
CTD | Cadoxton South junction & Trehafod junction | Permanent way layout just beyond facing junction from Wenvoe to Penrhos lines (A4232 Culverhouse Cross-M4 motorway link now occupies this site). This view highlights the gradient changes in the two branches | Tynycaeau junction | 5 | 58 | SE | 1960 | |
 bpm01047.jpg |
|||||||||
 bpm01048.jpg |
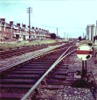
PRS | Penrhos | Permanent way and semaphore signals at commencement of Penrhos branch. (5.75mile-post visible on Cadoxton-Treforest line alongside bracket signal and at extreme edge of photo’ on Penrhos branch) | North of Tynycaeau junction. (A4232 Culverhouse cross-M4 motorway link now passes to the left of this site) | 5 | 59.5 | SE | 1961 | |
 bpm01049.jpg |
BRY | Cardiff (General) & Barry Pier | Arrangement of lever arm and adjustment turnbuckles for operation of swing-nose crossing at former Barry Dock signal box . Detection is located in the boxed housing. (Black & white photo’) | In down main at Barry Dock signal box | 7 | 07 | West | 1961 | |
 bpm01049a.jpg |
BRY | Cardiff (General) & Barry Pier | View of swing-nose crossing (elbows) in down main. This was track-circuited so all tie rods, stretcher plates etc, were insulated from one another to prevent short-circuiting of the electrical circuit between rails | South of Barry Dock signal box (Black & white photo’) | 7 | 07 | South | 1961 | |
 bpm01050.jpg |
BRY | Cardiff (General) & Barry Pier | Full view of swing-nose crossing in down main, allowing passage of traffic from up main to up high level sidings | South of Barry Dock signal box (Black & white photo’) | 7 | 07 | South | 1961 | |
|
Photos 1001-1050 |
|||||||||
|
Date Last Revised:November 30, 2009 |
|||||||||