|
Historical Railway Photograph Gallery 1051-1100 |
|||||||||
|
Photos 1051-1100 |
|||||||||
| Photo | ELR | Branch | Subject | Location | M | C | Elev'n | Date | Time |
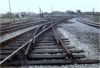
 bpm01051.jpg |
RSB BAL |
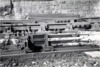
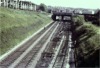
Rhondda & Swansea Bay and Bridgend & Abergwynfi | Double-pull mechanical detection at facing points (BRWR pattern). Note the series of holes on the detector bars, for adjustment of tension in the pull-wires (Black & white record) | Road overbridge at Cymmer East junction (After 1960 re-alignment. Original jct was at 5M-40C / 11M-53C) |
5 11 |
44 49 |
East | 1961 | |
 bpm01052.jpg |
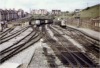
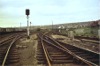
BRY | Cardiff (General) & Barry Pier | View of Barry Island East yard & DMU refuelling dep�t before 1964 rationalisation programme | Barry Island East signal box | 8 | 75 | West | ||
 bpm01053.jpg |
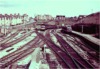
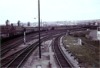
BRY | Cardiff (General) & Barry Pier | Layout at Barry Island East during first stages of remodelling at 1964 rationalisation programme. (A new turnout is already laid in fourth track from right) | Barry Island East Yard & DMU Refuelling dep�t (Viewed from Barry Island East signal box) | 8 | 75 | West | ||
 bpm01054.jpg |
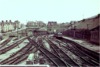
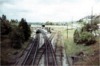
BRY | Cardiff (General) & Barry Pier | General view of DMU servicing dep�t & sidings before modernisation programme was in full progress (A new turnout is already laid in fourth track from right) | Barry Island yard | 8 | 76 | West | 1964 | |
 bpm01055.jpg |
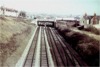
BRY | Cardiff (General) & Barry Pier | Diesel dep�t and associated sidings with alteration to siding already underway (see bpm01056 for later details) | Barry Island yard | 8 | 75 | West | 02-May-64 | 11.27 |
 bpm01056.jpg |
BRY | Cardiff (General) & Barry Pier | Alterations to layout due to abolition of Barry Island East signal box & installation of new groundframe | Barry Island yard | 8 | 75 | West | 03-May-64 | 11.22 |
 bpm01057.jpg |
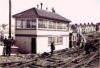
BRY | Cardiff (General) & Barry Pier | General view of Barry Island East signal box (now abolished) & new groundframe | Barry Island yard | 8 | 75 | South | 02-May-64 | 11.26 |
 bpm01058.jpg |
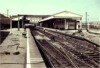
BRY | Cardiff (General) & Barry Pier | Removal of scissors crossover No.3 platform to No.2 platform or Barry Pier lines, due to abolition of Barry Island East signal box | Barry Island station | 8 | 73 | East | 03-May-64 | 11.26 |
 bpm01059.jpg |
BRY | Cardiff (General) & Barry Pier | Removal of compounds and scissors crossover in association with installation of new groundframe and abolition of Barry Island East signal box | Barry Island East | 8 | 74 | West | 03-May-64 | 11.26 |
 bpm01060.jpg |
BRY | Cardiff (General) & Barry Pier | Abolition of Barry Island East signal box (New groundframe cabin on right of signal box). S&T official, Mr. Ron Andrews seen here also (centre) | Barry Island East | 8 | 74 | South | 03-May-64 | 11.25 |
 bpm01061.jpg |
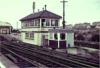
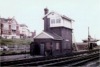
BRY | Cardiff (General) & Barry Pier | General view of Cadoxton Low Level junction signal box (Last day of operation) | Cadoxton Low Level junction | 6 | 28 | South | 19-Apr-64 | 15.00 |
 bpm01062.jpg |
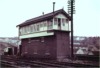
BRY | Cardiff (General) & Barry Pier | General view of Barry Dock signal box | Barry Dock signal box | 7 | 4.5 | South | 09-May-64 | 11.35 |
 bpm01063.jpg |
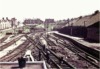
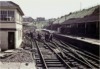
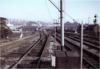
BRY | Cardiff (General) & Barry Pier | View looking north-east from end of Barry station during remodelling programme of permanent way and signalling, showing temporary severance of up main with No.1 platform line and sidings and line to Hydraulics stores | Barry station | 8 | 06 | SW | ||
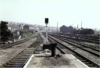 bpm01064.jpg |
BRY | Cardiff (General) & Barry Pier | View looking north-east from end of Barry station after remodelling programme of permanent way and signalling, showing new connection (in distance) with up main to No.1 platform line and sidings and line to Hydraulics stores | Barry station | 8 | 06 | SW | ||
 bpm01065.jpg |
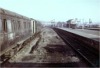
BRY | Cardiff (General) & Barry Pier | Recovery of general & cattle-pen sidings, Barry station. The signal & telegraph dept HQ for the Barry area comprised the two cream coloured steel huts at the foot of the Water tank. The area is now part car park, part garden centre (2001) | Barry station | 8 | 07 | SE | ||
 bpm01066.jpg |
BRY | Cardiff (General) & Barry Pier | Recovery of sidings, Barry station. The platform shown was No. 1 and known as the bay from which the Wenvoe-Pontypridd passenger service ran until closure of that service. The platform edge is now the east boundary of a Park & Ride car park (2001) | Barry station | 8 | 10 | SW | ||
 bpm01067.jpg |
BRY | Cardiff (General) & Barry Pier | Alterations to layout in conjunction with abolition of Cadoxton Low Level junction signal box | Cadoxton Low Level junction | 6 | 19 | West | 19-Apr-64 | 15:05 |
 bpm01068.jpg |
BRY | Cardiff (General) & Barry Pier | Alterations to layout in conjunction with abolition of Cadoxton Low Level junction signal box | Cadoxton station | 6 | 14 | East | 19-Apr-64 | 15:07 |
 bpm01069.jpg |
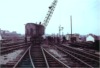
BRY | Cardiff (General) & Barry Pier | Cadoxton Low Level junction during rationalisation. The 2-arm semaphore assembly lying on its side, had only been installed a couple of years earlier | North of Cadoxton Low Level signal box | 6 | 19 | South | ||
 bpm01070.jpg |
BRY | Cardiff (General) & Barry Pier | Arrangement of elbows (swing nose crossing) in down main at Barry Dock (Shown clipped & padlocked). 3-aspect colour light signal also shown. These elbows and all lines to the left of the down main are now recovered and the land re-modelled | Barry Dock signal box | 7 | 6.5 | East | 09-May-64 | 11:35 |
 bpm01071.jpg |
BRY | Cardiff (General) & Barry Pier | View of up & down main with new colour-light signal for down main line, out-of-use elbows in down main and also storage sidings and No.1 dock coal hoists | Barry Dock signal box | 7 | 04 | East | ||
 bpm01072.jpg |
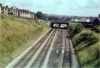
SWM | Severn Tunnel junction & Fishguard Harbour | Poor quality photo� of Llanharan West junction for Wern Tarw-Tondu line, (Cardiff & Ogmore branch) with stopping cross-country train at Llanharan station. (Just visible is a semaphore bracket signal (right) with former GWR 5ft wooden arms) | A473 road overbridge at Llanharan West junction |
183 0 |
65 00 |
East | ||
 bpm01073.jpg |
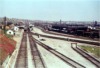
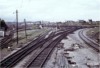
VOG | Vale of Glamorgan | Arrangement of up & down main & relief lines (to Barry Sidings) when in full use | A4050 St.Nicholas Road overbridge adjacent to Ship Hotel, Barry | 0 | 16 | SW | ||
 bpm01074.jpg |
VOG | Vale of Glamorgan | Arrangement of up & down main & relief lines (to Barry Sidings) when undergoing rationalisation, showing recovery of Barry Sidings up relief line | A4050 St.Nicholas Road overbridge adjacent to Ship Hotel, Barry | 0 | 16 | SW | ||
 bpm01075.jpg |
VOG | Vale of Glamorgan | Layout of main & down relief lines after alterations to layout between Barry junction & Barry Sidings | A4050 St.Nicholas Road overbridge adjacent to Ship Hotel, Barry | 0 | 16 | SW | 31-Jul-65 | 11:17 |
 bpm01076.jpg |
VOG | Vale of Glamorgan | Arrangement of Barry Sidings and before abolition of signal box and removal of all but one of the sidings | Lane overbridge at west end of Barry Sidings | 0 | 47 | West | 28-Jul-63 | pm |
 bpm01076a.jpg |
VOG | Vale of Glamorgan | Arrangement of Barry Sidings & before abolition of signal box and removal of all but one of the sidings | Lane overbridge at west end of Barry Sidings | 0 | 47 | West | ||
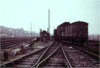
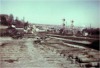
 bpm01077.jpg |
VOG | Vale of Glamorgan | View of Barry Sidings signal box after closure, showing spiked facing turnout from up main to sidings. Severed sidings & dead-end loco� spur can also be seen as can the former up homes bracket semaphore assembly, lying on its side | Lane overbridge at west end of Barry Sidings | 0 | 47 | West | ||
 bpm01078.jpg |
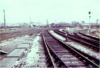
VOG | Vale of Glamorgan | View of Barry Sidings signal box after closure, showing permanent way partly dismantled and also full bore of Porthkerry No.1 tunnel in distance | Lane overbridge at west end of Barry Sidings | 0 | 40 | East | ||
 bpm01079.jpg |
VOG | Vale of Glamorgan | View of realigned down sidings connection showing severed down sidings section of former sidings. Up & down main line connections to former sidings had been taken out-of-use by time of photograph | Barry Sidings, east of Barry Sidings signal box | 0 | 40 | West | ||
 bpm01080.jpg |
VOG | Vale of Glamorgan | View of sidings fan and up & down relief lines when in full use | A4050 St.Nicholas Road overbridge near Ship Hotel, Barry Sidings | 0 | 16 | NE | ||
 bpm01081.jpg |
VOG | Vale of Glamorgan | View of partly dismantled sidings fan and up & down relief lines at Barry Sidings | A4050 St.Nicholas Road overbridge near Ship Hotel, Barry Sidings | 0 | 16 | NE | ||
 bpm01082.jpg |
VOG | Vale of Glamorgan | View of trackbeds of former Barry Sidings with only the up & down VOG lines & down relief line surviving | A4050 St.Nicholas Road overbridge near Ship Hotel, Barry Sidings | 0 | 16 | East | ||
 bpm01083.jpg |
VOG | Vale of Glamorgan | View of Barry junction & signal box when in full use | A4055 Harbour Road overbridge west of Barry junction | 0 | 07 | SW | 08-Mar-64 | 15.00 |
 bpm01084.jpg |
VOG | Vale of Glamorgan | View of Barry junction and signal box while being partly dismantled due to 1964 rationalisation | A4055 Harbour Road overbridge west of Barry junction | 0 | 07 | SW | 14-May-64 | 15.35 |
 bpm01085.jpg |
VOG | Vale of Glamorgan | View of Barry junction after remodelling and abolition of Barry junction signal box | A4055 Harbour Road overbridge west of Barry junction | 0 | 07 | SW | 04-Jun-65 | 13.25 |
 bpm01086.jpg |
BRY | Cardiff (General) & Barry Pier | View at north end of No.4 platform showing former Taff Vale lines, latterly used for Penarth branch passenger trains and also showing Cadoxton South signal box. The right line survives and is used for docks reception traffic from the Cardiff direction | Cadoxton station | 6 | 08 | SW | ||
 bpm01087.jpg |
BRY | Cardiff (General) & Barry Pier | View from track level showing former Taff Vale lines and former Collis siding connection on right and Cardiff/Penarth lines to centre and in left background, Wenvoe lines & Cadoxton North Yard | Cadoxton South junction | 6 | 07 | South | ||
 bpm01088.jpg |
BRY | Cardiff (General) & Barry Pier | View of partly dismantled Cadoxton South junction, showing Cadoxton North Yard and Wenvoe branch | Cadoxton South signal box verandah |
6 0 |
06 00 |
South | ||
 bpm01089.jpg |
BRY | Cardiff (General) & Barry Pier | View of partly dismantled permanent way showing severed swing-nose and diamond crossings in down main | Cadoxton South junction | 6 | 4.5 | South | ||
 bpm01090.jpg |
BRY | Cardiff (General) & Barry Pier | View of Barry Junction signal box and lifted track at carriage shed sidings | Barry carriage shed sidings | 8 | 20 | SE | ||
 bpm01091.jpg |
BRY | Cardiff (General) & Barry Pier | Clipped and padlocked facing points at south end of Cadoxton station (TVR platform )after commencement of rationalisation programme, 1964. Note the evidence of semaphore signal slotting weights on the wooden semaphore signal post in the background. The signal was a bracketed 3-doll assembly, jointly worked by Cadoxton South and Cadoxton Low Level signal boxes | Cadoxton station (Docks Line junction), south end of platform 4. | 6 | 14 | NW | ||
 bpm01092.jpg |
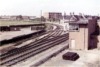
CAR | Cardiff (Stonefield junction) & Rhymney | View of up & down main lines with relief lines and junction to Roath Branch. Note the two single slips and double slips in the permanent way. (A housing estate now lies to the left of the third line from the right) | College Road road overbridge at former Roath Branch junction | 3 | 63 | NW | ||
 bpm01093.jpg |
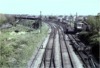
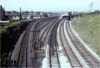
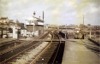
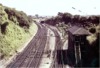
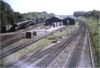
SWM | Severn Tunnel junction & Fishguard Harbour | Bridgend East signal box and East junction (For Vale of Glamorgan line) | Road overbridge at east end of Bridgend station | 190 | 37.5 | NW | ||
 bpm01094.jpg |
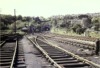
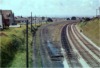
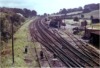
SWM | Severn Tunnel junction & Fishguard Harbour | Llanharan West junction showing former goods dep�t, cattle pen and sidings with compound crossing in up main and 2-blade traps in exit from down relief line | A473 road overbridge, Llanharan West junction | 183 | 62 | West | ||
 bpm01095.jpg |
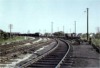
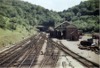
WAH | Hereford & Worcester | Track layout showing half compounds and double traps to goods sidings. South end of Ledbury tunnel can be seen at centre background | Ledbury station footbridge | 135 | 76 | SW | 13-Jul-64 | 13:20 |
 bpm01096.jpg |
Spare | ||||||||
 bpm01097.jpg |
SPARE | ||||||||
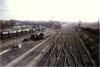
 bpm01098.jpg |
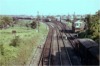
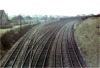
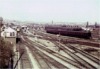
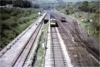
CAR | Cardiff (Stonefield junction) & Rhymney | View of Cherry Orchard sidings fan, showing double, inside compound points, trackbed of former up relief line and elevated down line on which a 6-car DMU is travelling from Rhymney to Cardiff. Cherry Orchard signal box is on the left in the cutting. Note the Then newly-painted signal posts and the sighting enhancement quadrant fitted to the down main starting signal | Road overbridge at Cherry Orchard, Lisvane | 5 | 48.75 | SE | ||
 bpm01099.jpg |
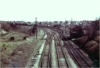
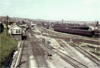
CAR | Cardiff (Stonefield junction) & Rhymney | View of Cherry Orchard wagon repair shops and sidings (The 1985-built Thornhill and Lisvane station now stands alongside this site) | Thornhill & Lisvane station site | 5 | 48.75 | NW | ||
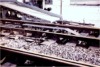
 bpm01100.jpg |
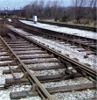
CTD | Cadoxton South junction & Trehafod junction | Partial view of facing points with fouling bar. Note the evidence that the rail section is fairly new since the rail table was only partly worn | Tynycaeau junction | 5 | 54.5 | South | ||
|
Photos 1051-1100 |
|||||||||
|
Date Last Revised:November 30, 2009 |
|||||||||