|
Historical Railway Photograph Gallery 1101-1150 |
|||||||||
|
Photos 1101-1150 |
|||||||||
| Photo | ELR | Branch | Subject | Location | M | C | Elev'n | Date | Time |
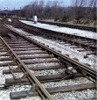 bpm01100.jpg |
CTD | Cadoxton South junction & Trehafod junction | Partial view of facing points with fouling bar. Note the evidence that the rail section is fairly new since the rail table was only partly worn | Tynycaeau junction | 5 | 54.5 | South | ||
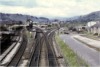 bpm01101.jpg |
CAM | Cardiff (Bute Road) & Merthyr | Walnut Tree junction and Taffs Well station when in full use | Walnut Tree junction | 7 | 14 | SE | ||
 bpm01102.jpg |
WYE | Wye Valley junction and Monmouth (Troy) | Triumph 650cc twin cylinder (Tiger 110) Motor Cycle No.T11008W in Western Region livery. Used for transport to & from sites for photosurvey between 1961 and 1966 | Tintern Station yard | 4 | 48 | East | 12-Sep-64 | 12:22 |
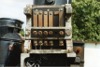
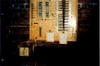 bpm01103.jpg |
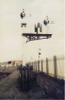
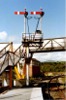
BRY | Cardiff (General) & Barry Pier | Fairly new signalling fuse and electrical distribution board for relay circuits etc, showing wiring looms | Cadoxton Low Level junction Signal Box | 6 | 28 | |||
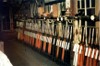
 bpm01104.jpg |
BRY | Cardiff (General) & Barry Pier | Daylight view of signal box lever frame. Note the lever cloths, spare detonators and lever collars in the scene. | Cadoxton Low Level junction Signal Box | 6 | 28 | |||
 bpm01105.jpg |
BRY | Cardiff (General) & Barry Pier | Night-time view of signal box lever frame. Note the lever reminder collars stored on the spare (white) levers | Cadoxton Low Level junction Signal Box | 6 | 28 | |||
 bpm01106.jpg |
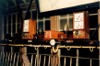
BRY | Cardiff (General) & Barry Pier | Up & down line Permissive Block instruments for working traffic from Cadoxton Low Level junction to Nos 1 & 2 Dock lines at Barry | Cadoxton Low Level junction signal box | 6 | 28 | |||
 bpm01107.jpg |
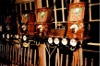
BRY | Cardiff (General) & Barry Pier | Up & down Absolute Block instruments and bells for passenger/freight working between Cadoxton Low Level junction and Barry Dock signal boxes. The block instruments are showing that the line has been set "Line Clear" for an imminent "up" train and because the block section between here and Cadoxton South signal box was so short, the needle is also showing "Line Clear" for Cadoxton South �box, the road having been "asked for" immediately after Barry Dock signalman had asked for "line clear" (From the left side). Note the master switch in between the block bells, which ws used to electrically switch out the signal box when the �box was not manned | Cadoxton Low Level junction signal box | 6 | 28 | |||
 bpm01108.jpg |
BRY | Cardiff (General) & Barry Pier | Night-time view of signal box lever frame. Note the chevrons on the up and down line detonator placer levers. The up starting signal levers for the Penarth and Barry branches, have a white band around the lever | Cogan junction signal box | 2 | 33 | |||
 bpm01109.jpg |
BRY | Cardiff (General) & Barry Pier | Three groups of 2-doll wooden GWR (probably formerly Barry Rly) bracket signal assemblies for movements from Cadoxton Low Level sidings complex. Each pair read to up main via No.1 Cadoxton platform and No.3 Cadoxton platform lines respectively. This photo has been replaced by an enhanced version 927 | Cadoxton Low Level junction | 6 | 28 | South | ||
 bpm01110.jpg |
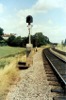
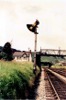
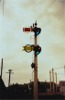
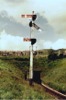
VOG | Vale of Glamorgan | Near shot of subsidiary stop semaphore with lamp and arm repeater circuit fitted | Aberthaw west end reception siding outlet to down main VOG line | 5 | 25 | North | ||
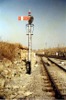 bpm01111.jpg |
VOG | Vale of Glamorgan | Then recently-installed 3-ft stop semaphore signal assembly with double blade catch point just beyond. | Aberthaw west end reception siding outlet to down main VOG line | 5 | 25 | South | ||
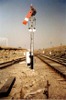 bpm01112.jpg |
VOG | Vale of Glamorgan | Then recently-installed 4-ft stop semaphore signal assembly with trailing points beyond, from west end reception line from up & down VOG main lines | Aberthaw west end reception siding outlet/inlet to down/from up main VOG line | 5 | 25 | South | ||
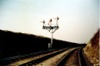 bpm01113.jpg |
VOG | Vale of Glamorgan | Then recently-installed 3-doll down homes bracket semaphore assembly, south-east of Aberthaw station | Between Rhoose and Aberthaw | 4 | 56 | East | ||
 bpm01114.jpg |
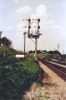
BRY | Cardiff (General) & Barry Pier | View of up IBS signal (CA410), semi-automatic from Cadoxton South signal box. The new MAS signal installed ready for the 1965 Cardiff MAS installation is seen in the background and carries a cross, indicating that it is not yet operational. The 4M-40C mile-post is located just this side of the new signal | Between Biglis junction and Dinas Powys station | 4 | 41.5 | South | ||
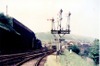
 bpm01115.jpg |
BRY | Cardiff (General) & Barry Pier | Rear view of 2-doll GWR wooden bracket signal with 4ft and 3ft subsidiary arms and route indicator. The array of mechanical slot detectors near the base was necessary to repeat the slot positions to both Cadoxton South and Cadoxton Low Level Jct signal boxes since both signalmen had to pull the signal box levers to lower a signal arm and/or indicate a route on the indicator | South end of Cadoxton station, Platform 1 | 6 | 14 | South | ||
 bpm01116.jpg |
SPARE | ||||||||
 bpm01117.jpg |
SPARE | ||||||||
 bpm01118.jpg |
SPARE | ||||||||
 bpm01119.jpg |
Spare | ||||||||
 bpm01120.jpg |
Spare | ||||||||
 bpm01121.jpg |
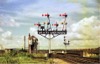
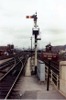
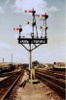
THT | Pontypridd & Treherbert | 4-doll TVR gantry with "Call-on" arm and GWR 4-ft steel arms and wood dolls | Just west of North Pontypridd junction and signal box | NW | 21-Jul-64 | 12:00 | ||
 bpm01122.jpg |
DCL | Didcot & Chester | 6-doll signal gantry with reverse facing array comprising worked distant, subsidiary and "Call-on" arm. The counterweights for the extreme arms are on the same pivot shaft as the next inboard doll. Some upper quadrant semaphores are to be seen in the distance and lines to the right of this location were the former LMS lines terminating at Oxford Rewley Road . | Just north of Oxford station |
171 32 |
54 29 |
SE | 13-Aug-65 | |
 bpm01123.jpg |
BRY | Cardiff (General) & Barry Pier | 4-doll bracket signal with route indicator, subsidiary arms and fixed and worked distant arm. The slot weights for the indicator are just below catwalk level. | Penarth Curve South | 0 | 51 | South | ||
 bpm01124.jpg |
BRY | Cardiff General & Cardiff Queen Street | 3-doll bracket signal with route indicator, subsidiary arms and fixed and worked distant arm. The slot weights for the indicator are just below platform level. The former route indicator and 3-foot arm for the up siding, relief goods line had recently been removed as the relevant lines had been taken out-of-use. The rusted area just below the walkway was the location of the route indicator slot weight assembly. | Penarth Curve South | 0 | 51 | South | ||
 bpm01125.jpg |
EVL | Eastern Valleys | At the time, a rare surviving GWR wooden semaphore assembly with ringed distant and stop arms. This site is now occupied by a Royal Mail establishment | Mill Street yard, Newport | ~0 | 62 | North | ||
 bpm01126.jpg |
EVL | Eastern Valleys | Rear view of stop and distant ringed goods line semaphore assembly. This site is now occupied by a Royal Mail establishment | Mill Street yard, Newport | ~0 | 61.5 | South | ||
 bpm01127.jpg |
SPARE | ||||||||
 bpm01128.jpg |
SPARE | ||||||||
 bpm01129.jpg |
SPARE | ||||||||
 bpm01130.jpg |
SPARE | ||||||||
 bpm01131.jpg |
SPARE | ||||||||
 bpm01132.jpg |
HNL | Newport & Hereford | Double 2-doll bracket signals with permanent caution and Call-on arms. The assemblies relate to the scissors crossover visible in the background | Pontypool Road Station | South | 13-Aug-65 | 10.01 | ||
 bpm01133.jpg |
SPARE | ||||||||
 bpm01134.jpg |
BAL | Llynfi Branch | 2-doll bracket signal with elevated disc and route indicator for Ogmore/Garw branches | Tondu (Llynfi Branch) platform | 2 | 66 | South | 20-Sep-92 | 15.20 |
 bpm01135.jpg |
Spare | ||||||||
 bpm01136.jpg |
WVL | Park junction & Ebbw Vale (Western Valleys) | Detail of Western Region V38 casting showing 3-pairs of contact assemblies (Right Hand partly removed) for signal arm proving circuit to signal box repeater | Park junction | 1 | 10 | West | 20-Jul-91 | 15.28 |
 bpm01137.jpg |
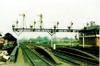
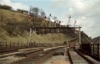
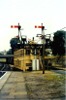
SWM | Severn Tunnel junction & Fishguard Harbour | 3-doll bracket semaphore with one motorised distant and one fixed distant. Assembly read: down main to down siding (loop) down main to down main and down main to Llynfi branch (for Tondu). This was a down homes bracket for Bridgend West signal box | West end of Bridgend Station | 190 | 53 | East | 20-Jun-64 | 14.13 |
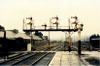
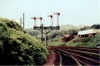
 bpm01138.jpg |
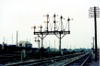
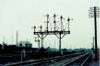
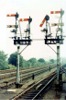
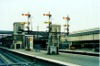
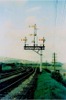
THT | Pontypridd & Treherbert | Arrangement of 7-doll signal gantry including slotted distant arms and redundant dolls | West of Trehafod station (15-milepost at right-hand gantry leg & Eirw branch junction just beyond bridge). | 14 | 79 | East | 10-Apr-65 | 15.47 |
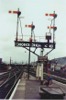
 bpm01139.jpg |
THT | Pontypridd & Treherbert | Arrangement of 7-doll signal gantry including slotted distant arms and redundant dolls | West of Trehafod station (15-milepost at right-hand gantry leg) | 15 | 01 | West | 31-May-64 | 11.36 |
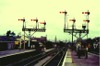
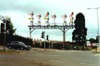
 bpm01140.jpg |
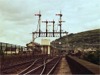
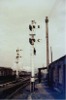
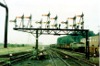
MLN | Cogload to Penzance | 8-doll gantry assembly with out-of-use dolls, standard BR Western Region stop arms and Westinghouse motorised distant arms. Subsidiary arms are Western Region standard 3 foot type | Newton Abbot | 214 | 00 | South | 19-Jul-66 | 14.16 |
 bpm01141.jpg |
MLN | Cogload to Penzance | 2-doll semaphore bracket signal assembly with starting signals, elevated discs and route indicators for two separate platform lines. "Call-on" arms also fitted | Newton Abbot Station & Signal Box | 214 | 15 | North | 19-Jul-66 | 14.19 |
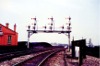
 bpm01142.jpg |
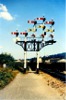
MLN | Cogload to Penzance | 6-doll signal gantry with motorised distants, permanent caution and "call-on" arms. Assembly relocated by David & Charles Publishers as a monument to GWR/BRWR semaphore signalling | A382 road overbridge south of Newton Abbot station | South | 27-May-96 | 10.12 | ||
 bpm01143.jpg |
MLN | Cogload to Penzance | 3-doll bracket semaphore assembly with wooden dolls, 2 fixed and one motorised distant arms, with "Call-on" arms | Exeter St.Davids | 193 | 71 | North | 19-Jul-66 | 12.30 |
 bpm01144.jpg |
MLN | Cogload to Penzance | Arrangement of 5-doll bracket signal with subsidiary arms, permanent caution, motorised distant and "Call-on" arms | Exeter St.Davids | 194 | 08 | South | 22-Jul-66 | 13.04 |
 bpm01145.jpg |
BDU | Walnut Tree junction & Aber junction | 2-doll bracket signal with starting signals and worked distant signals. The slot weights and slot-proving contact boxes are clearly visible as is the aerial telegraph termination post for the repeater electrical circuits | Penrhos junction | 9 | 38 | West | ||
 bpm01146.jpg |
BMZ | Blackmill | 3-doll bracket signal with permanent caution and call-on arms. The junction beyond the signal was the start of the Blackmill branch which linked the Pencoed branch to Llanharan, South Wales main line. Lines to the left led to the Ogmore and Garw branches | Ynysawdre junction, Bryncethin | 0 | 23 | 23-May-66 | 19.12 | |
 bpm01147.jpg |
|||||||||
 bpm01148.jpg |
SPARE | ||||||||
 bpm01149.jpg |
SPARE | ||||||||
 bpm01150.jpg |
CAR | Cardiff (Stonefield junction) & Rhymney | 4-doll bracket semaphore signal assembly with main and subsidiary arms. Part of this assembly still stood in 2005 but the right-hand sidings were out of use and overgrown. | Just north of Ystrad Mynach South junction | North | 31-May-64 | 11.58 | ||
|
Photos 1101-1150 |
|||||||||
|
Date Last Revised:December 05, 2009 |
|||||||||