|
Historical Railway Photograph Gallery 1151-1200 |
|||||||||
|
Photos 1151-1200 |
|||||||||
| Photo | ELR | Branch | Subject | Location | M | C | Elev'n | Date | Time |
 bpm01151.jpg |
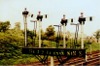
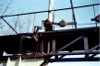
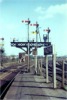
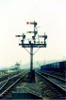
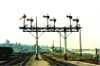
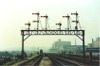
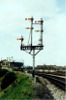
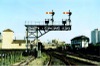
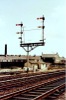
CAR | Cardiff (Stonefield junction) & Rhymney | Rear, elevated view of 4-doll semaphore signal assembly, showing back-light blinders. (All back-lights were visible from the signal box at Ystrad Mynach South). This unit was later modified and most of it was still in use in January 2001 | Near Ystrad Mynach, South signal box & junction | SE | 31-May-64 | 11.59 | ||
 bpm01152.jpg |
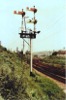
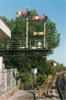
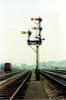
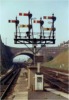
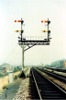
CAR | Cardiff (Stonefield junction) & Rhymney | 2-doll bracket signal worked distant arm and sighting enhancement quadrants. Mechanical slotting is clearly defined | Near Ystrad Mynach, South signal box & junction | 13 | 30 | South | 31-May-64 | 12.08 |
 bpm01153.jpg |
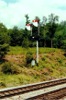
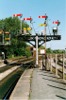
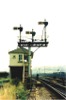
CAR | Cardiff (Stonefield junction) & Rhymney | The same 2-doll signal assembly as that shown in bpm1152jpg but after modification and the addition of a track circuit diamond | Ystrad Mynach, South signal box & junction | 13 | 30 | East | 04-Jun-89 | 11.07 |
 bpm01154.jpg |
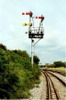
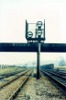
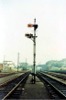
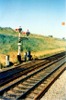
WVL | Park junction & Aberbeeg junction | 2-doll bracket signal with permanent caution arm | North-west of Park junction, Newport | 1 | 08 | 20-Jul-91 | 15.01 | |
 bpm01155.jpg |
CAM | Cardiff (Bute Road) & Merthyr | Close-up view of pull wire cranks and semaphore arm counterweight as fitted to former semaphore bracket assembly at Radyr junction | Radyr Station | 5 | 27 | NW | 10-Apr-65 | 16.42 |
 bpm01156.jpg |
CAM | Cardiff (Bute Road) & Merthyr | Close-up of part of walkway, elevated disc and track-circuit diamond and support bracing on semaphore bracket assembly at Radyr junction | Radyr Station | 5 | 27 | North | 10-Apr-65 | 16.42 |
 bpm01157.jpg |
MLN | Bristol Temple Meads & Bath | 11�" ground disc assembly which was operated by two separate signal boxes so that a slot was fitted & hence the inclusion of two separate electrical proving contacts in housings to the right of the pedestal. The cabling to the signal box repeaters is routed through the flexible conduit seen leaving the contact boxes & running into the ground. Note the track-circuit bonds in the bull head rail at the bottom left of photo� | Bristol, Eastern Dep�t, River Avon Main Down viaduct (141 yards) | 117 | 28 | South | 29-Aug-65 | 14.14 |
 bpm01158.jpg |
Spare | ||||||||
 bpm01159.jpg |
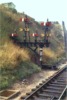
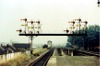
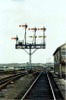
CAM | Cardiff (Bute Road) & Merthyr | 3-doll cantilevered bracket semaphore assembly with permanent caution arm, elevated disc and track-circuit diamond. This was previously a 3-doll unit but was modified after 1963 and the entire unit and the signal box beyond, was removed after the implementation of the new Cardiff-Pontypridd resignalling scheme in 1998. (See 01162.jpg) | Radyr station | 5 | 27 | West | 10-Apr-65 | 16.38 |
 bpm01160.jpg |
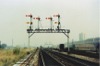
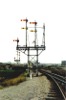
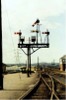
CAM | Cardiff (Bute Road) & Merthyr | 3-doll double-supported bracket signal assembly with permanent caution arm, elevated discs and route indicator. This assembly was modified after 1963 and the entire unit removed after the Cardiff-Pontypridd resignalling scheme was implemented in 1998 | Radyr station | 5 | 29 | West | 10-Apr-65 | 16.35 |
 bpm01161.jpg |
CAM | Cardiff (Bute Road) & Merthyr | 4-doll version of assembly shown in previous frame. This assembly was modified after 1963 and the entire unit removed after the Cardiff-Pontypridd resignalling scheme was implemented in 1998 | Radyr station | 5 | 29 | West | 11-Jul-89 | 18.19 |
 bpm01162.jpg |
CAM | Cardiff (Bute Road) & Merthyr | 2-doll cantilevered bracket semaphore assembly with permanent caution arm and elevated disc. This was previously a 3-doll unit but was modified after 1963 and the entire unit and the signal box beyond, was removed after the implementation of the new Cardiff-Pontypridd resignalling scheme in 1998. The diamond track-circuit indicator is mounted above the catwalk | Radyr station | 5 | 27 | West | 11-Jul-89 | |
 bpm01163.jpg |
MLN | Bristol (Temple Meads ) & Bridgwater | Banner repeating bracket signal with splitting distant (up main to up main and up main to up slow lines) fitted with anti-vandal screens at sides and rear. The signal assembly which this unit repeats can be seen in the background | South of Bristol West Dep�t | 121 | 01 | SW | 18-Aug-66 | 11:45 |
 bpm01164.jpg |
MLN | Bristol (Temple Meads ) & Bridgwater | 3-doll bracket semaphore with motorised splitting distant arms and a 3ft subsidiary arm for crossover to east side of Bristol West dep�t yard | Bristol West Dep�t | SW | 18-Aug-66 | 11:48 | ||
 bpm01165.jpg |
MLN | Bristol (Temple Meads ) & Bridgwater | 2-doll splitting distant assembly for Parson Street junction signal box. The stop arm was for Bristol West Dep�t main line up starting function. The slot weights are clearly visible as is the box housing the slot proving contacts | Bristol West Dep�t | SW | 18-Aug-66 | 12:11 | ||
 bpm01166.jpg |
|||||||||
 bpm01167.jpg |
MLN | Bristol (Temple Meads ) & Bridgwater | Intermediate relief line 3ft goods semaphore with attached 2ft arm for turnout within relief system | Bristol West Dep�t | 120 | 37 | SW | ||
 bpm01168.jpg |
|||||||||
 bpm01169.jpg |
MLN | Bristol (Temple Meads ) & Bridgwater | Arrangement of 4-doll bracket assembly, down main to down relief, down main to main with working distant, down main to up sidings (relief) and down main to Portishead branch with fixed distant for Ashton Gate signal box. The stop arms were Parson Street junction signal box down homes and the motorised distant was for West Dep�t junction signal box. The fixed distant was for Ashton Gate signal box | Parson Street station/Portishead junction | 120 | 21 | NE | 18-Aug-66 | 11:23 |
 bpm01170.jpg |
MLN | Bristol (Temple Meads ) & Bridgwater | Arrangement of 4-doll bracket truncated 3ft semaphore assembly, down relief to down sidings, relief to through relief, relief to main with working distant, and relief to Portishead branch with fixed distant. AWS ramps also visible in main and relief lines The signals were controlled from Parson Street junction and West Dep�t junction signal boxes | Parson Street station/Portishead junction | 120 | 21 | NE | 18-Aug-66 | 11:23 |
 bpm01171.jpg |
MLN | Bristol (Temple Meads ) & Bridgwater | Rear view of 4-doll truncated 3-ft arm relief line bracket signal assembly with motorised and fixed distant arms. The arm-proving contact housings are clearly visible at the rear of each arm shaft and also the turquoise glass is clearly shown. The lamp expander terminal casing attached to each lamp is also visible | Parson Street station/Portishead junction | 120 | 21.5 | SW | 18-Aug-66 | 12.23 |
 bpm01172.jpg |
MLN | Bristol (Temple Meads ) & Bridgwater | 4-doll semaphore signal gantry with motorised distant signals and track-circuit diamonds. The AWS ramps are just visible in the relief and main lines. This unit formed the up main & relief starting signals for Malago Vale signal box and the distants were for the up lines for Bedminster signal box. Rule 55 exemption plates (track-circuit diamonds) are also fitted at catwalk level | Between Malago Vale and Bedminster | 119 | 61 | SW | 18-Aug-66 | 12.37 |
 bpm01173.jpg |
MLN | Bristol (Temple Meads ) & Bridgwater | 6-doll semaphore gantry assembly comprising down main and down relief home arms for Malago Vale signal box and distant signals for Parson Street junction signal box. The slow line distant arm was fixed at caution whilst the fast was motorised. Track circuit diamonds are just visible as are the ATC ramps in the tracks | Between Malago Vale and Bedminster | 119 | 60 | NE | 18-Aug-66 | 12.42 |
 bpm01174.jpg |
MLN | Bristol (Temple Meads ) & Bridgwater | Malago Vale up main and relief advanced starting signal bracket assembly with up Bedminster worked distant arms. The slotting arrrangement is clearly visible and track-circuit diamonds are fitted just below the catwalk. Note the main support which is of back-to-back spaced channels with cross-bracing | Between Malago Vale and Bedminster | 119 | 41 | SW | 18-Aug-66 | 12.44 |
 bpm01175.jpg |
SPARE | ||||||||
 bpm01176.jpg |
BRL | Bristol Relief Line | 4-doll semaphore signal gantry with permanent caution arms and subsidiary arm arrranged at extended height for enhanced sighting. The chord between Dr Day's Bridge junction and Bristol Loop junction, had by this time, been removed and hence the absence of arms on the right-hand doll. In later years, the removed chord was relaid to allow traffic to and from South Wales and Bristol Parkway to run through to the Bath line without reversal at Temple Meads | North Somerset junction, Bristol | 117 | 37 | East | 29-Aug-65 | 14.04 |
 bpm01177.jpg |
MLN | St.Phillips Marsh Avoiding Line (Formerly Bristol Relief Line) | 3-doll semaphore signal gantry with permanent caution arms and subsidiary arm arranged at extended height for enhanced sighting | North Somerset junction, Bristol | 117 23 | 41 21 | East | 29-Aug-65 | 14.03 |
 bpm01178.jpg |
MLN | Bristol (Temple Meads) & Bath | 3-doll semaphore bracket signal assembly with permanent caution arm, subsidiary arm and double route indicator. Route is shown cleared for Marsh junction | Bristol East Dep�t, Down Yard signal box | 117 | 16 | East | 29-Aug-65 | 14.10 |
 bpm01179.jpg |
MLN | Bristol (Temple Meads) & Bath | 4-doll bracket semaphore assembly with permanent caution arms and route indicator | North Somerset junction & signal box, Bristol | 117 | 48 | West | 29-Aug-65 | 14.00 |
 bpm01180.jpg |
BSW | Bristol (Temple Meads ) & Severn Tunnel junction | GWR 2-doll wooden bracket signal assembly with ringed goods arms and track-circuit indicator. Lineside telephone also provided (Taken from moving train) | Pilning | 9 | 50 | North | 22-Jul-66 | 10.19 |
 bpm01181.jpg |
CEJ | Cardiff (General) & Queen Street South | 2-doll cantilevered bracket semaphore assembly with route indicators and "Call-on" arms | Queen Street South | 1 | 1.5 | South | 15-May-66 | 10.30 |
 bpm01182.jpg |
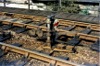
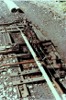
CYA | Cylla | Two-signal points detection for junction points, Rhymney line to Cylla branch (Penalltau) | Ystrad Mynach North, junction to Cylla branch | 13 | 72 | North | ||
 bpm01183.jpg |
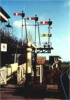
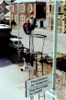
THT | Pontypridd & Treherbert | The then newly-installed semaphore signal with elevated disc with proving contact boxes fitted for repeater indication equipment in groundframe building | Up home signal, Porth Station | 16 | 10 | SE | 02-Jul-89 | 9.27 |
 bpm01184.jpg |
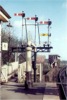
THT | Pontypridd & Treherbert | Then newly-installed semaphore signal with elevated disc with proving contact boxes fitted for repeater indication equipment in groundframe building. The blue glass for the proceed aspect is well defined in this record | Porth Station | 16 | 11 | North | 02-Jul-89 | 9.31 |
 bpm01185.jpg |
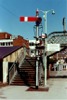
SWM | Severn Tunnel junction & Fishguard Harbour | 2-doll semaphore bracket signal assembly with one fixed and one worked distant arm and with "Call-on" arm. The two dolls applied to two separate lines, the left-hand applying to traffic off the Llynfi branch to the up South Wales main line via the back of the station (now backfilled) and the right-hand doll, to the up South Wales main | Just west of Bridgend station | 190 | 50 | SW | 20-Jun-64 | 14.13� |
 bpm01186.jpg |
SWM | Severn Tunnel Jct & Fishguard Harbour | Looking down Skewen incline towards Neath. The former Skewen station ws located here but after removal in the 1960's, a new station was established here | West of former Skewen Station | 210 | 42 | West | 25-Apr-90 | 12.01 |
 bpm01187.jpg |
SWM | Severn Tunnel Jct & Fishguard Harbour | The top of the incline at Skewen, looking towards Swansea. Previously a double line junction linked this location with the Swansea avoiding line via a cutting to the left. The previous skewen station removed after 1964, was re-established here later (See later jpeg) | West of former Skewen East junction | 210 | 43 | East | 25-Apr-90 | 12.10 |
 bpm01188.jpg |
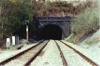
SDI JER | Swansea avoiding line | East portal of 925-yard L�nlas tunnel where originally a double-line junction existed for connection from the Swansea avoiding line to the South Wales main lines west of Skewen. | Former L�nlas junction (1990 mileage 0) | 1 1 | 7.75 49.75 | SE | 25-Apr-90 | 12.12 |
 bpm01189.jpg |
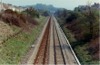
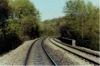
VOG | Vale of Glamorgan | Curve on Porthkerry bank, looking towards Porthkerry No.1 tunnel and Barry. Note the superelevated track for 40mile/h running | Porthkerry bank (Rail overbridge) to road in Porthkerry Country Park | 1 | 20 | West | 27-Apr-90 | 18.37 |
 bpm01190.jpg |
VOG | Vale of Glamorgan | Now removed Rhoose cement works siding connecting with down main, showing double-throw traps | Rhoose Cement Works inlet | 3 | 20 | SE | 28-Apr-90 | 9.51 |
 bpm01191.jpg |
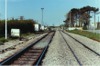
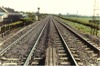
VOG | Vale of Glamorgan | View of up & down Vale of Glamorgan lines immediately east of Rhoose level crossing. The out-of-use groundframe, down siding points (in foreground) and the former lead to Rhoose cement works are all now removed. Beyond the level crossing, a new down platform was reinstated and opened in June 2005 | Rhoose Level Crossing | 3 | 19.5 | East | 28-Apr-90 | 9.53 |
 bpm01192.jpg |
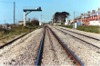
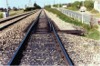
VOG | Vale of Glamorgan | View of up & down Vale of Glamorgan lines immediately east of Rhoose level crossing. The out-of-use down siding is now removed | Rhoose Down line AW100 colour-light signal (Rhoose Level Crossing) | 3 | 18 | 28-Apr-90 | 9.56 | |
 bpm01193.jpg |
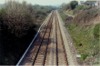
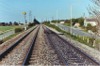
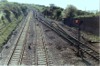
VOG | Vale of Glamorgan | View of up & down Vale of Glamorgan lines taken from rail overbridge at Fontygary country park | Fontygary (Aberthaw down distant signal, now identified as AW1) | 3 | 72.5 | East | 28-Apr-90 | 10.07 |
 bpm01194.jpg |
VOG | Vale of Glamorgan | View looking towards Rhoose from rail overbridge at Fontygary country park showing up IBS distant signal for Rhoose level crossing. The cement works in the distance is now completely removed | Fontygary (Aberthaw up IBS distant signal AW101R) | 3 | 69 | West | 28-Apr-90 | 10.07 |
 bpm01195.jpg |
VOG | Vale of Glamorgan | Full switch, sprung traps in up line, showing Pandrol-fixed 113A flat-bottom rail on pre-stressed concrete sleepers. (Removed later) | Fontygary | 3 | 72 | East | 28-Apr-90 | 10.07 |
 bpm01196.jpg |
VOG | Vale of Glamorgan | Arrangement of single line connection and trailing crossover at Aberthaw east-end reception sidings inlet/outlet junction to main line | Aberthaw east | 4 | 64 | West | 28-Apr-90 | 10.12 |
 bpm01197.jpg |
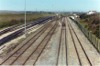
VOG | Vale of Glamorgan | General view of up & down main lines and reception sidings at Aberthaw station site | Aberthaw east | 4 | 64 | East | 28-Apr-90 | 10.12 |
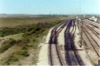 bpm01198.jpg |
VOG | Vale of Glamorgan | General view of reception sidings at Aberthaw station site | Aberthaw east | 4 | 64 | East | 28-Apr-90 | 10.12 |
 bpm01199.jpg |
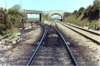
VOG | Vale of Glamorgan | Facing points in down main line to Aberthaw east reception sidings | Aberthaw east reception inlet/outlet | 4 | 62.5 | East | 28-Apr-90 | 10.15 |
 bpm01200.jpg |
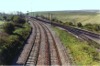
VOG | Vale of Glamorgan | Up & down main lines approaching Aberthaw station from west end. MGR coal lines to Aberthaw power station are seen on right of view | Aberthaw main line & reception sidings | 5 | 22 | NW | 28-Apr-90 | 10.21 |
|
Photos 1151-1200 |
|||||||||
|
Date Last Revised:November 25, 2009 |
|||||||||