|
Historical Railway Photograph Gallery 1501-1550 |
|||||||||
|
Photos 1501-1550 |
|||||||||
| Photo | ELR | Branch | Subject | Location | M | C | Elev'n | Date | Time |
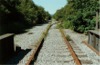
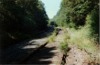
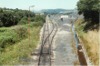
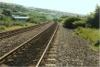
 bpm01501.jpg |
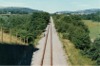
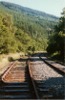
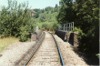
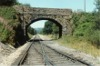
VON | Neath (General) & Pontypool Road | Mothballed Vale of Neath single line to Aberpergwm before 1992 re-opening of line to new Ryan's coal complex at Cwmgwrach, showing excellent condition of permanent way | Heads of the Valleys road overbridge south-west of Aberdulais | SW | 13-Jul-89 | 16.44 | ||
 bpm01502.jpg |
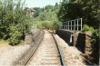
VON | Neath (General) & Pontypool Road | Mothballed Vale of Neath single line to Aberpergwm before 1992 re-opening of line to new Ryan's coal complex at Cwmgwrach, showing reinforced concrete road overbridge, part of the new Heads of the Valleys A465 route to Abergavenny | Heads of the Valleys road overbridge south of Aberdulais | NE | 13-Jul-89 | 16.45 | ||
 bpm01503.jpg |
NAB | Neath Riverside & Colbren junction | Vertical FB switch ('B' type) common 1:10 crossing 113A installed 1980. Since removed and re-used elsewhere since abolition of Blaenant BC complex in 1990 (25th May) | North-end junction, Blaenant Colliery | 4 | 30.5 | NE | 13-Jul-89 | 16.59 |
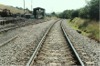
 bpm01504.jpg |
NAB | Neath & Brecon junction & Colbren junction | Single track in 109lb flat bottom rail on reinforced concrete sleepers showing expansion switch just before signal. Note Pan 11 fixings | North-end junction, Blaenant Colliery | 4 | 31 | SW | 13-Jul-89 | 16.59 |
 bpm01505.jpg |
VON | Neath (General) & Pontypool Road | Mothballed Vale of Neath single line to Aberpergwm before 1992 re-opening of line to new Ryan's coal complex at Cwmgwrach, showing Glyncastle (Britsh Coal) siding connection and beyond, the River Neath rail overbridge at 34M 64C and built by Fairfield's of Chepstow, 1958. | Site of former Resolven East signal box / Glyncastle Colliery, Rheola | 34 | 67 | SW | 13-Jul-89 | 17.18 |
 bpm01506.jpg |
VON | Neath (General) & Pontypool Road | Mothballed Vale of Neath single line to Aberpergwm before 1992 re-opening of line to new Ryan's coal complex at Cwmgwrach, showing siding turnout and north-east end of River Neath rail overbridge. | Glyncastle sidings and former junction to Rheola Aluminium Works | 34 | 63.5 | SW | 13-Jul-89 | 17.24 |
 bpm01507.jpg |
VON | Neath (General) & Pontypool Road | Mothballed Vale of Neath single line to Aberpergwm before 1992 re-opening of line to new Ryan's coal complex at Cwmgwrach, showing part of down-side sidings. | Glyncastle siding north-east of Resolven (Rheola area) | ~34 | 30 | SW | 13-Jul-89 | 17.28 |
 bpm01508.jpg |
VON | Neath (General) & Pontypool Road | Mothballed Vale of Neath single line to Aberpergwm before 1992 re-opening of line to new Ryan's coal complex at Cwmgwrach, showing double-line rail overbridge over River Neath | River Neath rail overbridge between Resolven and Glyn Neath | 34 | 23 | SW | 13-Jul-89 | 17:32 |
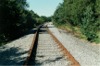
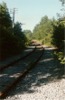
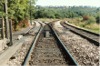
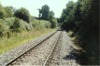
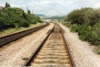
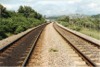
 bpm01509.jpg |
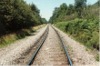
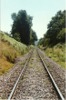
VON | Neath (General) & Pontypool Road | Section of straight weed-free, single line bullhead track south of Aberpergwm junction | South-west of Aberpergwm junction, Vale of Neath | ~33 | 30 | SW | 13-Jul-89 | 17.47 |
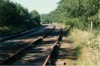
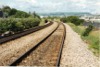
 bpm01510.jpg |
VON APG | Neath (General) & Pontypool Road and Aberpergwm | Turnout-on-the-curve at Aberpergwm junction. The left divergent track served the former Aberpergwm colliery lines (No.10 Railway) but the former Vale of Neath section was reopened after 1992 to serve the Ryan coal complex at Cwmgwrach. | Aberpergwm junction (No.10 Railway), Vale of Neath |
0 33 |
00 14 |
SE | 13-Jul-89 | 17.54 |
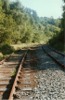
 bpm01511.jpg |
APG | Aberpergwm No.10 Railway | Line leading to former Aberpergwm colliery sidings but now removed | Near former Aberpergwm juinction. Vale of Neath | 0 | 04 | SW | 13-Jul-89 | 17.55 |
 bpm01512.jpg |
APG | Aberpergwm No.10 Railway | 2-line sidings (No.10 Railway), formerly serving Aberpergwm colliery but now completely removed | West of Aberpergwm junction, Vale of Neath | 0 | 09.5 | SE | 13-Jul-89 | 17.56 |
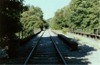
 bpm01513.jpg |
APG | Aberpergwm No.10 Railway | View looking from now removed 2-line sidings just north-west of former Aberpergwm junction (No.10 Railway). | West of Aberpergwm junction, Vale of Neath | 0 | 09.5 | NW | 13-Jul-89 | 17.56 |
 bpm01514.jpg |
APG | Aberpergwm No.10 Railway | View looking from now removed 2-line sidings just north-west of former Aberpergwm junction (No.10 Railway). The single-line river bridge is at the far end of the sidings. | Former No.10 Railway, Aberpergwm. | ~0 | 15 | SE | 13-Jul-89 | 17.57 |
 bpm01515.jpg |
APG | Aberpergwm No.10 Railway | View looking towards Aberpergwm junction within sidings of former No.10 Railway | Aberpergwm No.10 Railway | ~0 | 15 | North | 13-Jul-89 | 17.58 |
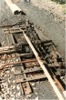
 bpm01516.jpg |
APG | Aberpergwm No.10 Railway | Single-line junction at end of sidings of former No.10 Railway. The single line passes over the bridge over the River Neath and although the rail link is now obliterated, the bridge still stands and is very close to the new section of the A465 Heads of the Valleys trunk road which passes over the camera point and about 10-feet higher than the trackbed. | Aberpergwm No.10 Railway | 0 | 32.75 | South | 13-Jul-89 | 17.58� |
 bpm01517.jpg |
APG | Aberpergwm No.10 Railway | View of sidings formerly serving Aberpergwm colliery and as seen from the single-line junction immediately east of the river Neath rail bridge. The bridge still stands but the Heads of the valleys trunk road re-route passes this camera point now. | Aberpergwm No.10 Railway | 0 | 30 | North | 13-Jul-89 | 17.59 |
 bpm01518.jpg |
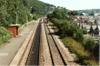
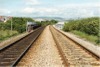
CAR | Cardiff (Stonefield junction) & Rhymney | View looking north-west , taking in up, staggered station platform | Footbridge at Llanbradach Station | 10 | 71 | SE | 15-Jul-89 | 10.13 |
 bpm01519.jpg |
CAR | Cardiff (Stonefield junction) & Rhymney | View looking south-east, taking in down, staggered station platform | Footbridge at Llanbradach Station | 10 | 71 | NW | 15-Jul-89 | 10.13 |
 bpm01520.jpg |
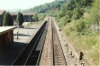
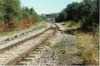
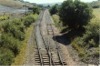
CAR | Cardiff (Stonefield junction) & Rhymney | View of up & down main lines at approx 12M-56C, looking in "up" direction towards Ystrad Mynach South signalbox | Approx rail overbridge near 12M-56C | ~12 | 56 | 15-Jul-89 | 10.24 | |
 bpm01521.jpg |
CAR | Cardiff (Stonefield junction) & Rhymney | Up & down main line looking in down direction (towards Caerphilly) at 12M-56C approx | Up & down main approaching Ystrad Mynach South | ~12 | 56 | North | 15-Jul-89 | 10.24 |
 bpm01522.jpg |
CAR | Cardiff (Stonefield junction) & Rhymney | View looking towards juction with up main line and single-line to Cylla branch, when still in full use. | Ystrad Mynach north junction (former Cylla branch junction) | 13 | 71 | South | 15-Jul-89 | 10.32 |
 bpm01523.jpg |
CYA | Cylla | General arrangement of junction points and 2-blade mechanical signal detection at Ystrad Mynach North junction and groundframe | Ystrad Mynach north junction (former Cylla branch junction) | 13 | 72 | Plan | 15-Jul-89 | 10.32 |
 bpm01524.jpg |
CYA | Cylla | View of Cylla single line branch near Ystrad Mynach North, showing double-throw catch points. | View from a point near Ystrad Mynach Groundframe | 13 | 74.5 | 15-Jul-89 | 10.33 | |
 bpm01525.jpg |
CAR | Cardiff (Bute Rd) & Merthyr | View looking towards Ystrad Mynach station from single-line Cylla branch. | Ystrad Mynach north junction (former Cylla branch junction) | 13 | 74.5 | NW | 15-Jul-89 | 10.33 |
 bpm01526.jpg |
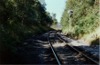
CAR | Cardiff (Bute Rd) & Merthyr | View of junction for single-line Penalltau branch & main Rhymney branch showing two turnouts both fitted with mandatory facing-point locks. The nearer switch is for down traffic from the Penalltau branch to cross over to the down Rhymney line . | Ystrad Mynach south junction | 13 | 41 | SE | 15-Jul-89 | 10.43 |
 bpm01527.jpg |
CAR | Cardiff (Bute Rd) & Merthyr | Reciprocal view of frame 1526 showing up to down crossover in main Rhymey passenger lines and beyond, Ystrad Mynach south signal box. The extended wings at the crossing vee will be noted. | Ystrad Mynach south junction & up / down main crossover | 13 | 41 | North | 15-Jul-89 | 10:43 |
 bpm01528.jpg |
CAR | Cardiff (Bute Rd) & Merthyr | View of up refuge siding, up & down main passenger lines and down-side siding just south of Ystrad Mynach South signal box | Up refuge sidings (backshunt) Ystrad Mynach South signal box | 13 | 29 | North | 15-Jul-89 | 10.49 |
 bpm01529.jpg |
CAR | Cardiff (Bute Rd) & Merthyr | View of up refuge siding and up & down passenger lines with down siding, just south of Ystrad Mynach South signal box. The white sighting enhacing quadrants for the starting bracket signals beyond, will be noted. | Ystrad Mynach south signal box & up siding | 13 | 29 | South | 15-Jul-89 | 10.49 |
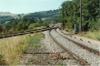
 bpm01530.jpg |
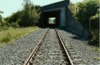
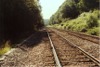
PTA | Ystrad Mynach South & Penalltau Jct | Single-line road underbridge spanning the A472 road near Tredomen, west of Ystrad Mynach and carrying the Penalltau branch to the former junction with the Vale of Neath line. (This was originmally a double line section) | A472 road underbridge, Hengoed / Tredomen | 13 | 72 | SE | 15-Jul-89 | 11.06 |
 bpm01531.jpg |
PTA | Ystrad Mynach South & Penalltau Jct | Single-line road underbridge spanning the A472 road near Tredomen, west of Ystrad Mynach and carrying the Penalltau branch to the former junction with the Vale of Neath line | A472 road underbridge, Hengoed / Tredomen | ~13 | 72 | SE | 15-Jul-89 | 11.06 |
 bpm01532.jpg |
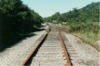
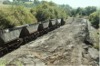
PTA | Ystrad Mynach South & Penalltau Jct | Single inclined section of former double-tracked Penalltau branch looking towards Penalltau junction (Jct with the Vale of Neath line). | Between Tredomen and Nelson | ~14 | East | 15-Jul-89 | 11.10 | |
 bpm01533.jpg |
PTA | Ystrad Mynach South & Penalltau Jct | View looking towards Ystrad Mynach along the former double-tracked Penalltau branch | Between Tredomen and Nelson | 14 | 40 | West | 15-Jul-89 | 11.18 |
 bpm01534.jpg |
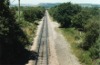
VON | Neath (General) & Pontypool Road | View looking towards Nelson showing modified former Vale of Neath passenger lines and on the left, the down Ystrad Mynach South, distant signal for the single-line Penalltau branch | East of Penalltau junction near Nelson Bog | 12 | 21 | NE | 15-Jul-89 | 11.25 |
 bpm01535.jpg |
VON | Neath (General) & Pontypool Road | The eastern extremity of the former Vale of Neath line, west of Hengoed and Ystrad Mynach. The area was retained at the time of taking the photograph, for a British Coal shale handling facility at the Nelson Bog area. | Penalltau (Nelson Bog wagon wash site) | 12 | 21 | SW | 15-Jul-89 | 11.25 |
 bpm01536.jpg |
PTA | Ystrad Mynach South & Penalltau Jct | View looking westwards towards Nelson, showing singled former Vale of Neath line and a "breather" in continuously-welded flat bottomed railtrack | Access lane overbridge, west of Penalltau junction | 14 | 60 | East | 15-Jul-89 | 11.26 |
 bpm01537.jpg |
VON PTA | Ystrad Mynach South & Penalltau Jct | View towards HAA (MGR) wagon washing facility at Nelson Bog site. The Vale of Neath lines went straight ahead and, in the distance, the Penalltau branch, still in occasional use in 2006, is seen to fall down towards Ystrad Mynach South junction. Note the double-bladed traps in the siding. | Overbridge at Nelson East groundframe (Former Penalltau junction) | 12 | 55 | West | 15-Jul-89 | 11.31 |
 bpm01538.jpg |
VON | Neath (General) & Pontypool Road | Single-line junction in former Vale of Neath line, at which point, to the east, an shale-handling site existed for a period after (1990 REPLACE IMAGE) | Overbridge at Nelson East groundframe (Former Penalltau junction) | 12 | 55 | East | 15-Jul-89 | 11.45 |
 bpm01539.jpg |
VON PTA | Neath (General) & Pontypool Road | Site of former Penalltau junction in the Vale of Neath line, at which point a replacement to the signal box was installed in the form of a groundframe. | Nelson East groundframe (at bridge No.25 ?) | 12 | 55 | East | 15-Jul-89 | 11.46 |
 bpm01540.jpg |
VON PTA | Neath (General) & Pontypool Road | View at Britich Coal shale-handling facility at Nelson Bog, with Penalltau single-line branch falling away to the right | Nelson & Llancaiach BC Shale Siding [~12M-40C (VON), 15M-00C (PTA)] |
12 15 |
40 00 |
West | 15-Jul-89 | 11.52 |
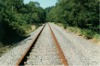
 bpm01541.jpg |
PTA | Ystrad Mynach South & Penalltau Jct | View along former double-line Penalltau branch, just east of British Coal shale-handling site at Nelson Bog | Near bridge No.?? & down permanent caution semaphore for Ystrad Mynach South | 14 | 64 | West | 15-Jul-89 | 11.56 |
 bpm01542.jpg |
CYA | Cylla | Overview of CWR track with expansion switch, Pandrol fixings & RC sleepers in single-line Cylla branch | North of Ystrad Mynach (Road overbridge) | South | 15-Jul-89 | 12.22 | ||
 bpm01543.jpg |
SWM | Severn Tunnel Jct & Fishguard Harbour | View looking towards Landore Diesel Maintenance Sheds from Cwmbwrla bank | Between Swansea Loop West Jct & Cockett | 215 | 26 | West | 11-Jul-91 | 16.46 |
 bpm01544.jpg |
SWM | Severn Tunnel Jct & Fishguard Harbour | View looking towards Swansea West Loop Jct from Cwmbwrla bank and showing spiked catch-points in down south Wales Main line. The latter were subsequently removed | Between Swansea Loop West Jct & Cockett | 215 | 36 | West | 11-Jul-91 | 16.50 |
 bpm01545.jpg |
SWM | Severn Tunnel Jct & Fishguard Harbour | View looking up Cwmbwrla bank toward Cockett showing double-line reverse curve in South Wales Main line | Between Swansea Loop West Jct & Cockett | 215 | 42 | East | 11-Jul-91 | 16.53 |
 bpm01546.jpg |
SWM | Severn Tunnel Jct & Fishguard Harbour | View looking towards Swansea West Loop Jct from Cwmbwrla bank and showing "Spring-Points" sign. | Between Swansea Loop West Jct & Cockett | 215 | 42 | West | 11-Jul-91 | 16.53 |
 bpm01547.jpg |
SWM | Severn Tunnel Jct & Fishguard Harbour | View looking towards Swansea West Loop Jct from Cwmbwrla bank and showing road underbridge . | Between Swansea Loop West Jct & Cockett | West | 11-Jul-91 | 16.55 | ||
 bpm01548.jpg |
SWM | Severn Tunnel Jct & Fishguard Harbour | View looking towards Swansea West Loop Jct from Cwmbwrla bank and redundant radio-relay poles and wiring within confines of railway boundary | Between Swansea Loop West Jct & Cockett | West | 11-Jul-91 | 16.58 | ||
 bpm01549.jpg |
SWM | Severn Tunnel Jct & Fishguard Harbour | View looking towards Swansea West Loop Jct from Cwmbwrla bank and redundant radio-relay poles placed within confines of railway boundary | Between Swansea Loop West Jct & Cockett | 216 | 00 | West | 11-Jul-91 | 17.05 |
 bpm01550.jpg |
SWM | Severn Tunnel Jct & Fishguard Harbour | View looking towards Cockett from Cwmbwrla bank and showing still-wired redundant radio-relay poles placed within confines of railway boundary | Between Swansea Loop West Jct & Cockett | 216 | 00 | East | 11-Jul-91 | 17.05 |
|
Photos 1501-1550 |
|||||||||
|
Date Last Revised:November 30, 2009 |
|||||||||