|
Historical Railway Photograph Gallery 2301-2350 |
|||||||||
|
Photos 2301-2350 |
|||||||||
| Photo | ELR | Branch | Subject | Location | M | C | Elev'n | Date | Time |
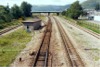
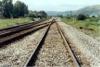
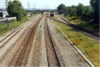 bpm02301.jpg |
OVE SWM |
Ogmore Vale extension South Wales Main |
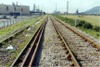
Looking west from the main road access overbridge to Margam Abbey steelworks. The up goods line is on the left, followed by the up & down South Wales Main lines and on the right is the OVE line, for part, bi-directional. The connection from the OVE line also has a trailing crossover beyond and until the closure of the main part of Llanwern steelworks, was used to carry loaded iron-ore traffic from the deep-sea terminal at Port Talbot to Llanwern | Margam Yard junction |
0 200 |
79 63 |
North | 21-Jul-91 | 15.46˝ |
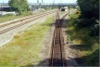 bpm02302.jpg |
OVE SWM |
Ogmore Vale extension South Wales Main |
The same area as that shown in frame bpm02302.jpg but from a different angle and illustrating an excellent heated turnout in the OVE line. The 1 milepost lies just beyond the points | Margam Yard junction |
0 200 |
79 63 |
North | 21-Jul-91 | 15.48 |
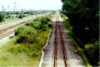 bpm02303.jpg |
OVE SWM |
Ogmore Vale extension South Wales Main |
Looking south-east towards Margan knuckle yard from a footbridge east of the main road access overbridge to Margam Abbey steelworks, showing the single bi-directional OVE line with the South Wales Main up & down lines and up goods on the right | Footbridge south of Margam Yard junction |
1 200 |
05 52 |
North | 21-Jul-91 | 15.50˝ |
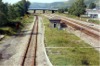 bpm02304.jpg |
OVE SWM |
Ogmore Vale extension South Wales Main |
Looking north-west towards the main road access overbridge to Margam Abbey steelworks and Margam Yard junction. The bi-directional OVE line is on the left and the up & down South Wales Main lines and up goods are on the right. | Footbridge south of Margam Yard junction |
1 200 |
05 52 |
South | 21-Jul-91 | 15.50˝ |
 bpm02305.jpg |
OVE SWM |
Ogmore Vale extension South Wales Main |
Looking north-west towards the main road access overbridge to Margam Abbey steelworks and Margam Yard junction. The bi-directional OVE line is on the left and the up & down South Wales Main lines and up goods are on the right. The facing junction was bi-directional and permitted iron-ore traffic to enter or leave the OVE branch to & from the deep-sea iron-ore terminal at Port Talbot. The trailing crossover turnout from down to up main lines is just visible at the foot of the photograph | South of Margam Yard junction |
1 200 |
05 52 |
South | 21-Jul-91 | 15.51 |
 bpm02306.jpg |
OVE SWM |
Ogmore Vale extension South Wales Main |
Looking south-east towards Margan knuckle yard from a footbridge east of the main road access overbridge to Margam Abbey steelworks, showing the trailing crossover from down to up South Wales Main lines. The crossings are in cast manganese steel | South of Margam Yard junction |
1 200 |
05 52 |
N orth | 21-Jul-91 | 15.57˝ |
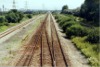
 bpm02307.jpg |
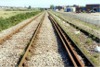
OVE | Ogmore Vale Extension | Double to single bi-directional junction in the OVE line between Margam knuckle yard and Margam Yard junction. | South of Margam Yard junction | 1 | 47 | North | 21-Jul-91 | 16.08 |
 bpm02308.jpg |
OVE | Ogmore Vale Extension | Single bi-directional OVE line at turnout to down South Wales main line | South of Margam Yard junction | 1 | 44.5 | South | 21-Jul-91 | 16.10 |
 bpm02309.jpg |
SWM | South Wales Main | Converging single line outlet from OVE line into South Wales Main down line. The facing crossover line beyond, permitted traffic to enter the bi-directional OVE line from the up South Wales Main line or the up goods loop line | South of Margam Yard junction | 200 | 25 | South | 21-Jul-91 | 16.12 |
 bpm02310.jpg |
SWM | South Wales Main | Crossover from up to down South Wales main line just south of up goods loop exit line, Margam | South of Margam Yard junction | 200 | 28 | South | 21-Jul-91 | 16.15 |
 bpm02311.jpg |
SWM | South Wales Main | Facing crossover from up to down South Wales main line, for access to OVE line southbound, after up goods line outlet into up main, Margam | South of Margam Yard junction | 200 | 31 | North | 21-Jul-91 | 16.17 |
 bpm02312.jpg |
SWM | South Wales Main | Outlet from up goods loop into South Wales main up line, Margam | South of Margam Yard junction | 200 | 31.5 | South | 21-Jul-91 | 16.18 |
 bpm02313.jpg |
SWM | South Wales Main | Double-throw traps at up goods loop into up South Wales main line, Margam | South of Margam Yard junction | 200 | 34 | South | 21-Jul-91 | 16.19 |
 bpm02314.jpg |
SWM | South Wales Main | Double-throw traps at up goods loop into up South Wales main line, Margam | South of Margam Yard junction | 200 | 34.75 | North | 21-Jul-91 | 15.36˝ |
 bpm02315.jpg |
OVE | Ogmore Vale Extension | Single line junction north of Margam Yard junction | North of Margam Yard junction | 0 | 69 | North | 21-Jul-91 | 15.36˝ |
 bpm02316.jpg |
OVE | Ogmore Vale Extension | Signal PT 325 at termination of up & down OVE lines into 2-way worked single-line section north of Margam Yard junction. Note the double-throw traps in the up line and double-throw catchpoints in the down line. | North of Margam Yard junction | 0 | 65 | North | 21-Jul-91 | 15.36˝ |
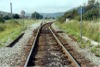
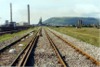
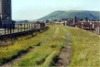
 bpm02317.jpg |
OVE | Ogmore Vale Extension | Up & down OVE lines on incline between Margam Yard junction and former Copper Works junction. One line was about to be renewed with the rails lying alongside the track | Margam steelworks iron ore lines incline | 0 | 59 | South | 21-Jul-91 | 15.36˝ |
 bpm02318.jpg |
OVE | Ogmore Vale Extension | Up & down OVE lines on incline between Margam Yard junction and former Copper Works junction. One line was about to be renewed with the rails lying alongside the track | Margam steelworks iron ore lines incline | 0 | 59 | North | 21-Jul-91 | 15.36˝ |
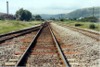
 bpm02319.jpg |
OVE | Ogmore Vale Extension | Up & down OVE lines on incline between Margam Yard junction and former Copper Works junction. One line was about to be renewed with the rails lying alongside the track | Margam steelworks iron ore lines incline | 0 | 50 | South | 21-Jul-91 | 15.36˝ |
 bpm02320.jpg |
OVE | Ogmore Vale Extension | Up & down OVE lines on incline between Margam Yard junction and former Copper Works junction. One line was about to be renewed with the new rails lying alongside the track | Margam steelworks iron ore lines incline | 0 | 45 | North | 21-Jul-91 | 15.36˝ |
 bpm02321.jpg |
OVE | Ogmore Vale Extension | Up & down OVE lines on incline between Margam Yard junction and former Copper Works junction. One line was about to be renewed with the new rails lying alongside the track | Margam steelworks iron ore lines incline | 0 | 59 | South | 21-Jul-91 | 15.36˝ |
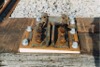
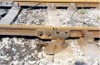 bpm02322.jpg |
OVE | Ogmore Vale Extension | Staggered joint with skirted fishplate and broken rail. A notified defect and about to be corrected | Margam steelworks iron ore lines incline | West | 21-Jul-91 | 15.36˝ | ||
 bpm02323.jpg |
OVE | Ogmore Vale Extension | Up & down OVE lines on ramp approaching former Copper Works junction at Margam steel works | Margam steelworks iron ore lines incline | South | 21-Jul-91 | 15.36˝ | ||
 bpm02324.jpg |
OVE | Ogmore Vale Extension | Up & down iron ore OVE lines just south of former Copper Miners junction at Margam steelwworks | Margam steelworks iron ore lines incline | South | 21-Jul-91 | 15.36˝ | ||
 bpm02325.jpg |
OVE | Ogmore Vale Extension | Up & down OVE iron ore lines to & from Margam iron ore terminal | Margam steelworks iron ore lines, north of Copper Works junction | East | 21-Jul-91 | 15.36˝ | ||
 bpm02326.jpg |
OVE | Ogmore Vale Extension | Up & down OVE iron ore lines to & from Margam iron ore terminal | East of Copper Works junction | North | 21-Jul-91 | 15.36˝ | ||
 bpm02327.jpg |
OVE | Ogmore Vale Extension | Looking east along curve of former double track earthworks which formed the route to the Port Talbot and Pontyrhyll line and Taibach loop | Copper Works junction |
0 0 |
00 70 |
West | 21-Jul-91 | 15.36˝ |
 bpm02328.jpg |
OVE | Ogmore Vale Extension | Another view of the curve to Taibach Loop and the Port Talbot & Pontyrhyll line from Copper works junction area. The South Wales Main lines lie beyond the distant arched structure | Copper Works junction |
0 0 |
00 70 |
West | 21-Jul-91 | 15.36˝ |
 bpm02329.jpg |
OVE | Ogmore Vale Extension | Another view of the curve to Taibach Loop and the Port Talbot & Pontyrhyll line from Copper works junction area. The South Wales Main lines lie beyond the distant arched structures | Copper Works junction |
0 0 |
00 70 |
SW | 21-Jul-91 | 15.36˝ |
 bpm02330.jpg |
PTD | Port Talbot Docks Lines | The trackbed of the former Ramp Line which joined the Port Talbot Docks branch at the north end of the curve from Copper Works junction to Taibach Loop or Dyffryn Yard. The ramp line was brought into use in December 1948 and necessitated a re-alignment of the double line curve on the embankment from Copper Works junction. The entire network was closed in 1967 | Ramp Line junction, Margam end of Taibach Loop, Port Talbot |
1 0 |
11 00 |
North | 21-Jul-91 | 15.36˝ |
 bpm02331.jpg |
PTD | Port Talbot Docks Lines | The point at which the viaduct carrying the Port Talbot docks (Copper Works jct) line link to Dyffryn Yard and the PTP branch to Maesteg & beyond, left the Taibach Loop lines, east of Port Talbot. The first pier, devoid of overline, still stands at the far side of the South Wales main lines (2006) | Overbridge junction, Margam end of Taibach Loop, Port Talbot | 1 | 13 | South | 21-Jul-91 | 15.36˝ |
 bpm02332.jpg |
PTD | Port Talbot Docks Lines | The point at which the viaduct carrying the Port Talbot docks (Copper Works Jct) line link to Dyffryn Yard and the PTP branch to Maesteg & beyond, left the Taibach Loop lines, east of Port Talbot. The first pier, devoid of overline, still stands at the far side of the South Wales main lines | Margam end of Taibach Loop, Port Talbot | 1 | 14 | South | 21-Jul-91 | 15.36˝ |
 bpm02333.jpg |
PTD | Copper Miners Jct and Cwmdu | Trackbed on viaduct carrying former Port Talbot Railway lines and after, through a remodelling project in 1948, the BR Taibach Loop lines from Copper Works junction to the South Wales main line nearer Port Talbot station. Lines taken out of use in 1966 | Taibach Loop, Port Talbot | 1 | 15 | SE | 21-Jul-91 | 15.36˝ |
 bpm02334.jpg |
PTD | Copper Miners Jct and Cwmdu | Trackbed on viaduct carrying former Port Talbot Docks branch lines from Copper Works junction to Dyffryn Yard, Port Talbot & to Maesteg and also, after 1960, to the Taibach Loop to join the South Wales main line nearer Port Talbot station. The Ramp lines junction was located further along the bed. Taibach Loop lines were closed in December 1966, the ex Port Talbot Railway single line to Dyffryn Yard being closed in February 1967 | Taibach Loop, Port Talbot | 1 | 15 | NW | 21-Jul-91 | 15.36˝ |
 bpm02335.jpg |
SWM | Severn Tunnel Jct & Fishguard Harbour | Close up of guideplates and baseplates & timbers about to be installed as a breather switch in the down main at Tremains | Tremains area, east of Bridgend | 189 | 02 | Plan | 16-Aug-91 | 16.45 |
 bpm02336.jpg |
SWM | Severn Tunnel Jct & Fishguard Harbour | Preparatory work for insertion of an adjustment or "breather" switch in the main lines | Tremains area, east of Bridgend | 189 | 02 | West | 16-Aug-91 | 16.58 |
 bpm02337.jpg |
SWM | Severn Tunnel Jct & Fishguard Harbour | West elevation of up & down main lines with down relief loop on right | Tremains down loop | 189 | 25 | West | 16-Aug-91 | 17.29 |
 bpm02338.jpg |
SWM | Severn Tunnel Jct & Fishguard Harbour | Full traps in down goods loop exit into down South Wales Main line | Tremains west down goods loop outlet | 189 | 59 | East | 16-Aug-91 | 17.11 |
 bpm02339.jpg |
SWM | Severn Tunnel Jct & Fishguard Harbour | Trailing down goods loop outlet at Tremains West, South Wales Main line | At colour light signal, UM189, Tremains west down goods loop outlet | 189 | 62.5 | West | 16-Aug-91 | 17.14 |
 bpm02340.jpg |
SWM | Severn Tunnel Jct & Fishguard Harbour | Up & down main lines at Tremains west | Tremains west | 189 | 62 | East | 16-Aug-91 | 17.14˝ |
 bpm02341.jpg |
SWM | Severn Tunnel Jct & Fishguard Harbour | Up & down main lines and down goods loop at Tremains, east of Bridgend | Tremains area, east of Bridgend | 189 | 40 | West | 16-Aug-91 | 17.27 |
 bpm02342.jpg |
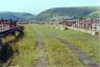
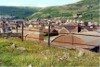
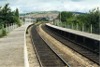
CAR | Cardiff (Stonefield Jct) & Rhymney | General view of Aber halt platforms | Aber halt | 8 | 69.5 | SE | 17-Aug-91 | 11.22 |
 bpm02343.jpg |
CAR | Cardiff (Stonefield Jct) & Rhymney | Up & dowm main lines south of Aber halt | Between Caephilly station & Aber halt | 8 | 67 | NW | 17-Aug-91 | 11.22 |
 bpm02344.jpg |
CAR | Cardiff (Stonefield Jct) & Rhymney | North end of Aber halt up platform | Aber halt | 8 | 73 | SE | 17-Aug-91 | 11.23 |
 bpm02345.jpg |
CAR | Cardiff (Stonefield Jct) & Rhymney | Reverse curve in the Rhymney-Cardiff main line north of former Aber junction | In vicinity of former Aber junction | 9 | 09 | South | 17-Aug-91 | 11.28 |
 bpm02346.jpg |
CAR | Cardiff (Stonefield Jct) & Rhymney | Up and down lines just short of 9M-20C milepost. The former trackbeds of Energlyn sidings are visible on the left | Between Aber halt and Llanbradach | 9 | 19 | North | 17-Aug-91 | 11.30 |
 bpm02347.jpg |
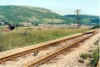
CAR | Cardiff (Stonefield Jct) & Rhymney | Looking along the trackbed of the former Senghenydd branch where it left the Rhymney branch at Aber junction | Approx. location of junction for Senghenydd Branch north of Aber junction | 9 | 20.5 | East | 17-Aug-91 | 11.31˝ |
 bpm02348.jpg |
CAR | Cardiff (Stonefield Jct) & Rhymney | Looking towards Aber and at a point where the former Senghenydd branch ran off to the right of the location. | Approx. location of junction for Senghenydd Branch north of Aber junction | 9 | 20.5 | North | 17-Aug-91 | 11.32 |
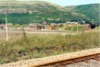
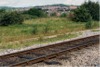
 bpm02349.jpg |
CAR | Cardiff (Stonefield Jct) & Rhymney | Looking towards Aber and Caerphilly from a point south of Llanbradach. | South of Energlyn between Caerphilly & Llanbradach | South | 17-Aug-91 | 11.33˝ | ||
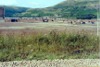
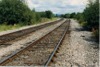
 bpm02350.jpg |
CAR | Cardiff (Stonefield Jct) & Rhymney | Looking towards Llanbradach, south of Energlyn. The left-hand area earlier contained the Energlyn sidings which connected with the Barry Railway's line that passed over the Llanbradach viaduct | South of Energlyn between Caerphilly & Llanbradach | South | 17-Aug-91 | 11.33˝ | ||
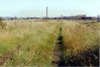
|
Photos 2301-2350 |
|||||||||
|
Date Last Revised:December 01, 2009 |
|||||||||