|
Historical Railway Photograph Gallery 1601-1650 |
|||||||||
|
Photos 1601-1650 |
|||||||||
| Photo | ELR | Branch | Subject | Location | M | C | Elev'n | Date | Time |
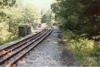
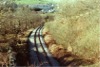
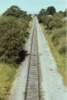 bpm01601.jpg |
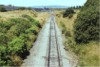
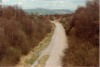
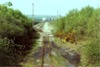
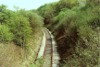
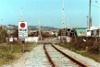
VON | Neath (General) & Pontypool Road | View from former main A465 road overbridge between Dynevor Arms (Merthyr) and Hirwaun, looking at single line to Tower Colliery on curtailed Vale of Neath branch | Old Hirwaun-Merthyr road overbridge | 25 | 10 | East | 23-Jul-89 | 10.01 |
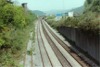
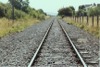 bpm01602.jpg |
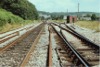
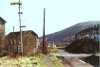
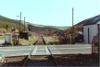
VON | Neath (General) & Pontypool Road | Looking towards Aberdare and former sidings from site of Hirwaun level crossing. | Former Hirwaun Station (Hirwaun level crossing) | 26 | 01 | NW | 23-Jul-89 | 10.15 |
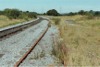
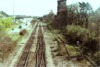
 bpm01603.jpg |
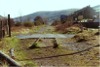
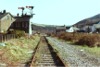
VON | Neath (General) & Pontypool Road | View of Hirwaun station platforms with single line to Tower Colliery | Former Hirwaun Station | 25 | 73 | SE | 23-Jul-89 | 10.15 |
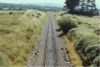
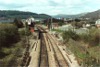
 bpm01604.jpg |
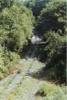
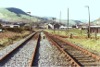
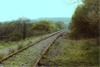
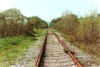
VON | Neath (General) & Pontypool Road | Looking west along the Vale of Neath trackbed just west of the former Hirwaun station | West end of former Hirwaun Station (Hirwaun level crossing) | 26 | 04 | SE | 23-Jul-89 | 10.18 |
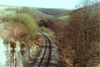
 bpm01605.jpg |
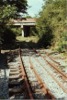
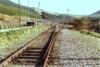
VON | Neath (General) & Pontypool Road | Looking towards the former Hirwaun station from the A4054 Hirwaun-Brecon road overbridge. | Hirwaun-Brecon road overbridge | 26 | 34 | NW | 23-Jul-89 | 10.24 |
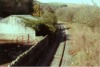
 bpm01606.jpg |
VON | Neath (General) & Pontypool Road | Looking towards Tower colliery loading area from the A4054 Hirwaun-Brecon road overbridge. | Hirwaun-Brecon road overbridge | 26 | 34 | SE | 23-Jul-89 | 10.24 |
 bpm01607.jpg |
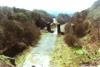
VON | Neath (General) & Pontypool Road | Looking towards Tower colliery loading area through the A4054 Hirwaun-Brecon road overbridge. The road over this bridge was later closed and a diversionary section of road over a new overbridge put into use, east of this location, i.e. behind the camera point | Bridge No.78 (Hirwaun-Brecon road (A4054)) | 26 | 34 | SE | 23-Jul-89 | 10.26 |
 bpm01608.jpg |
CAM | Cardiff (Bute Rd) & Merthyr | Overview of down through siding to down main, up main to down main crossover (trailing) & up main to No.1 Carn Park siding lead, at Stormstown sidings south of Abercynon (RESCAN due to distortion) | Stormstown Sidings, South end | 15 | 32 | South | 23-Jul-89 | 11.15 |
 bpm01609.jpg |
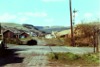
CAM | Cardiff (Bute Rd) & Merthyr | Looking south towards Pontypridd from the southerly end of Stormstown sidings. The right-hand line ran to Ynysybwl and was out of use at this time. | Down through siding to down main, south end of Stormstown Sidings | 15 | 03 | North | 23-Jul-89 | 11.15 |
 bpm01610.jpg |
YNL | Stormstown & Ynysybwl | Looking down onto out-of-use single line curve at approach to River clydach viaduct, Clydach Court | Coedycwm Road overbridge, Clydach Court (15M-12C at bridge as marked by BRB inspection) | 15 | 12 | SW | 23-Jul-89 | 11.21 |
 bpm01611.jpg |
YNL | Stormstown & Ynysybwl | Checked single line curve onto River Clydach viaducts at Clydach Court | River Clydach viaduct between Stormstown and Ynysybwl | North | 23-Jul-89 | 11.34 | ||
 bpm01612.jpg |
YNL | Stormstown & Ynysybwl | End of checked section of single line between River Clydach viaduct and Coedycwm road overbridge, Clydach Court | Between River Clydach viaduct and Coed-y-cwm road overbridge | 0 | 40 | NE | 23-Jul-89 | 11.35 |
 bpm01613.jpg |
YNL | Stormstown & Ynysybwl | Checked single line curve onto River Clydach viaducts at Clydach Court | Between River Clydach viaduct and Coed-y-cwm road overbridge | 0 | 40 | SW | 23-Jul-89 | 11.38 |
 bpm01614.jpg |
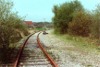
YNL | Stormstown & Ynysybwl | Checked single line showing lead-in flares on River Clydach viaduct, Clydach Court | River Clydach viaduct between Stormstown and Ynysybwl | 0 | 38 | South | 23-Jul-89 | 11.40 |
 bpm01615.jpg |
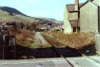
CAM | Cardiff (Bute Rd) & Merthyr | South elevation looking towards Taffs Well station. Only the two lines on the right now survive. The brick pier still standing is one of the Walnut Tree viaduct supports, left as a monument to the Barry Railway | South East of Walnut Tree junction (Taffs Well) | ~6 | 75 | SE | 07-May-89 | 11.20 |
 bpm01616.jpg |
CAM | Cardiff (Bute Rd) & Merthyr | Looking towards Cardiff from road overbridge just south of former Walnut tree junction. Only the two left lines now survive. The pier still standing is one of the supports which carried the Barry Railway's Walnut tree viaduct | Just south of former Walnut Tree junction (7M-16C & 12M-02C Walnut Tree Branch) | 7 | 16 | NW | 08-Apr-89 | 14.40 |
 bpm01617.jpg |
CAM | Cardiff (Bute Rd) & Merthyr | View from old A470 road overbridge looking at site of Walnut Tree junction from where the "big hill" branched to the right for Penrhos and Caerphilly. The trackbed can be seen and a park & ride carpark has been established at the right of the station. The signal box has been demolished but parts survive on the Dean Forest Railway | Former Walnut Tree junction (7M-16C & 12M-02C Walnut Tree Branch) | 7 | 16 | SE | 08-Apr-89 | 14.40 |
 bpm01618.jpg |
Spare | ||||||||
 bpm01619.jpg |
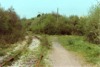
WNT | Walnut Tree junction & Aber junction | Abandoned trackbed of former Barry Railway, Rhymney railway and PC & N railway at Penrhos junction site | Former Penrhos junction, 2M-36C from Walnut Tree jct.& 6M-64C from Tynycaeau Signalbox | 9 | 47 | NE | 08-Apr-89 | 14.48 |
 bpm01620.jpg |
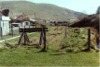
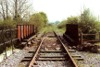
OGM | Tondu & Nantymoel | The buffer stop at the end of the Ogmore branch. The station was located just south of this. Fragments of track are still evident but lower down the valley from this point, the land was raised and levelled for a sports field, the track beyond it still set in Tarmacadam and about 18ft below the field level (See next frame) | Site of former Nantymoel Station | 7 | 18.5 | NW | 08-Apr-89 | 16.35 |
 bpm01621.jpg |
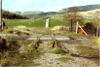
OGM | Tondu & Nantymoel | Abandoned level crossing and turnout at Wyndham Pits. The land has been raised beyond here and is a sports field | Level crossing at former Wyndham Pits South | 6 | 25.5 | South | 08-Apr-89 | 16.40 |
 bpm01622.jpg |
OGM | Tondu & Nantymoel | Abandoned level crossing and turnout at Wyndham Pits. (See previous view for view looking north) | Former Level crossing at former Wyndham Pits South | 6 | 26.5 | North | 08-Apr-89 | 16.40 |
 bpm01623.jpg |
OGM | Tondu & Nantymoel | Former Ogmore Vale 2-line station and remaining level crossing, showing up permanent caution semaphore for Caedu Signalbox | Ogmore Vale Station & level crossing | 5 | 47 | South | 08-Apr-89 | 16.46 |
 bpm01624.jpg |
OGM | Tondu & Nantymoel | View looking down the valley (railway "up" direction) showing Ogmore Vale level crossing and "up" permanent caution semaphore signal for Caedu Signalbox. The area was later redeveloped and the distant signal repositioned as a 'memorial' but facing the other way near the site | Ogmore Vale level crossing at former railway station | 5 | 48.5 | North | 08-Apr-89 | 16.46 |
 bpm01625.jpg |
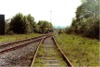
OGM | Tondu & Nantymoel | Looking up the valley from Ogmore Vale (Caedu) level crossing after closure of line | A4061 level crossing, Caedu, Ogmore Vale | 4 | 79 | South | 08-Apr-89 | 16.50 |
 bpm01626.jpg |
OGM | Tondu & Nantymoel | Looking south across Caedu level crossing after abandonment of the branch | A4061 level crossing, Caedu, Ogmore Vale | 4 | 79.5 | North | 08-Apr-89 | 16.52 |
 bpm01627.jpg |
OGM | Tondu & Nantymoel | Looking south-east towards Caedu level crossing, | Just north of Caedu level crossing | 4 | 83 | 08-Apr-89 | 16.53 | |
 bpm01628.jpg |
OGM | Tondu & Nantymoel | Looking south from a point below Caedu level crossing, Ogmore Vale, after abandonment of the branch | South of Caedu level crossing, Ogmore Vale | 4 | 75 | North | 08-Apr-89 | 16.57 |
 bpm01629.jpg |
OGM | Tondu & Nantymoel | Looking north towards Caedu level crossing, Ogmore Vale, after abandonment of the branch | Former junction to British Coal Rhondda Main Washery, Ogmore Vale | 4 | 71.5 | South | 08-Apr-89 | 16.57 |
 bpm01630.jpg |
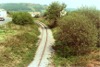
OGM | Tondu & Nantymoel | Looking north towards Lewistown from A4061 road overbridge between Blackmill and Ogmore Vale after closure of line | A4061 road overrbridge north of Blackmill | ~3 | 11 | South | 08-Apr-89 | 17.05 |
 bpm01631.jpg |
OGM | Tondu & Nantymoel | Looking south towards Blackmill from A4061 road overbridge between Lewistown and Blackmill after closure of line | A4061 road overrbridge north of Blackmill | ~3 | 11 | North | 08-Apr-89 | 17.05 |
 bpm01632.jpg |
OGM | Tondu & Nantymoel | Looking north-east from A4065 road overbridge, Brynmenyn | A4065 road overbridge, Brynmenyn | ~0 | 30 | SW | 08-Apr-89 | 17.15 |
 bpm01633.jpg |
LTR | Llantrisant (Cwm Llantwit Branch) | Single line approach to Cwm colliery marshalling yard | Road overbridge just between Cwm groundframe & colliery yard | ~2 | 64 | North | 06-May-89 | 15.05 |
 bpm01634.jpg |
LTR | Llantrisant (Cwm Llantwit Branch) | Part-lifted Cwm colliery marshalling yard | Cwm colliery yard (A473 road overbridge) | ~2 | 64 | South | 06-May-89 | 15.05 |
 bpm01635.jpg |
LTR | Llantrisant (Cwm Llantwit Branch) | Out of use single line from Llantrisant to Cwm colliery and coke ovens complex | Just south-west of groundframe prior to Cwm colliery yard | 2 | 60 | NE | 06-May-89 | 15.07 |
 bpm01636.jpg |
LTR | Llantrisant (Cwm Llantwit Branch) | Severed single line at groundframe location south of Cwm colliery sidings fan showing rail removal. (The groundframe is visible alongside the severed rail). This is the site of the original alignment (to the right) of the through Llantrisant Branch to Tonteg junction and Treforest. | Groundframe on single line south of Cwm colliery sidings yard | 2 | 60 | SW | 06-May-89 | 15.07 |
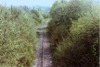
 bpm01637.jpg |
LTR | Llantrisant (Cwm Llantwit Branch) | Out of use single line north of Cross Inn, serving Cwm coke ovens plant. The line was still in place at June 2004 but heavily silted and with trees well established in the trackbed | Road overbridge north of former Common Branch junction | ~2 | 09.5 | West | 06-May-89 | 15.3 |
 bpm01638.jpg |
LTR | Mwyndy junction & Tonteg junction | Out of use single line north of Cross Inn, serving Cwm coke ovens plant. The line was still in place at June 2004 but heavily silted and with trees well established in the trackbed | Road overbridge (A473) north of former Common Branch junction | ~2 | 09 | North | 06-May-89 | 15.13 |
 bpm01639.jpg |
LTR | Mwyndy junction & Tonteg junction | Out of use single line from Llantrisant to Cwm coke ovens plant. The clear trackbed on the right previously took the temporarily reinstated single line from Creigiau quarry into Common Branch junction (Circa 1964) so that traffic from both sites could be routed via Llantrisant junction to the South Wales main line | Common Branch junction site (1M-71C & 9M-71C Waterhall Branch) | 1 | 71 | South | 06-May-89 | 15.25 |
 bpm01640.jpg |
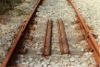
LTR | Mwyndy junction & Tonteg junction | General arrangement of FB 113A 'breather' switch showing constraining ties in 95lb Bull-heal rail section. Ensuing track panels are Pandrol-fixed, on Costain/Dow Mac reinforced concrete (pre-stressed) sleepers | Common Branch junction | South | 06-May-89 | 15.25 | ||
 bpm01641.jpg |
LTO LTR | Llantrisant (Cwm Llantwit) | Single out-of-use line from Cwm colliery to Llantrisant and trackbed of former diverging line via Creigiau quarry to Waterhall junction. (Only the concrete sleepers remained by 2004) | Common Branch junction site (1M-71C & 9M-71C Waterhall Branch) | 1 | 71 | NW | 06-May-89 | 15.28 |
 bpm01642.jpg |
LTR | Mwyndy junction & Tonteg junction | Out-of-use single FB track on concrete sleepers at access underbridge south of former Cross Inn station | Between Maesauraul junction & former Cross Inn station | 1 | 23.5 | South | 06-May-89 | 15.34 |
 bpm01643.jpg |
LTR | Mwyndy junction & Tonteg junction | Single out-of-use single line leaving site of former Maesaraul junction towards Cross Inn. A new house was being constructed immediately to the right of the line, as at 4th Jun 2004 .The Brofiscin branch passed to the right of the view. | Maesaraul junction | 1 | 04 | West | 06-May-89 | 15.40 |
 bpm01644.jpg |
LTR | Mwyndy junction & Tonteg junction | Single out-of-use line looking from former Maesaraul junction towards Talbot Green | Maesauraul junction | 1 | 04 | East | 06-May-89 | 15.40 |
 bpm01645.jpg |
LTR | Mwyndy junction & Tonteg junction | Former Cowbridge Road level crossing site subsequently removed and relocated in Talbot Green bypass but rail deviation used only a couple of times. | Former Cowbridge Road level crossing (now in new location) | 0 | 15 True | SW | 06-May-89 | 15.48 |
 bpm01646.jpg |
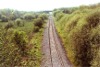
ELY | Ely Valley | Abandoned single line of Ely valley branch looking towards Coed Ely from A473 road underbridge at Talbot Green. (Since completely removed) | A473 road underbridge, Talbot Green | ~0 | 67 | South | 06-May-89 | 15.55 |
 bpm01647.jpg |
ELY | Ely Valley | Abandoned single line of Ely valley branch looking towards Coed Ely from A473 road underbridge at Talbot Green. (Since completely removed) | A473 road underbridge, Talbot Green | ~0 | 67 | North | 06-May-89 | 15.55 |
 bpm01648.jpg |
MWY ELY |
Mwyndy & Ely Valley | Mwyndy junction looking towards Llantrisant yard | Mwyndy junction (0M-48C Penygraig Branch & 0M-01C Ely) | 0 | 48 | North | 06-May-89 | 16.01 |
 bpm01649.jpg |
MWY ELY |
Mwyndy & Ely Valley | View looking towards Mwyndy junction, all out of use at time of taking | North end, Llantrisant yard (Mwyndy junction) | 0 | 46 | South | 06-May-89 | 16.01 |
 bpm01650.jpg |
ELY | Ely Valley | View looking towards Mwyndy junction from north end of Llantrisant yard | North end, Llantrisant yard (approaching Mwyndy junction) | 0 | 43 | South | 06-May-89 | 16.06 |
|
Photos 1601-1650 |
|||||||||
|
Date Last Revised:November 30, 2009 |
|||||||||